Asus P5B SE User Manual - Page 127
Saving the settings and exiting setup, Rebuilding a Mirror Drive
 |
UPC - 610839154968
View all Asus P5B SE manuals
Add to My Manuals
Save this manual to your list of manuals |
Page 127 highlights
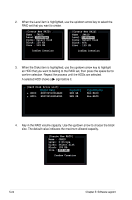
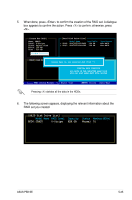
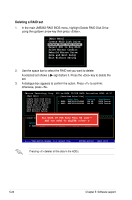
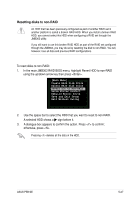
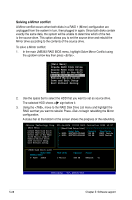
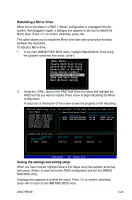
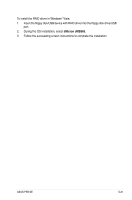
Rebuilding a Mirror Drive When one of the disks in a RAID 1 (Mirror) configuration is unplugged from the system, then plugged in again, a dialogue box appears to ask you to rebuild the Mirror drive. Press to confirm; otherwise, press . This option allows you to rebuild the Mirror drive later and synchronize the data between two hard disks. To rebuild a Mirror drive: 1. In the main JMB363 RAID BIOS menu, highlight Rebuild Mirror Drive using the up/down arrow key then press . [Main Menu] Create RAID Disk Drive Delete RAID Disk Drive Revert HDD to Non-RAID Solve Mirror Conflict Rebuild Mirror Drive Save and Exit Setup Exit Without Saving 2. Using the , move to the RAID Disk Drive List menu and highlight the RAID set that you want to rebuild. Press to begin rebuilding the Mirror configuration. A status bar at the bottom of the screen shows the progress of the rebuilding. JMicron Technology Corp. PCI-to-SATA II/IDE RAID Controller BIOS v0.97 [Main Menu] [Hard Disk Drive List] Create RAID Disk Drive Delete RAID Disk Drive Revert HDD to Non-RAID Solve Mirror Conflict Rebuild Mirror Drive Save and Exit Setup Exit Without Saving Model Name Capacity HDD0: HDS722516VLSA80 164 GB HDD1: HDS722516DLA380 164 GB Type/Status RAID Inside RAID Inside [RAID Disk Drive List] Model Name Members(HDDx) RDD0: JRAID RAID Level 1-Mirror Capacity Status XXX GB Rebuild 01 Rebuilding... 01%, please wait... Saving the settings and exiting setup When you have finished, highlight Save & Exit Setup using the up/down arrow key then press to save the current RAID configuration and exit the JMB363 RAID BOS utility. A dialogue box appears to confirm the action. Press to confirm; otherwise, press to return to the JMB RAID BIOS menu. ASUS P5B SE 5-29
-
 1
1 -
2
-
3
-
4
-
5
-
6
-
7
-
8
-
9
-
10
-
11
-
12
-
13
-
14
-
15
-
16
-
17
-
18
-
19
-
20
-
21
-
22
-
23
-
24
-
25
-
26
-
27
-
28
-
29
-
30
-
31
-
32
-
33
-
34
-
35
-
36
-
37
-
38
-
39
-
40
-
41
-
42
-
43
-
44
-
45
-
46
-
47
-
48
-
49
-
50
-
51
-
52
-
53
-
54
-
55
-
56
-
57
-
58
-
59
-
60
-
61
-
62
-
63
-
64
-
65
-
66
-
67
-
68
-
69
-
70
-
71
-
72
-
73
-
74
-
75
-
76
-
77
-
78
-
79
-
80
-
81
-
82
-
83
-
84
-
85
-
86
-
87
-
88
-
89
-
90
-
91
-
92
-
93
-
94
-
95
-
96
-
97
-
98
-
99
-
100
-
101
-
102
-
103
-
104
-
105
-
106
-
107
-
108
-
109
-
110
-
111
-
112
-
113
-
114
-
115
-
116
-
117
-
118
-
119
-
120
-
121
-
 122
122 -
 123
123 -
 124
124 -
 125
125 -
 126
126 -
 127
127 -
 128
128 -
 129
129 -
 130
130 -
 131
131 -
 132
132 -
133
-
134
-
135
-
136
 |
 |
