Asus P5KPL-AM SE User Manual
Asus P5KPL-AM SE - Motherboard - Micro ATX Manual
 |
UPC - 610839167463
View all Asus P5KPL-AM SE manuals
Add to My Manuals
Save this manual to your list of manuals |
Asus P5KPL-AM SE manual content summary:
- Asus P5KPL-AM SE | User Manual - Page 1
P5KPL-AM SE Motherboard - Asus P5KPL-AM SE | User Manual - Page 2
express written permission of ASUSTeK Computer Inc. ("ASUS"). Product warranty or service will not be extended if: (1) the ASUS HAS BEEN ADVISED OF THE POSSIBILITY OF SUCH DAMAGES ARISING FROM ANY DEFECT OR ERROR IN THIS MANUAL OR PRODUCT. SPECIFICATIONS AND INFORMATION CONTAINED IN THIS MANUAL - Asus P5KPL-AM SE | User Manual - Page 3
information vi About this guide vi P5KPL-AM SE specifications summary viii Chapter 1: Product information 1.1 Before you proceed 1-1 1.2 Motherboard overview 1-2 1.2.1 Motherboard layout 1-2 1.2.2 Layout contents 1-2 1.3 Central Processing Unit (CPU 1-3 1.4 System memory 1-3 1.4.1 Overview - Asus P5KPL-AM SE | User Manual - Page 4
Mode 2-11 2.5.2 ACPI 2.0 Support 2-11 2.5.3 ACPI APIC Support 2-11 2.5.4 APM Configuration 2-11 2.5.5 Hardware Monitor 2-12 2.6 Boot menu 2-13 2.6.1 Boot Device Priority 2-13 2.6.2 Boot Settings Configuration 2-13 2.6.3 Security 2-14 2.7 Tools menu 2-15 2.7.1 ASUS EZ Flash 2 2-15 2.7.2 AI - Asus P5KPL-AM SE | User Manual - Page 5
and, if not installed and used in accordance with manufacturer's instructions, may cause harmful interference to radio communications. However, there digital apparatus complies with Canadian ICES-003. DO NOT throw the motherboard in municipal waste. This product has been designed to enable proper - Asus P5KPL-AM SE | User Manual - Page 6
. • If you encounter technical problems with the product, contact a qualified service technician or your retailer. About this guide This user guide contains the information you need when installing and configuring the motherboard. How this guide is organized This guide contains the following parts - Asus P5KPL-AM SE | User Manual - Page 7
manual. DANGER/WARNING: Information to prevent injury to yourself when trying to complete a task. CAUTION: Information to prevent damage to the components when trying to complete a task. IMPORTANT: Instructions ASUS websites The ASUS website provides updated information on ASUS - Asus P5KPL-AM SE | User Manual - Page 8
P5KPL-AM SE specifications summary CPU Chipset Front Side Bus Memory Expansion Slots VGA Storage LAN Audio USB ASUS Features Rear panel LGA775 socket for Technology ready (Refer to www.asus.com for Intel CPU support list) Northbridge: Intel® G31 Southbridge: Intel® ICH7 1600(O.C.) / 1333 / 1066 - Asus P5KPL-AM SE | User Manual - Page 9
P5KPL-AM SE specifications summary Internal connectors ASUS Exclusive Overclocking Features BIOS features Manageability Support DVD contents Accessories Form factor 2 x USB 2.0 connectors supports additional 4 USB ports 1 x internal speaker connector 2 x Serial ATA connectors 1 x CPU fan connector - Asus P5KPL-AM SE | User Manual - Page 10
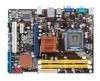
an ASUS® P5KPL-AM SE motherboard! Before you start installing the motherboard, and hardware devices on it, check the items in your motherboard package. components by the edges to avoid touching the ICs on themP. 5KPL-AM/PS • Whenever you uninstall any component, place it on a grounded antistatic pad - Asus P5KPL-AM SE | User Manual - Page 11
Intel® G31 PCIEX16 RTM870T-954 Super I/O Lithium Cell CMOS Power PCIEX1_1 P5KPL-AM SE SPEAKER Intel® ICH7 ALC662 AAFP F_PANEL CD PCI1 SB_PWR USBPW5-8 USB78 CLRTC USB56 PRI_IDE 8Mb BIOS SATA2 SATA1 Place six screws into the holes indicated by circles to secure the motherboard to the - Asus P5KPL-AM SE | User Manual - Page 12
CPU. • Upon purchase of the motherboard P5KPL-AM SE P5KPL-AM SE 240-pin DDR2 DIMM sockets Channel Channel A Channel B Sockets DIMM_A1 DIMM_B1 1.4.2 Memory configurations You may install 256MB, 512MB, 1GB, 2GB, and 4GB unbuffered ECC/non-ECC DDR2 DIMMs into the DIMM sockets. 1-3 ASUS P5KPL-AM SE - Asus P5KPL-AM SE | User Manual - Page 13
Windows OS when having 4GB or more memory installed on the motherboard. • The default memory operation frequency depends on its SPD. Under the default state, some memory modules for overclocking cooling system to support a full memory load (2 DIMMs) or overclocking conditions. Qualified Vendors - Asus P5KPL-AM SE | User Manual - Page 14
SS V59C1512804QBF25S0054707PEBPA DS K4T51083QC-ZCE7 DS Heat-Sink Package DS NT5TU64M8BE-25C62321800CP DS Heat-Sink Package DS Heat-Sink Package SS K4T51083QC-ZCE7 DIMM support A* B* • • • • • • • • • • • • • • • • • • • • (continued on the next page) 1-5 ASUS P5KPL-AM SE - Asus P5KPL-AM SE | User Manual - Page 15
• • • • • • • • Visit the ASUS website at (www.asus.com) for the latest QVL. SS - Single-sided / DS - Double - sided DIMM support: • A*: Supports one module inserted into any slot as Single-channel memory configuration. • B*: Supports one pair of modules inserted into the yellow slots - Asus P5KPL-AM SE | User Manual - Page 16
may cause you physical injury and damage motherboard components. 1.5.1 PCI slot The PCI slot supports cards such as LAN cards, SCSI cards, USB cards, and other cards that comply with the PCI specifications. 1.5.2 PCI Express x1 slot This motherboard supports PCI Express x1 network cards, SCSI cards - Asus P5KPL-AM SE | User Manual - Page 17
due to overclocking. For system failure due to overclocking, use the CPU Parameter Recall (C.P.R.) feature. Shut down and reboot the system, then the BIOS automatically resets . CLRTC 12 23 P5KPL-AM SE Normal (Default) Clear RTC P5KPL-AM SE Clear RTC RAM Chapter 1: Product introduction 1-8 - Asus P5KPL-AM SE | User Manual - Page 18
ports. PS2_USBPW1-4 12 23 P5KPL-AM SE +5V +5VSB (Default) P5KPL-AM SE Keyboard Power Setting 1.7 1.7.1 1 Connectors Rear panel ports 2 34 10 9 8 7 6 5 1. PS/2 mouse port (green). This port is for a PS/2 mouse. 2. LAN (RJ-45) port. Supported by Realtek 10/100 LAN controller, this port - Asus P5KPL-AM SE | User Manual - Page 19
port (purple). This port is for a PS/2 keyboard. 1.7.2 Internal connectors 1. ICH7 Serial ATA connectors (7-pin SATA1, SATA2) These connectors are for the Serial ATA signal cables for Serial ATA hard disk drives. P5KPL-AM SE SATA2 SATA1 GND RSATA_TXN2 RSATA_TXP2 GND RSATA_RXN2 RSATA_RXP2 - Asus P5KPL-AM SE | User Manual - Page 20
PIN 1 USB56 PIN 1 P5KPL-AM SE USB2.0 connectors USB+5V USB_P8- USB_P8+ GND NC USB+5V USB_P5USB_P5+ GND USB+5V USB_P6USB_P6+ GND NC Never connect a 1394 cable to the USB connectors. Doing so will damage the motherboard! The USB module cable is purchased separately. 1-11 ASUS P5KPL-AM SE - Asus P5KPL-AM SE | User Manual - Page 21
system may damage the motherboard components. These are not jumpers! Do not place jumper caps on the fan connectors! P5KPL-AM SE CPU_FAN CPU FAN PWM CPU FAN IN CPU FAN PWR GND CHA_FAN Rotation +12V GND P5KPL-AM SE fan connectors Only the CPU_FAN connector support the ASUS Advanced Q-Fan feature - Asus P5KPL-AM SE | User Manual - Page 22
connector is for the chassis-mounted system warning speaker. The speaker allows you to hear system beeps and warnings. SPEAKER +5V GND GND Speaker Out P5KPL-AM SE PIN 1 P5KPL-AM SE Speaker Out Connector 1-13 ASUS P5KPL-AM SE - Asus P5KPL-AM SE | User Manual - Page 23
) This connector supports several chassis-mounted functions. PWR LED PWR BTN F_PANEL PIN 1 P5KPL-AM SE HD_LED RESET P5KPL-AM SE System panel connector or puts the system in sleep or soft-off mode depending on the BIOS settings. Pressing the power switch for more than four seconds while the system - Asus P5KPL-AM SE | User Manual - Page 24
. Click an icon to display Support DVD/ motherboard information Click an item to install If Autorun is NOT enabled in your computer, browse the contents of the Support DVD to locate the file ASSETUP.EXE from the BIN folder. Double-click the ASSETUP.EXE to run the DVD. 1-15 ASUS P5KPL-AM SE - Asus P5KPL-AM SE | User Manual - Page 25
that comes with the motherboard package. Installing ASUS Update: 1. Place the Support DVD into the optical drive. The Drivers menu appears. 2. Click the Utilities > Install ASUS Update. Follow the onscreen instructions. Quit all Windows® applications before you update the BIOS using this utility - Asus P5KPL-AM SE | User Manual - Page 26
press , EZ Flash 2 updates the BIOS and automatically reboots the system when done. • This function supports USB flash disks with FAT 32/16 format and single partition only. • DO NOT shut down or reset the system while updating the BIOS to prevent system boot failure! 2-2 ASUS P5KPL-AM SE - Asus P5KPL-AM SE | User Manual - Page 27
checks the optical drive first. If no optical drive is found, the utility automaticlly checks the USB flash disk. • The recovered BIOS may not be the latest BIOS version for this motherboard. Visit the ASUS website at www.asus.com to download the latest BIOS file. Chapter 2: BIOS information 2-3 - Asus P5KPL-AM SE | User Manual - Page 28
only. They may not exactly match what you see on your screen. • Visit the ASUS website at www.asus.com to download the latest BIOS file for this motherboard. 2.3 Main menu When you enter the BIOS Setup program, the Main menu screen appears, giving you an overview of the basic system information - Asus P5KPL-AM SE | User Manual - Page 29
to display the IDE/SATA device information. The BIOS automatically detects the values opposite the dimmed items (Device device type. Select [CDROM] if you are specifically configuring a CD-ROM drive. Select [ARMD] Auto enables the LBA mode if the device supports this mode, and if the device was not - Asus P5KPL-AM SE | User Manual - Page 30
you to individually set overclocking parameters. Auto - loads the optimal settings for the system. Overclock Profile - loads overclocking profiles with optimal parameters for stability when overclocking. Test Mode - loads overclock (overclocking 5%) with spread spectrum. 2-6 ASUS P5KPL-AM SE - Asus P5KPL-AM SE | User Manual - Page 31
item appears only when you set the AI Overclocking item to [Manual]. CPU Frequency [xxx] Displays the frequency sent by the clock generator to the system bus and PCI bus. The value of this item is auto-detected by the BIOS. Use the and keys to adjust the CPU frequency. You can also type the - Asus P5KPL-AM SE | User Manual - Page 32
functions. Configuration options: [Disabled] [Enabled] Vanderpool Technology [Enabled] Enable this item when the processor supports Vanderpool technology. Users need to reset the computer to change the configuration of this item. Configuration options: [Disabled] [Enabled] 2-8 ASUS P5KPL-AM SE - Asus P5KPL-AM SE | User Manual - Page 33
or disables Intel® CPU Thermal Monitor (TM2) function, a CPU overheating protection function. When enabled, the CPU core frequency and voltage is reduced when the CPU is overheats. Configuration /FIXED Memory. Configuration options: [128MB] [256MB] [Maximum DVMT] Chapter 2: BIOS information 2-9 - Asus P5KPL-AM SE | User Manual - Page 34
Support Type [HD Audio] Allows you to select the front panel support type. If High Definition Audio Front Panel used, please set HD Audio mode. Configuration options: [AC97] [HD Audio] 2.4.5 Onboard Devices Configuration Onboard PCIE 10/100M LAN set to [No], BIOS configures all the ASUS P5KPL-AM SE - Asus P5KPL-AM SE | User Manual - Page 35
was left off. [Auto] - Detected by OS. 2.5.2 ACPI 2.0 Support [Disabled] Allows you to add more tables for Advanced Configuration and Power Interface (ACPI) 2.0 specifications. Configuration options: [Disabled] [Enabled] 2.5.3 ACPI APIC Support [Enabled] Allows you to enable or disable the Advanced - Asus P5KPL-AM SE | User Manual - Page 36
PS/2 Mouse [Disabled] When set to [Enabled], this parameter allows you to use the PS motherboard, the field shows N/A. Select Ignored if you do not wish to display the detected speed. CPU specific field shows N/A. Select Ignored if you do not wish to display the detected speed. 2-12 ASUS P5KPL-AM SE - Asus P5KPL-AM SE | User Manual - Page 37
the screen depends ASUS MyLogo2™ feature. AddOn ROM Display Mode [Force BIOS] Sets the display mode for option ROM. Configuration options: [Force BIOS] [Keep Current] Bootup Num-Lock [On] Allows you to select the power-on state for the NumLock. Configuration options: [Off] [On] PS/2 Mouse Support - Asus P5KPL-AM SE | User Manual - Page 38
supervisor password. The Supervisor Password item on top of the screen shows the default Not Installed. After you set a password . The message Password uninstalled appears. If you forget your BIOS password, you can clear it by erasing the CMOS Real Time Clock utility. 2-14 ASUS P5KPL-AM SE - Asus P5KPL-AM SE | User Manual - Page 39
User Password item on top of the screen shows the default Not Installed. After you and update BIOS. This utility doesn't support : 1.NTFS format 2.7.1 ASUS EZ Flash 2 Allows you to run ASUS EZ Flash 2 Check Realtek LAN cable [Disabled] Enables or disables checking of the Realtek LAN cable during the - Asus P5KPL-AM SE | User Manual - Page 40
Go to Sub-screen F1 General Help F10 Time, and Password, the BIOS asks for a confirmation before window appears. Select OK to load default values. Select Exit & Save Changes or make other changes before saving the values to the non-volatile RAM. 2-16 ASUS P5KPL-AM SE
-
 1
1 -
 2
2 -
 3
3 -
 4
4 -
 5
5 -
 6
6 -
 7
7 -
8
-
9
-
10
-
11
-
12
-
13
-
14
-
15
-
16
-
17
-
18
-
19
-
20
-
21
-
22
-
23
-
24
-
25
-
26
-
27
-
28
-
29
-
30
-
31
-
32
-
33
-
34
-
35
-
36
-
37
-
38
-
39
-
40
 |
 |

Motherboard
P5KPL-AM SE