Asus P5V-VM SE DH P5VD2-VM English Edition User''s Manual - Page 101
Press <Esc> to go back to main menu.
 |
View all Asus P5V-VM SE DH manuals
Add to My Manuals
Save this manual to your list of manuals |
Page 101 highlights
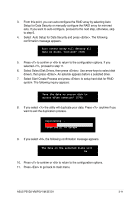
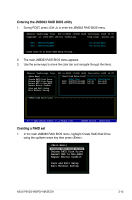
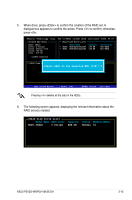
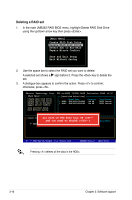
3. From this point, you can auto-configure the RAID array by selecting Auto Setup for Data Security or manually configure the RAID array for mirrored sets. If you want to auto-configure, proceed to the next step, otherwise, skip to step 6. 4. Select Auto Setup for Data Security and press . The following confirmation message appears. Auto create array will destroy all data on disks, Continue? (Y/N) 5. Press to confirm or to return to the configuration options. If you selected , proceed to step 11. 6. Select Select Disk Drives, then press . Use arrow keys to select disk drive/s, then press . An asterisk appears before a selected drive. 7. Select Start Create Process and press to setup hard disk for RAID system. The following inquiry appears: Save the data on source disk to mirror after creation? (Y/N) 8. If you select the utility will duplicate your data. Press anytime if you want to exit the duplication process. Duplicating... RAID 1 for data protection Press Yes(Y) to Escape 9. If you select , the following confirmation message appears. The data on the selected disks will be 10. Press to confirm or to return to the configuration options. 11. Press to go back to main menu. ASUS P5VD2-VM/P5V-VM SE DH 3-11
-
 1
1 -
2
-
3
-
4
-
5
-
6
-
7
-
8
-
9
-
10
-
11
-
12
-
13
-
14
-
15
-
16
-
17
-
18
-
19
-
20
-
21
-
22
-
23
-
24
-
25
-
26
-
27
-
28
-
29
-
30
-
31
-
32
-
33
-
34
-
35
-
36
-
37
-
38
-
39
-
40
-
41
-
42
-
43
-
44
-
45
-
46
-
47
-
48
-
49
-
50
-
51
-
52
-
53
-
54
-
55
-
56
-
57
-
58
-
59
-
60
-
61
-
62
-
63
-
64
-
65
-
66
-
67
-
68
-
69
-
70
-
71
-
72
-
73
-
74
-
75
-
76
-
77
-
78
-
79
-
80
-
81
-
82
-
83
-
84
-
85
-
86
-
87
-
88
-
89
-
90
-
91
-
92
-
93
-
94
-
95
-
 96
96 -
 97
97 -
 98
98 -
 99
99 -
 100
100 -
 101
101 -
 102
102 -
 103
103 -
 104
104 -
 105
105 -
 106
106 -
107
-
108
-
109
-
110
 |
 |
