Asus Pro E800 G4 User Manual - Page 29
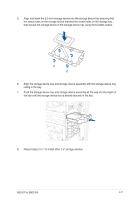
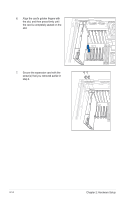
ASUS Pro E800 G4, the bay until the storage device tray is seated securely in the bay.
 |
View all Asus Pro E800 G4 manuals
Add to My Manuals
Save this manual to your list of manuals |
Page 29 highlights
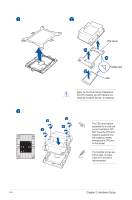
4. Align and insert the 3.5-inch storage device into the storage device tray ensuring that the screw holes on the storage device matches the HDD notches on the storage device bay. Ensure the storage device is seated firmly in the storage device bay. Screw holes (HDD) HDD notches (Storage device tray) 5. Align the storage device tray and storage device assembly with the storage device tray railing in the bay. 6. Push the storage device tray and storage device assembly all the way into the depth of the bay until the storage device tray is seated securely in the bay. 7. Repeat steps 2 to 6 to install other 3.5" storage devices. ASUS Pro E800 G4 2-9
-
 1
1 -
2
-
3
-
4
-
5
-
6
-
7
-
8
-
9
-
10
-
11
-
12
-
13
-
14
-
15
-
16
-
17
-
18
-
19
-
20
-
21
-
22
-
23
-
 24
24 -
 25
25 -
 26
26 -
 27
27 -
 28
28 -
 29
29 -
 30
30 -
 31
31 -
 32
32 -
 33
33 -
 34
34 -
35
-
36
-
37
-
38
-
39
-
40
-
41
-
42
-
43
-
44
-
45
-
46
-
47
-
48
-
49
-
50
-
51
-
52
-
53
-
54
-
55
-
56
-
57
-
58
-
59
-
60
-
61
-
62
-
63
-
64
-
65
-
66
-
67
-
68
-
69
-
70
-
71
-
72
-
73
-
74
-
75
-
76
-
77
-
78
-
79
-
80
-
81
-
82
-
83
-
84
-
85
-
86
-
87
-
88
-
89
-
90
-
91
-
92
-
93
-
94
-
95
-
96
-
97
-
98
-
99
-
100
-
101
-
102
-
103
-
104
-
105
-
106
-
107
-
108
-
109
-
110
-
111
-
112
-
113
-
114
-
115
-
116
-
117
-
118
-
119
-
120
-
121
-
122
-
123
-
124
-
125
-
126
-
127
-
128
 |
 |

2-9
ASUS Pro E800 G4
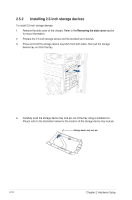
4.
Align and insert the 3.5-inch storage device into the storage device tray ensuring that
the screw holes on the storage device matches the HDD notches on the storage device
bay. Ensure the storage device is seated firmly in the storage device bay.
Screw holes (HDD)
HDD notches (Storage device tray)
5.
Align the storage device tray and storage device assembly with the storage device tray
railing in the bay.
6.
Push the storage device tray and storage device assembly all the way into the depth of
the bay until the storage device tray is seated securely in the bay.
7.
Repeat steps 2 to 6 to install other 3.5” storage devices.