Asus RAMPAGE V EXTREME U3.1 User Guide - Page 86
Press the OC Panel LCM Power button to turn on the OC Panel LCM display.
 |
View all Asus RAMPAGE V EXTREME U3.1 manuals
Add to My Manuals
Save this manual to your list of manuals |
Page 86 highlights
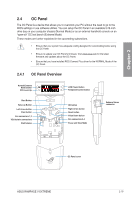
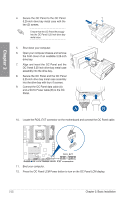
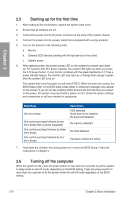
Chapter 2 4. Secure the OC Panel to the OC Panel 5.25-inch drive bay metal case with the two (2) screws. Ensure that the OC Panel fits snugly into the OC Panel 5.25-inch drive bay metal case. 5. Shut down your computer. 6. Open your computer chassis and remove the front cover of an available 5.25-inch drive bay. 7. Align and insert the OC Panel and the OC Panel 5.25-inch drive bay metal case assembly into the drive bay. 8. Secure the OC Panel and the OC Panel 5.25-inch drive bay metal case assembly into the drive bay with four (4) screws. 9. Connect the OC Panel data cable (A) and a SATA Power cable (B) to the OC Panel. 10. Locate the ROG_EXT connector on the motherboard and connect the OC Panel cable. 11. Boot your computer. 12. Press the OC Panel LCM Power button to turn on the OC Panel LCM display. 2-22 Chapter 2: Basic Installation
-
 1
1 -
2
-
3
-
4
-
5
-
6
-
7
-
8
-
9
-
10
-
11
-
12
-
13
-
14
-
15
-
16
-
17
-
18
-
19
-
20
-
21
-
22
-
23
-
24
-
25
-
26
-
27
-
28
-
29
-
30
-
31
-
32
-
33
-
34
-
35
-
36
-
37
-
38
-
39
-
40
-
41
-
42
-
43
-
44
-
45
-
46
-
47
-
48
-
49
-
50
-
51
-
52
-
53
-
54
-
55
-
56
-
57
-
58
-
59
-
60
-
61
-
62
-
63
-
64
-
65
-
66
-
67
-
68
-
69
-
70
-
71
-
72
-
73
-
74
-
75
-
76
-
77
-
78
-
79
-
80
-
 81
81 -
 82
82 -
 83
83 -
 84
84 -
 85
85 -
 86
86 -
 87
87 -
 88
88 -
 89
89 -
 90
90 -
 91
91 -
92
-
93
-
94
-
95
-
96
-
97
-
98
-
99
-
100
-
101
-
102
-
103
-
104
-
105
-
106
-
107
-
108
-
109
-
110
-
111
-
112
-
113
-
114
-
115
-
116
-
117
-
118
-
119
-
120
-
121
-
122
-
123
-
124
-
125
-
126
-
127
-
128
-
129
-
130
-
131
-
132
-
133
-
134
-
135
-
136
-
137
-
138
-
139
-
140
-
141
-
142
-
143
-
144
-
145
-
146
-
147
-
148
-
149
-
150
-
151
-
152
-
153
-
154
-
155
-
156
-
157
-
158
-
159
-
160
-
161
-
162
-
163
-
164
-
165
-
166
-
167
-
168
-
169
-
170
-
171
-
172
-
173
-
174
-
175
-
176
-
177
-
178
-
179
-
180
-
181
-
182
-
183
-
184
-
185
-
186
-
187
-
188
-
189
-
190
-
191
-
192
-
193
-
194
-
195
-
196
-
197
-
198
-
199
-
200
-
201
-
202
-
203
-
204
-
205
-
206
-
207
-
208
-
209
-
210
-
211
-
212
-
213
-
214
-
215
-
216
-
217
-
218
-
219
-
220
-
221
-
222
-
223
-
224
-
225
-
226
-
227
-
228
-
229
-
230
 |
 |
