Asus RS100-E8-PI2 User Guide - Page 21
Reinstalling the chassis cover, ASUS RS100-E8-PI2
 |
View all Asus RS100-E8-PI2 manuals
Add to My Manuals
Save this manual to your list of manuals |
Page 21 highlights
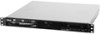
2.1.2 Reinstalling the chassis cover To reinstall the chassis cover: 1. Position the cover on top of the chassis with the hooks aligned to the side tabs of the chassis. 2. Slide the cover toward the front until it snaps in place. Side tabs ASUS RS100-E8-PI2 2-3
-
 1
1 -
2
-
3
-
4
-
5
-
6
-
7
-
8
-
9
-
10
-
11
-
12
-
13
-
14
-
15
-
 16
16 -
 17
17 -
 18
18 -
 19
19 -
 20
20 -
 21
21 -
 22
22 -
 23
23 -
 24
24 -
 25
25 -
 26
26 -
27
-
28
-
29
-
30
-
31
-
32
-
33
-
34
-
35
-
36
-
37
-
38
-
39
-
40
-
41
-
42
-
43
-
44
-
45
-
46
-
47
-
48
-
49
-
50
-
51
-
52
-
53
-
54
-
55
-
56
-
57
-
58
-
59
-
60
-
61
-
62
-
63
-
64
-
65
-
66
-
67
-
68
-
69
-
70
-
71
-
72
-
73
-
74
-
75
-
76
-
77
-
78
-
79
-
80
-
81
-
82
-
83
-
84
-
85
-
86
-
87
-
88
-
89
-
90
-
91
-
92
-
93
-
94
-
95
-
96
-
97
-
98
-
99
-
100
-
101
-
102
-
103
-
104
-
105
-
106
-
107
-
108
-
109
-
110
-
111
-
112
-
113
-
114
-
115
-
116
-
117
-
118
-
119
-
120
-
121
-
122
-
123
-
124
-
125
-
126
-
127
-
128
-
129
-
130
-
131
-
132
-
133
-
134
-
135
-
136
-
137
-
138
-
139
-
140
-
141
-
142
-
143
-
144
-
145
-
146
-
147
-
148
-
149
-
150
-
151
-
152
-
153
-
154
-
155
-
156
-
157
-
158
 |
 |

2-3
ASUS RS100-E8-PI2
2.1.2
Reinstalling the chassis cover
To reinstall the chassis cover:
1.
Position the cover on top of the chassis with the hooks aligned to the side tabs of the
chassis.
2.
Slide the cover toward the front until it snaps in place.
Side tabs