Behringer ABACUS Quick Start Guide
Behringer ABACUS Manual
 |
View all Behringer ABACUS manuals
Add to My Manuals
Save this manual to your list of manuals |
Behringer ABACUS manual content summary:
- Behringer ABACUS | Quick Start Guide - Page 1
Quick Start Guide ABACUS Analog Music Computer for Eurorack V 0.0 - Behringer ABACUS | Quick Start Guide - Page 2
. Install in accordance with the manufacturer's instructions. 8. Do not install near any heat your local city office, or your household waste collection service. 12. Do not install in a confined space, such compris un ampli de puissance). Quick Start Guide 3 9. Utilisez exclusivement des accessoires et - Behringer ABACUS | Quick Start Guide - Page 3
tempo, a sua colaboração para a eliminação correcta deste produto irá contribuir para a utilização eficiente dos recursos naturais. Para mais Quick Start Guide 5 informação acerca dos locais onde poderá deixar o seu equipamento usado para reciclagem, é favor contactar os serviços municipais locais - Behringer ABACUS | Quick Start Guide - Page 4
, spisar eller annan utrustning som avger värme (inklusive förstärkare). 9. Använd endast tillkopplingar och tillbehör som angetts av tillverkaren. Quick Start Guide 7 10. Använd endast med vagn, stativ, trefot, hållare eller bord som angetts av tillverkaren, eller som sålts till-sammans med - Behringer ABACUS | Quick Start Guide - Page 5
przestrzeni, takiej jak półka na książki lub podobny zestaw. 13. Nie stawiaj na urządzeniu źródeł otwartego ognia, takich jak zapalone świece. Quick Start Guide 9 - Behringer ABACUS | Quick Start Guide - Page 6
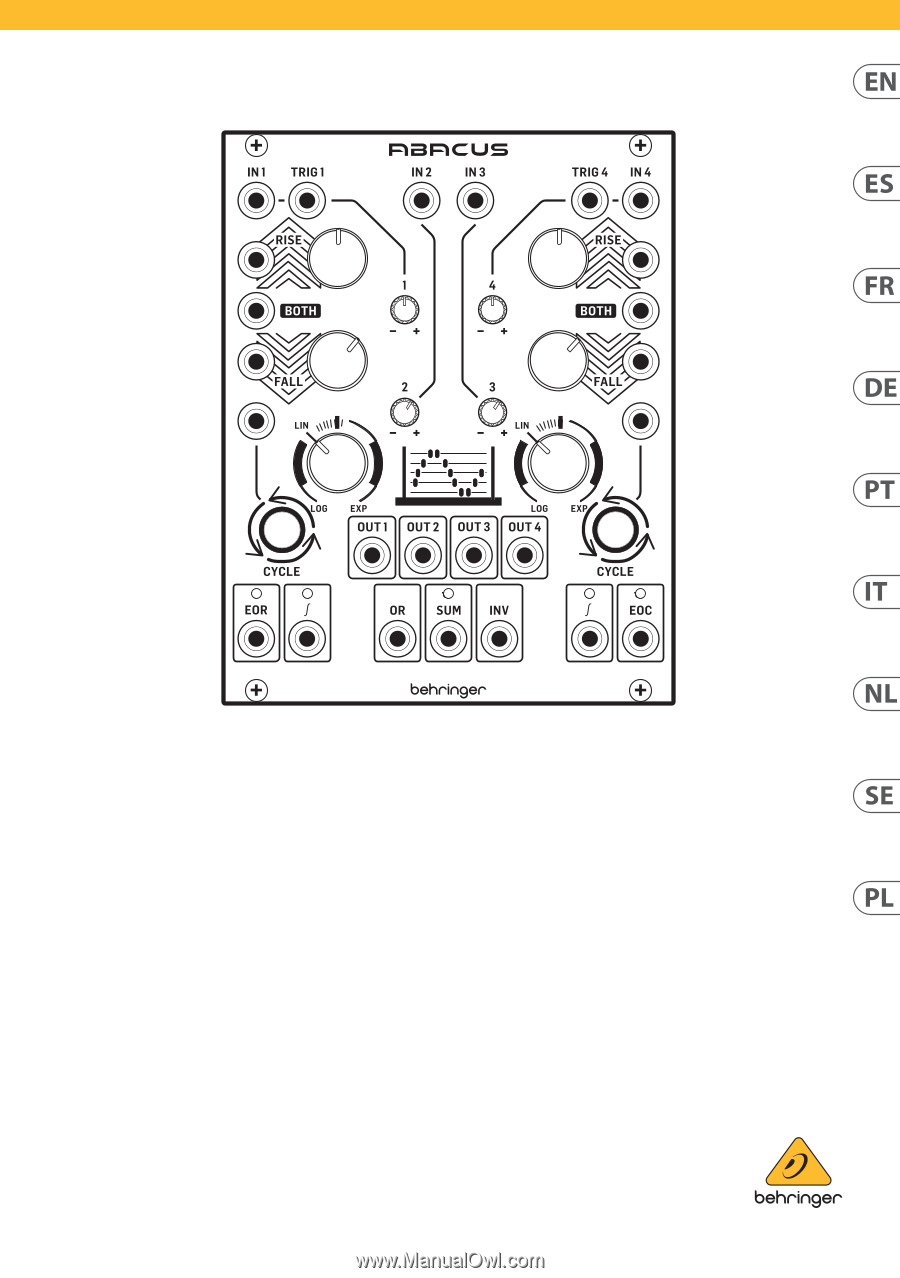
of approximately +10 V. (7) CHANNEL 1 RISE CV INPUT - Allows CV control of the Rise function, in conjunction with control 8. Accepts voltages Quick Start Guide 11 in the range +/- 8 V. Positive voltages increase the Rise time until the maximum is achieved; negative voltages decrease it until it - Behringer ABACUS | Quick Start Guide - Page 7
/Fall processing. Does not pass internal voltage unless processing is taking place. (21) CHANNEL 4 ATTENUVERTER - Use this control to attenuate Quick Start Guide 13 (CW) or invert (CCW) the output of Channel 1 after Rise/Fall processing. Does not pass internal voltage unless processing is taking - Behringer ABACUS | Quick Start Guide - Page 8
Acepta cualquier señal de puerta o disparador entrante positiva que supere los + 2.5 V. Esta señal hace que la función Rise/Fall sea activada. Quick Start Guide 15 (6) CHANNEL 4 CV INPUT - Acepta voltajes variables en el rango de +/- 10 V para su procesado por el canal 4. Si no hay ningún voltaje - Behringer ABACUS | Quick Start Guide - Page 9
el procesado. (21) CHANNEL 4 ATTENUVERTER - Use este control para atenuar (derecha) o invertir (izquierda) la salida del canal 4 después del Quick Start Guide 17 procesado Rise/Fall. No pasa voltaje interno salvo que esté ejecutándose el procesado. (22) CHANNEL 4 CYCLE TRIGGER - Permite que una se - Behringer ABACUS | Quick Start Guide - Page 10
CHANNEL 2 CV INPUT - Peut recevoir des tensions sur une plage de +/- 10 V pour atténuation/inversion (attenuverting) par le réglage 20. Quick Start Guide 19 (4) CHANNEL 3 CV INPUT - Peut recevoir des tensions sur une plage de +/- 10 V pour atténuation/inversion (attenuverting) par le réglage 21 - Behringer ABACUS | Quick Start Guide - Page 11
'à ce que la valeur maximale soit atteinte ; une tension négative diminue sa durée jusqu'à ce que la valeur minimale soit atteinte. Quick Start Guide 21 (19) CHANNEL 1 CYCLE TRIGGER - Permet d'activer la fonction Cycle du canal 1 avec des signaux de gate ou de déclenchement externes supérieurs - Behringer ABACUS | Quick Start Guide - Page 12
OF CYCLE OUTPUT - Porte une tension de + 9 V générée à la fin du cycle Rise/Fall, indiqué par la LED correspondante. Quick Start Guide 23 (DE) Bedienelemente (1) CHANNEL 1 CV INPUT - Akzeptiert variable Spannungen im Bereich von +/-10 V zur Verarbeitung durch Kanal 1. Wenn keine Spannung anliegt - Behringer ABACUS | Quick Start Guide - Page 13
werden. (17) CHANNEL 4 FALL TIME - Mit diesem Regler können Sie die Abfallzeit einstellen. Siehe Tabelle unten für maximale Zeiten bei Quick Start Guide 25 verschiedenen Einstellungen. Kann durch Einspeisung einer CV in Buchse 18 weiter moduliert werden. (18) CHANNEL 4 FALL CV INPUT - Ermöglicht - Behringer ABACUS | Quick Start Guide - Page 14
grün für eine positive Spannung und rot für eine negative. Die Kanäle 1 und 4 benötigen eine externe Spannung, um einbezogen zu werden. Quick Start Guide 27 (35) INVERTED SUM OUTPUT - Gibt die Inversion des Summenausgangs 34 aus. (36) CHANNEL 4 UNITY OUTPUT - Gibt eine Spannung von 0 bis +10 V aus - Behringer ABACUS | Quick Start Guide - Page 15
+/- 8 V. Tensões positivas aumentam o tempo de Fall até que chegue ao máximo; tensões negativas o diminuem até que cheque ao mínimo. Quick Start Guide 29 (16) CHANNEL 1 FALL TIME - Use este controle para ajustar o tempo de Fall. Verifique a tabela abaixo para obter os tempos máximos de acordo com - Behringer ABACUS | Quick Start Guide - Page 16
12, 13, 20, 21). O LED fica verde quando há tensão positiva, e vermelho quando há tensão negativa. Os canais 1 e 4 precisam de tensão externa incluída. Quick Start Guide 31 (35) INVERTED SUM OUTPUT - Faz a saída da inversão da soma da saída 34. (36) CHANNEL 4 UNITY OUTPUT - Faz a saída de tens - Behringer ABACUS | Quick Start Guide - Page 17
fino a raggiungere il massimo. (15) CHANNEL 1 FALL CV INPUT - Consente il controllo CV della funzione FALL, in combinazione Quick Start Guide 33 con il controllo 16. Accetta tensioni nell'intervallo +/- 8 V. Le tensioni positive aumentano il tempo di caduta fino al raggiungimento del massimo - Behringer ABACUS | Quick Start Guide - Page 18
il risultato della funzione OR analogica basata sull'impostazione degli attenuatori per i canali da 1 a 4 (controlli 12, 13, 20, 21). Quick Start Guide 35 Per essere inclusi i canali 1 e 4 necessitano di una tensione esterna. (34) SUM OUTPUT - Emette una tensione sommata nell'intervallo +/- 10 - Behringer ABACUS | Quick Start Guide - Page 19
de intern gegenereerde voltages te verzwakken (naar rechts draaien) of te inverteren (naar links draaien) over een bereik -5 V tot + 6 V. Quick Start Guide 37 (14) CHANNEL 4 BOTH CV INPUT - Accepteert een spanning over een bereik van +/- 8 V. Een positieve spanning verkort de totale tijd van Rise - Behringer ABACUS | Quick Start Guide - Page 20
Rise een +9 V-spanning uit, die wordt aangegeven door de bijbehorende LED, die actief blijft tot het einde van de Fall-cyclus. Quick Start Guide 39 (32) CHANNEL 1 UNITY OUTPUT - Verzendt een spanning van 0 +10 V na de functies Rise/Fall als kanaal 1 cycelt (roteert); volgt anders de kanaalingang - Behringer ABACUS | Quick Start Guide - Page 21
uttag 3 eller den internt genererade spänningen i intervallet -10 V till + 10 V. (13) CHANNEL 3 ATTENUVERTER - Använd denna kontroll för att Quick Start Guide 41 dämpa (medurs) eller invertera (moturs) spänningar som skickas till kanal 3-ingången på uttag 4 eller den internt genererade spänningen - Behringer ABACUS | Quick Start Guide - Page 22
lyser grönt för en positiv spänning, röd för en negativ. (33) OR OUTPUT - Skickar ut resultatet av en analog OR-funktion baserat Quick Start Guide 43 på inställningen av attenuvertrarna för kanal 1-4 (kontroll 12, 13, 20, 21).Kanal 1 och 4 behöver en extern spänning för att inkluderas. (34) SUM - Behringer ABACUS | Quick Start Guide - Page 23
ęcia przesyłane do wejścia kanału 3 na wejściu 4 lub wewnętrznie generowane napięcie w przedziale od -10 V do + 10 V. Quick Start Guide 45 (14) CHANNEL 4 BOTH CV INPUT - Przyjmuje napięcie w przedziale +/- 8 V. Dodatnie napięcie wykładniczo zredukuje ostateczny czas opadania/ narastania (Rise/Fall - Behringer ABACUS | Quick Start Guide - Page 24
ższy priorytet, niż aktywacja zewnętrzna. (31) CHANNEL 1 END OF RISE OUTPUT - Wysyła napięcie + 9 V na szczycie funkcji narastania (Rise) Quick Start Guide 47 wskazywane przez powiązaną diodę, które pozostaje aktywne aż do końca cyklu opadania (Fall). (32) CHANNEL 1 UNITY OUTPUT - Wysyła napięcie - Behringer ABACUS | Quick Start Guide - Page 25
Fall Tiempo Cycle Log 9 m 0 s 9.48 v 25 m 15 s 0.03 v 42 m 45 s Lin 55 s 9.48 v 50 s 0.03 v 1 m 45 s Exp 7 s 4.5 v 5 s 0.03 v 10 s Quick Start Guide 49 Notas y avisos • Puede usar los canales 1 y 4 para modular las funciones Rise, Fall o Both del otro canal. • Puede usar el disparador - Behringer ABACUS | Quick Start Guide - Page 26
Summenspannung als Steuerquelle. (PT) Tempos de Função Máxima - Canal 1 e Canal 4 Controle(s) e Attenuverter ajustados ao máximo (sentido horário máximo) Quick Start Guide 51 Tempo de Rise Pico de Rise Tempo de Fall Min de Fall Tempo do Ciclo Log 9 m 0 s 9.48 v 25 m 15 s 0.03 v 42 - Behringer ABACUS | Quick Start Guide - Page 27
van kanaal 1 kan worden gebruikt als een modifier voor elke CV-ingang op kanaal 1 en 4; of als externe spanningsingang voor elk kanaal. Quick Start Guide 53 • Kanalen 2 en 3 kunnen worden gebruikt om een offsetspanning te genereren voor de CV-ingangen van kanaal 1 en 4. • Experimenteer met de ge - Behringer ABACUS | Quick Start Guide - Page 28
być użyte w celu dostarczenia napięcia równoważącego dla wejść CV kanałów 1 i 4. • Eksperymentuj z odwróconą sumą napięć jako źródła kontroli. Quick Start Guide 55 (EN) Power Connection The module comes with the required power cable for connecting to a standard Eurorack power supply system. Follow - Behringer ABACUS | Quick Start Guide - Page 29
, puede haber una serie de orificios fijos separados 2 HP a lo largo de la caja, o una pista que permita que las placas Quick Start Guide 57 roscadas individuales se deslicen a lo largo de la caja. Las placas roscadas de movimiento libre permiten un posicionamiento preciso del módulo, pero cada - Behringer ABACUS | Quick Start Guide - Page 30
Enden des Netzkabels fest angeschlossen wurden, können Sie das Modul in einem Gehäuse montieren und die Stromversorgung einschalten. Quick Start Guide 59 Installation Die erforderlichen Schrauben sind im Lieferumfang des Moduls für die Montage in einem Eurorack-Gehäuse enthalten. Schließen Sie - Behringer ABACUS | Quick Start Guide - Page 31
modo errato. Se l'alimentatore non dispone di una presa con chiave, assicurarsi di orientare il pin 1 (-12 V) con la striscia rossa sul cavo. Quick Start Guide 61 3. Inserire il connettore a 10 pin nella presa sul retro del modulo. Il connettore ha una linguetta che si allineerà con la presa per un - Behringer ABACUS | Quick Start Guide - Page 32
Om strömförsörjningen inte har ett nyckeluttag, se till att orientera stift 1 (-12 V) med den röda remsan på kabeln. Quick Start Guide 63 3. Sätt i 10-polig kontakt i uttaget på baksidan av modulen. Kontaktdonet har en flik som kommer i linje med uttaget för korrekt orientering. 4. När båda ändarna - Behringer ABACUS | Quick Start Guide - Page 33
ęściowo, aby rozpocząć, co pozwoli na drobne korekty położenia, gdy wszystkie zostaną wyrównane. Po ustaleniu ostatecznego położenia dokręcić śruby. Quick Start Guide 65 - Behringer ABACUS | Quick Start Guide - Page 34
60 mA +12 V / 50 mA -12 V 20 hp 10 cm x 12.8 cm x 2.4 cm (3.94 " x 5.04 " x 0.94 ") 191 g (6.74 oz) 284 g (10.02 oz) Quick Start Guide 67 - Behringer ABACUS | Quick Start Guide - Page 35
aucune exception. especificaciones, sin excepción. Quick Start Guide 69 Weitere wichtige Informationen Outras Informações Importantes Sie bitte, ob Ihr Problem von unserem „Online Support" gelöst werden kann, den Sie ebenfalls auf musictribe. com unter „Support" finden. Alternativ reichen - Behringer ABACUS | Quick Start Guide - Page 36
problem Music Tribe dla swojego kraju, kan hanteras av vår "Onlinesupport" wymienionym w sekcji „Wsparcie" som också finns under "Support i wartości. Quick Start Guide 71 FEDERAL COMMUNICATIONS COMMISSION COMPLIANCE used in accordance with the instructions, may cause harmful interference to - Behringer ABACUS | Quick Start Guide - Page 37
We Hear You
-
 1
1 -
 2
2 -
 3
3 -
 4
4 -
 5
5 -
 6
6 -
 7
7 -
8
-
9
-
10
-
11
-
12
-
13
-
14
-
15
-
16
-
17
-
18
-
19
-
20
-
21
-
22
-
23
-
24
-
25
-
26
-
27
-
28
-
29
-
30
-
31
-
32
-
33
-
34
-
35
-
36
-
37
 |
 |
Quick Start Guide
ABACUS
Analog Music Computer for Eurorack
V 0.0