Behringer iNUKE NU4-6000 Quick Start Guide - Page 8
iNUKE NU4-6000 Controls
 |
View all Behringer iNUKE NU4-6000 manuals
Add to My Manuals
Save this manual to your list of manuals |
Page 8 highlights
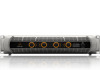
14 iNUKE NU4-6000 iNUKE NU4-6000 Controls (EN) Step 2: Controls (ES) Paso 2: Controles (FR) Etape 2 : Réglages (DE) Schritt 2: Regler (PT) Passo 2: Controles SIGNAL and LIMIT LEDs display the signal level for each channel. Reduce the input gain if the red LIMIT LED lights up continuously. Los pilotos SIGNAL y LIMIT le indican el nivel de la senal para cada canal. Reduzca la ganancia de entada si el piloto a rojo LIMIT se ilumina de forma continua. Les Leds SIGNAL et LIMIT affichent le niveau du signal de chaque canal. Reduisez le gain d'entree si la Led rouge LIMIT reste allumee. Die SIGNAL- und LIMIT LEDs zeigen den Signalpegel jedes Kanals an. Drehen Sie die CH A/CH B-REGLER des Eingangs zurück, wenn die rote LIMIT LED ständig leuchtet. SIGNAL and LIMIT LEDs são indicadores de nível para cada canal. Reduza os CH A/CH B CONTROLS de entrada se o LIMIT LED vermelho acender continuamente. 15 Quick Start Guide VENTILATION opening allows airflow throughout the amplifier. RANURAS DE VENTILACION El sistema de ventilacion con diseno "trasero-frontal" evita el recalentamiento. OUÏES DE VENTILATION Le tunnel de ventilation d'arriere vers l'avant evite les surchauffes. BELÜFTUNGÖFFNUNGEN Die Belüftung erfolgt von hinten nach vorne und verhindert eine Überhitzung des Geräts. VENTILATION OPENINGS O design de ventilacao "traseiro-frontal" previne superaquecimento POWER button turns the amplifier on and off. BOTON/PILOTO POWER Pulse este boton para encender o apagar el amplificador. INTERRUPTEUR SECTEUR/LED Appuyez sur ce bouotn pour placer l'amplificateur sous/hors tension. POWER-TASTE Drücken Sie diese Taste, um den Verstärker ein/auszuschalten. LED Pressione este botão para ligar ou desligar o amplifiçador. RACK EARS secure the unit into a rack using four attaching screws and washers (fasteners not included). Requires two rack units. ESCUADRAS PARA COLOCACION EN RACK Coloque esta unidad en un bastidor rack usando los cuatro tornillos y arandelas incluidas (no se incluyen tuercas). Esta unidad requiere dos espacios rack para su instalacion. POIGNÉES Fixez l'amplificateur au boitier Rack en utilisant quatre vis et rondelles (non fournies). Cet amplificateur utilise deux espaces Rack en hauteur. RACK-HALTERUNGEN Montieren Sie das Gerät mit vier Befestigungsschrauben und Unterlegscheiben im Rack (Befestigungen nicht im Lieferumfang enthalten). Benötigt zwei Höheneinheiten RACK EARS Fixe a unidade a um rack usando quatro parafusos e buchas (chaves não inclusas). Requer duas unidades de rack. CH A/CH B/CH C/CH D CONTROLS adjust the input level. To increase signal gain, rotate the knobs clockwise; to reduce the gain, rotate the knobs counter-clockwise. CONTROLES CH A/ CH B/CH C/CH D Ajuste el nivel de entrada por medio de estos mandos. Para aumentar la ganancia de la senal, gire estos mandos a la derecha `y a la izquierda para reducirla. BOUTONS CH A/CH B/ CH C/CH D CONTROLS Determinent le niveau d'entree. Pour augmenter le gain, tournez les boutons vers la droite ; pour reduire le gain, tournez les boutons vers la gauche. CH A/CH B/CH C/ CH D -REGLER Stellen Sie mit diesen Drehreglern den Eingangspegel ein. Zur Erhöhung der Signalverstärkung drehen Sie die Regler nach rechts, zur Verringerung der Verstärkung drehen Sie die Regler nach links. CH A/CH B/CH C/CH D CONTROLS Ajuste o nível de entrada usando esses botões. Para aumentar o ganho de sinal gire os botões no sentido horário; para reduzir o ganho, gire os botões no sentido anti-horário.
-
 1
1 -
2
-
 3
3 -
 4
4 -
 5
5 -
 6
6 -
 7
7 -
 8
8 -
 9
9 -
 10
10 -
 11
11 -
 12
12 -
 13
13 -
14
-
15
-
16
 |
 |
