Behringer iNUKE NU4-6000 Quick Start Guide - Page 9
Step 2: Controls, Paso 2: Controles, Etape 2 : Réglages, Schritt 2: Regler, Passo 2: Controles
 |
View all Behringer iNUKE NU4-6000 manuals
Add to My Manuals
Save this manual to your list of manuals |
Page 9 highlights
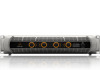
16 iNUKE NU4-6000 iNUKE NU4-6000 Controls (EN) Step 2: Controls (ES) Paso 2: Controles (FR) Etape 2 : Réglages (DE) Schritt 2: Regler (PT) Passo 2: Controles POWER SOURCE jack accepts the included IEC power cable. TOMA DE CORRIENTE Introduzca el cable de alimentacion (incluido) en esta toma de corriente IEC. EMBASE SECTEUR Connectez le cordon secteur fourni a cette embase. NETZANSCHLUSS Schliessen Sie das mitgelieferte passende Netzkabel an diesen IEC-Netzanschluss an. POWER CONNECTION Plugue o cabo de força correspondente (incluso) a este conector de força IEC. BREAKER (automated fuse). After eliminating the cause of faulty operation, simply depress the BREAKER and power up the unit again. The BREAKER acts in place of common discardable fuses. BREAKER (fusible automático). Sencillamente presionando este interruptor puede volver a ponerse en funcionamiento el fusible disparado una vez se hayan eliminado las fuentes de error. El fusible automático BREAKER sustituye los habituales cortacircuitos fusibles. Le commutateur BREAKER (coupe-circuit) remplace un fusible classique. Si la protection a sauté, une simple pres-sion sur ce commutateur permet de la remettre en fonction une fois la cause du problème localisée et supprimée. BREAKER (Sicherungsautomat). Durch einfaches Drücken auf diesen Schalter kann der Verstärker nach Beseitigung aller Fehlerquellen wieder in Betrieb genommen werden. Der BREAKER ersetzt die sonst üblichen Schmelzsicherungen. BREAKER (disjuntorautomático). Depois de premir este interruptor, é possível colocar novamente em funcionamento o dispositivo accionado após a eliminação de todas as fontes de erros. O BREAKER substitui os fusíveis tradicionais 17 Quick Start Guide VENTILATION FAN speed adjusts automatically to ensure trouble-free operation. VENTILADOR La velocidad de este ventilador se ajusta de forma automatica para asegurarle un funcionamiento continuo y sin problemas. VENTILATEUR La vitesse du ventilateur se regle automatiquement. LÜFTER Die Lüftergeschwindigkeit ist automatisch geregelt und gewährleistet einen reibungslosen Betrieb. VENTILADOR DE VENTILAÇÃO A velocidade do ventilador é automaticamente ajustada, assegurando assim um funcionamento sem quaisquer problemas. INPUTS Route linelevel input signals into these combination jacks using XLR, balanced ¼" TRS, or unbalanced ¼" TS connectors ENTRADAS Conecte su fuente de sonido al amplificador a traves de conectores TRS de 6,3 mm, XLR o RCA. Las tomas TRS tambien aceptan conectores TS de 6,3 mm. ENTRÉES Connectez votre le signal d'entree a l'ampli a l'aide des embases Jack stereo 6,35 mm, XLR, ou RCA. L'entree Jack recoit les fiches symetriques (Jack stereo) ou asymetriques (Jack mono). EINGÄNGE Leiten Sie Linepegel-Eingangssignale über XLR-Stecker, symmetrische 6,3-mmStereoklinken- oder unsymmetrische 6,3-mm-Klinkenstecker zu diesen Kombinationsbuchsen. ENTRADAS INPUT Encaminhe os sinais de entrada de nivel de linha para estes conectores de combinacao utilizando conectores XLR, TRS de 1/4" balanceados ou TS de 1/4" nao balanceados. XLR Plug ¼" TS Plug ¼" TRS Plug TWIST- LOCKING SPEAKER OUTPUTS connect the amplifier to the speakers using professional speaker cables with twist-locking plugs. SALIDAS DE ALTAVOZ CON FIJACION DE TIPO BAYONETA Conecte este amplificador a los altavoces usando cables de altavoz profesionales con conectores con sistema de fijacion de tipo bayoneta. CONNEXIONS POUR ENCEINTES À VERROUILLAGE Connectez l'ampli aux enceintes a l'aide de fiches professionnelles a verrouillage. DREHRIEGELBOXENAUSGÄNGE Verbinden Sie den Verstärker über die Drehriegelstecker professioneller Boxenkabel mit den Lautsprechern. TWIST- LOCKING SPEAKER OUTPUTS Conecte o amplifiçador aos alto-falantes usando cabos para altofalantes profissionais com plugues de travamento de giro. 2 2 2 MODE SWITCH (mono/stereo/bridge) Choose the amplifier mode by toggling the sliding MODE SWITCH between the MONO, STEREO, and BRIDGE positions. INTERRUPTOR MODE (mono/stereo/bridge) Elija el modo operativo del amplificador cambiando la posicion de este interruptor entre las posiciones MONO, STEREO y BRIDGE (puente mono). SÉLECTEUR DE MODE (mono/stereo/bridge) Selectionnez le mode de fonctionnement de l'amplificateur en placant le selecteur MODE sur MONO, STEREO, ou BRIDGE. MODE-SCHALTER (mono/stereo/gebrückt) Wählen Sie den Verstärkermodus, indem Sie den MODE Schiebeschalter auf MONO, STEREO oder BRIDGE einstellen. MODE SWITCH (mono/estéreo/ponte) Escolha o modo do amplifiçador alterando o botão de deslize MODE SWITCH entre as posições MONO, STEREO, e BRIDGE (ponte). CROSSOVER Activate the crossover by sliding the CROSSOVER SWITCH from the FULLRANGE to the split LF/HF setting. When activated, the crossover routes low frequencies (100 Hz and below) to the Channel B/D output, while high frequencies (100 Hz and above) go out through Channel A/C. CROSSOVER Activez le filtre actif en placant le selecteur CROSSOVER de la position FULLRANGE (large bande) a la position LF/HF (basses frequences/ hautes frequences). Le filtre actif dirige les frequences inferieures a 100 Hz a la sortie du canal B/D, et les frequences superieures a 100 Hz au canal A/C. INTERRUPTOR CROSSOVER Active el crossover o divisor de frecuencias deslizando este interruptor desde el ajuste FULLRANGE (rango completo) al LF/HF (division agudos/ graves). Cuando lo active, este crossover dirigira las frecuencias graves (100 Hz e inferiores) a la salida del canal B/D y las agudas (superiores a 100 Hz) a la del canal A/C. CROSSOVER-SCHALTER- Aktivieren Sie die Frequenzweiche, indem Sie den CROSSOVER-SCHALTER von FULLRANGE auf die trennende LF/HF-Einstellung setzen. Nach der Aktivierung leitet das Crossover die Bässe (100 Hz und tiefer) zum Ausgang von Kanal B/D und die Höhen (100 Hz und höher) zum Ausgang von Kanal A/C. CROSSOVER SWITCH- Ative o crossover deslizando o interruptor CROSSOVER SWITCH do FULLRANGE à configuração dividida LF (freqüências baixas) / HF (freqüências altas). Quando ativado, o crossover direciona as freqüências baixas (100 Hz e menores) à saída Channel B/D, enquanto as freqüências altas (100 Hz e maiores) saem através do Channel A/C.
-
 1
1 -
2
-
3
-
 4
4 -
 5
5 -
 6
6 -
 7
7 -
 8
8 -
 9
9 -
 10
10 -
 11
11 -
 12
12 -
 13
13 -
 14
14 -
15
-
16
 |
 |
