BenQ LW61ST - PRJ Networking Operation Guide - Page 7
QPresenter, Minimum system requirements, Downloading QPresenter, Installing QPresenter, For PC - manual
 |
View all BenQ LW61ST manuals
Add to My Manuals
Save this manual to your list of manuals |
Page 7 highlights
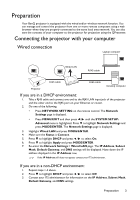
QPresenter QPresenter is an application running on the host PC. It helps connect your computer to an available network projector and transfer the desktop contents and/or audio signal to the network projector via local network connection. Minimum system requirements • Supported OS: Windows® XP 32 bit/64 bit, Windows® 2003, Windows® 7 32 bit/64 bit, Mac OS 10.5 and Mac OS 10.6. • CPU: Intel Pentium 4, 3.0G CPU (for1:1audio output through projector's speaker), Core2 Duo 2.40GHz CPU (for broadcasting function) • Memory: 1 GB (for1:1audio output through projector's speaker) or 2GB (for broadcasting function) • Free HDD space: 32 MB or more • Web browser: Internet Explorer version 7 or 8 (Java Plug-in should be installed and JavaScript should be enabled.) BenQ does not guarantee the compatibility in respective user environments. Different PC/notebook may have different compatibility results. Downloading QPresenter There are several ways to do it: • From the projector The projector also provides QPresenter for Mac computers. If you are using a Mac computer, the projector automatically provides Mac version of the QPresenter for you to download. i. Connect the computer to the projector. See "Connecting the projector with your computer" on page 3 for detail. ii. Enter the address of the projector in the address bar of your browser and press Enter. iii. Open the Admin page of the Projector Network Display System. iv. Click the Download icon. • From the user manual CD (for selective models) i. Insert the user manual CD that comes with your projector into your CD-ROM drive. ii. Download QPresenter-Broadcast.setup. • From BenQ.com i. Please go to your local BenQ.com to download the latest version of QPresenter. Installing QPresenter For PC 1. When the download is complete, click the exe file. 2. Click "Next" to continue. 3. Click "I agree" to agree the License Agreement. 4. Click "Next" to install the component. QPresenter 7
-
 1
1 -
 2
2 -
 3
3 -
 4
4 -
 5
5 -
 6
6 -
 7
7 -
 8
8 -
 9
9 -
 10
10 -
 11
11 -
 12
12 -
13
-
14
-
15
-
16
-
17
-
18
-
19
-
20
-
21
-
22
-
23
-
24
-
25
 |
 |
