Bernina 717 Manual
Bernina 717 Manual
 |
View all Bernina 717 manuals
Add to My Manuals
Save this manual to your list of manuals |
Bernina 717 manual content summary:
- Bernina 717 | Manual - Page 1
My BERNINA Guide 707 717 - Bernina 717 | Manual - Page 2
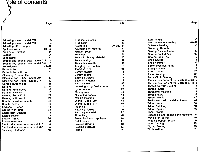
14 Basting 24 Blind-hems 21 Bobbin and bobbin case model 717 4 Bobbin and bobbin case model 707 6 Breakdowns 45-47 Buttonholes 25 Buttonholes with cord 26 Changing Presser feet 9 Cleaning and Oiling model 707 48 Cleaning and Oiling model 717 50 Corded Buttonholes 26 Darning 27 - Bernina 717 | Manual - Page 3
Your Bernina dealer will be glad to advise you. As soon as you have mastered the sewing techniques taught to you during your instruction period you will discover that sewing with a Bernina is a pleasure. We wish you every success. Fr. Gegauf Ltd., Manufacturers of Bernina Sewing Machines Steckborri - Bernina 717 | Manual - Page 4
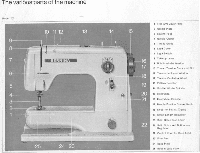
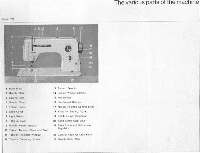
The various parts of the machine Model 707 9 8 7 • 10 11 12 13 BERNINA 4 I • 1 3 2 1 I I 25 24 23 14 A \ • • S 15 16 17 18 19 20 21 22 1 Free Arm Cover Plate 2 Needle Plate 3 Sowing Foot 4 Needle Clamp 5 7nread Guide 6 Light Cover 7 Light Switch 8 Take-up Lever 9 Bobbin winder - Bernina 717 | Manual - Page 5
Model 717 4 3 10 1112 Or OLRNINA 14 15 19 41 20 21 The various parts of the machine 1 Base Plate 2 Needle Plate 3 Sewing Foot 4 Needle Clamp S Thread Guide 6 Light Cover 7 Light Switch II Take-up Lever 9 Bobbin winder tension 10 Thread Tension Discs and Slot 11 Tension Indicator Window 12 - Bernina 717 | Manual - Page 6
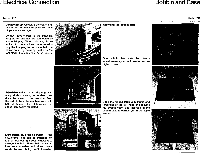
. Removing the bobbin case Bobbin and Case Model 717 rJ Open stitch plate slide. Turn handwheel towards you, until needle reaches highest point. Open the hinged latch with thumb and forefinger of the left hand and remove the bobbin case. The insertion of the bobbin case is carried out in the - Bernina 717 | Manual - Page 7
in motion. Model 707 When :replacing the machine after use, make aura that the hand wheel is next to the compartment for the foot starter. Adjustable motor. It is an advantage with many kinds of sewing to be able to reduce the speed of the machine. Push the switch. Now the machine runs with half - Bernina 717 | Manual - Page 8
top cover to the right and mount the bobbin case. Bobbin winder is now switched on. Correct choice of needle and thread Use only needle system 705 B for the Bernina machine class 707 and 717. Make sure that both needle and thread correspond to the sewing table given above. The usual needle numbers - Bernina 717 | Manual - Page 9
tension (9) and from there - as shown in picture - guide it to the mounted bobbin case. Start the motor by pressing on the foot starter. As soon as there Is enough thread wound, stop motor, remove the bobbin case and push the bobbin winder spindle again to theleft.Re-tighten releasescrew on - Bernina 717 | Manual - Page 10
machine thread guide Bernina has the unique advantage that during normal sewing bobbin Model 707 Darning. Turn control knob (22) to the ' left as far as it will go towards the darning sign. For normal sewing turn kncb to right as far as it will go towards the zigzag and straight stitch sign. Model 717 - Bernina 717 | Manual - Page 11
time, especially when scissors are not close at hand. Only model 107 Filling the geeing table. The sewing table Is secured to the back of the case by a wing-nut which when turned release* the table. When sliding the table on the free arm, make sure that the locking leveris turned to the left - Bernina 717 | Manual - Page 12
: 2 3 4 close to 0 Zigzag sewing If the satin stitch is too dense or too Setting the machine for the zigzag width: open... use knob sewing thread No.30. If a different thread is used then knob 21 may have to be adjusted. Various stitches which can be sewn on the Bernina Class 707 or 717 - Bernina 717 | Manual - Page 13
left elbow on the table even when using the slide-on sewing plate which makes sewing easier. Sit exactly in front of the needle bar. The mastering of your sewing depends only on how you guide the material. The basic rules are therefore: 1. Guide the material as close as possible from the side, and - Bernina 717 | Manual - Page 14
can be set at right or at left for buttonholes, blind hemming, zips, etc. Securing in thick seams (Stitch length not too short.) For normal sewing the needle remains in the centre. Before stitching in reverse always leave 13 the needle completely down in the ma- terial, then move lever to - Bernina 717 | Manual - Page 15
width according to work and material. Finishing Edges Zigzag: 212/ -4 Stitch length: 1 -2 Needle position: centre Automatic: zigzag VWWWV Drop feed control: sewing If you guide the work like this: From the front, close to the foot, fingers on the edge, you will easily get a neat finish - Bernina 717 | Manual - Page 16
lever up Stitch length regulator up as far as stop Needle position: centre Mai Automatic: zigzag yr,Awyw Drop feed control: sewing Model 707 only : When embroidering always use the slide- The Bernina satin stitch control gives the correct stitch length (density) for a satin stitch and autoon - Bernina 717 | Manual - Page 17
Needle position: centre Automatic: zigzag WMANV Drop feed control: sewing Single turned-In hems Zigzag: 3 Stitch length: Double turned guided easily. Important ti Hold the thread slightly taut while sew- ing and the Jersey will not stretch so much. The thread can also be guided - Bernina 717 | Manual - Page 18
Patching Jersey Zigzag: about 3 Stitch length: 1-112/ Needle position: centre Automatic: zigzag WNWVV Drop teed control: sewing Baste the new piece on to the right side of the work, then sew it on, first Whenever possible make the patches in round shapes. with the zigzag just covering the - Bernina 717 | Manual - Page 19
. Flat Seam - Cotton Jersey Under/MN 1st run: join up at one presser foot width. Zigzag: 1 Stitch length: 1-1'/2 2nd run: press seam open and sew over it on right side. Zigzag: 3 Stitch length: 1-1V2 To finish off cut the remaining material. Hold the scissors correctly. Gusset Seam 1st ►un - Bernina 717 | Manual - Page 20
: 1 Needle position: centre Automatic. Blindstitch Drop feed control: sewing Place folded edge to the left as for quick seam. Elastic zigzag. Hold the The easiest way when sewing Jer- scissors correctly. sey is to gather it up first, sewing long straight stitches, then draw the under - Bernina 717 | Manual - Page 21
Zigzag: about 112/ -2 Stitch length: about 14/ -72 Needle position: centre Automatic: zigzag 1,AAWAN Drop feed control: sewing Prepare and press turnings. Sew zigzag over this pressed edge as for oversewing. (Guide work as for oversewing.) Finally trim away turnings. Hold scissors correctly. - Bernina 717 | Manual - Page 22
the elastic too much. ti .-.3rW•4r Gathering material Zigzag: 2 Stitch length: 2 (for heavy fabrics up to 4) Needle position: centre Drop feed control: sewing Automatic: zigzag MOM Pearl Cord The pearl cord is threaded through the hole of the embroidery foot (as with elastic thread) and - Bernina 717 | Manual - Page 23
length: about 212/ Needle position: right Drop feed control: sewing Automatic: Blindstitch Setting for sheer fabric Zigzag: about 112/ Stitch /2 Needle position: centre Oversew and prepare the hem as diagram, baste with machine or by hand 1/4 " from edge and press. Blind hem stitch This - Bernina 717 | Manual - Page 24
foot Zigzag: Stitch length: Automatic: 11/ 2 -2 1-11/2 zigzag VWWVW Needle: 80-70 Thread: 50 Do not cut off damaged part but baste the new patch on right side of work, and sew it on with a small zigzag. C. 2nd run C Zigzag. 4 Stitch length: close to 0 Automatic: Running stitch Now - Bernina 717 | Manual - Page 25
and very elastic fabrics like Helanca ®, Crimplene, etc. Zigzag: 1-1'/2 Stitch length: 1/2 -'/3 Automatic: Stretch seam Needle position: centre Drop feed control: On sewing Sew tacked seam. (Lay the work under the presser foot in such a way that the somewhat wider zigzag stitch is directed - Bernina 717 | Manual - Page 26
the left side of the foot. (Holding the work taut from the front and rear ensures correct guiding.) The magic needle has two eyes, one above the other. The lower eye is threaded for regular sewing. For basting, thread the upper eye. Choose stitch length according to material and work, not too - Bernina 717 | Manual - Page 27
80-70 Thread: 30 or 50 ffr, For sewing a buttonhole, thread bottom cotton through hole in finger of bobbin case. 1 23 f/// -P. 0 -19 0 21 be felt. Zigzag 1,75 (Spring setting) Sewing the Buttonhole Set the required buttonhole length with the guide on the buttonhole foot. Move needle downwards - Bernina 717 | Manual - Page 28
for the first bead. Finish first bead with needle in work and to right of the cord and lift foot. How to sew the buttonhole with reinforcing cord Set machine. Lower needle to the raised foot and make sure that it is in the centre. If not do one stitch by turning - Bernina 717 | Manual - Page 29
stitching will draw little holes at the ends. Beginners may prefer the L or M movement. Take care not to get circles. Frequent thread breaking - work guided irregularly. Poor stitch (looping on top) - work moved too quickly. Darning When wrong side of work is " grainy" work moved too slowly. How - Bernina 717 | Manual - Page 30
Darning fine socks Model 707 only Small darning foot Needle: 80-70 Thread: 50 Darning fine socks (also sleeves) Zigzag: Stitch length: 0 Automatic: straight stitch Needle position: centre Drop feed control: lowered Place the darning ring on the free arm (stud of its shank in hole on right - Bernina 717 | Manual - Page 31
work to and fro on the machine, but hold it taut whileyou guide. When applying the wool bear the following points in mind: Model 707 only - Do not make too work again as before. Now sew across 4n. the new wool threads with a zigzag. The Model 707 only zigzag rows should not overlap nor lie - Bernina 717 | Manual - Page 32
hole. Then lower usually the same, with the exception of presser foot. decorative buttons. Every zigzag presser foot can be used for button sewing. However, those who sew buttons on often will find the button presser foot superior. The wide gap in front allows a clear view. Turn hand wheel until - Bernina 717 | Manual - Page 33
side from top to bottom, once with the needle position right and once with the needle position left. Hint: The easiest way to insert a zip Sew seam first with a very long straight stitch or basting stitch, then press open. (Damp if necessary.) Finish the edges then unpick the seam. (When stitches - Bernina 717 | Manual - Page 34
for top thread only; and normal sewing thread for the bobbin. a Needle: 90 Zigzag: 2 sew always apart and cut through the threads. lay the thread sideways under the presser foot. \-\ When tacking by hand one works directly alongside the pattern. It is to be recommended when working by machine - Bernina 717 | Manual - Page 35
Mark the corners this way .. .. and the darts like this Tailor tacking - Bernina 717 | Manual - Page 36
sewing To begin sewing: Fold edge of fabric twice (not too wide). Lay work under the presser foot and sew a few stitches. 11; How to guide presser foot. When gUiding fabric hold it taut and lift it slightly. The edge of the fabric must be vertical and run through the machine In a straight line - Bernina 717 | Manual - Page 37
taut draw it towards you and lay the end under the needle. Stick the needle in and lower foot. Shell hemmer Needle: 80-70 Mercerised sewing thread No. 50 Zigzag: 4 Stitch length: 21/2-3 Automatic: zigzag WANVVV Needle position: centre Drop feed control - Bernina 717 | Manual - Page 38
underneath projects by 3 mm ('/e"). Fold overlapping piece over the top p€ece and slide it under the presser foot. Sew a few stitches. Leave need€e in the fabric, lift presser foot and guide fabric into the foot. When sewing make sure that the same width of material enters the feller all the time - Bernina 717 | Manual - Page 39
Zigzag: 0 Stitch length: 1112_4 Automatic: straight stitch Needle position: centre Drop feed control: sewing The flat piece of material is inclined to slip out of the slot. In order to avoid this the work should be guided as shown in the illustration, by holding the lower piece with the left - Bernina 717 | Manual - Page 40
length: Satin Stitch Important: The machine feeds automatically but only in a straight line. For the frame and the dom of movement. best possible free- Cover the cut edge on the right side with Satin Stitch. Sew corners and small curves the work must be guided by hand i. e. the frame or - Bernina 717 | Manual - Page 41
edge uncovered. zigzag stitches. Where a straight This will be covered again by the next 1. Only this part of the applique ma- stitch has been used leave 12/ cm part. terial should be tacked on. Sew (1/8") beyond stitches. around: Where the colours overlap use straight stitch and zigzag the Top - Bernina 717 | Manual - Page 42
moves over a seam already embroidered. By guiding the work close to the foot and made). 1,' ',1"r"I l Satin Stitch corners Borders for table-cloths, table-napkins, doilies, etc. 1. Open corner: Sew d) During sewing turn the zigzag again slowly onto 4; sew slowly I Note: The machine feeds in - Bernina 717 | Manual - Page 43
of the foot. In tinue sewing. Cut surplus material away carefully. this way the yarn is joined exactly to the edge. Make the corner in the same way as with the wide border. 2nd run: Zigzag: Th-3 Stitch length: 1-1'h Oversew edge with zigzag. At the same time guide through pearl cord (No - Bernina 717 | Manual - Page 44
middle thread on the other. Adjustment (Wind third thread on a bobbin and place it on the left hand upper thread Automatic: As desired pin beneath other spoole.) Needle position: centre Drop feed control: Sewing Double needle Zigzag: 21/2 Stitch length: Y4-1 (according to - Bernina 717 | Manual - Page 45
together, but bring them singly from take-up lever to CY the needles. - The gimp is threaded like this: model 717 The quickest way to set up the machine for pintucking Insert bobbin case. (Do not bring up lower thread yet.) Insert and thread the The gimp is threaded like this : twin needle - Bernina 717 | Manual - Page 46
as a border (e. g. for a stole). A very attractive effect is brought about if a double metallic thread is led through the hole in the embroidery foot. Method Sew first row of stitching. Leave tip of needle in work, turn and sew second row (the needle will then pierce holes of first row on one side). - Bernina 717 | Manual - Page 47
exactly into the holes of the first seam, do not hold back work. Zigzag Hemstitching Zigzag: 13/4 Stitch length: 13/4 Automatic: zigzag VWWVVV Sew the first side of the hemstitch row of embroidery. Just pierce the last left stitch, then turn back the hand wheel again and raise the - Bernina 717 | Manual - Page 48
carried out without a foot. Important: Lower the foot lever just the same as usual, otherwise the Guiding bobbin case the work will run more smoothly (as with button- hole sewing). Method Bring up the bottom thread through the material, sew : Allow the machine to run write with it. - Bernina 717 | Manual - Page 49
hole is pitted by b) if thread remnants are under the needle and needs repolishing. (Bring bobbin case tension spring. free arm cover plate, resp. needle plate to authorized Bernina dealer.) 7. Machine runs slowly g) hook point is damaged (call authoriz- a) Motor does not function properly ed - Bernina 717 | Manual - Page 50
707 Jc._.A=,..,•.i?..,,,7 • , . . , -. 1c. a e • • -.\ glumal.a.:12 11-S a ACM !re- , Oil the machine freguerdly but not too Cleaning the machine. During sewing of the machine. The main oiling points under the free arm cover. To take on the open arm corer Remove sewing foot and needle - Bernina 717 | Manual - Page 51
the hook. Remove Alter cleaning pour a low drops of oil bobbin case. With the forefinger of the Into the shuttle race. Insert a precautionary measure. Re- 'art -Ws place arm cover and -e-scree: tightly. When the bobbin r . - elect the hinged shuttle Govt., .r /A I Now the hook can be taken - Bernina 717 | Manual - Page 52
Wawa use and removed from time to time so that the not afterwards. Use clear sewing ma- sewing nun can be cleaned away. chine oil only. free from resin and acid. Obtainable at all Bernina dealers Proper oiling of the machine assures its free running and long life. All the oiling points on the - Bernina 717 | Manual - Page 53
oiling L V Remarks Bernina Dealer's notes regarding instructions, home calls and possible guarantee work Date Notes Cleaning and oiling the hook. Tilt head Alter cleaning pour a lew drops of oil of machine to the back. Remove bobbin into tho shuttle race. Insert the shuttle case. With thumb - Bernina 717 | Manual - Page 54
lw Address of my Bernina agency: ENO N
-
 1
1 -
 2
2 -
 3
3 -
 4
4 -
 5
5 -
 6
6 -
 7
7 -
8
-
9
-
10
-
11
-
12
-
13
-
14
-
15
-
16
-
17
-
18
-
19
-
20
-
21
-
22
-
23
-
24
-
25
-
26
-
27
-
28
-
29
-
30
-
31
-
32
-
33
-
34
-
35
-
36
-
37
-
38
-
39
-
40
-
41
-
42
-
43
-
44
-
45
-
46
-
47
-
48
-
49
-
50
-
51
-
52
-
53
-
54
 |
 |
My
BERNINA
Guide
707
717