Binatone Focus 360 User Guide
Binatone Focus 360 Manual
 |
View all Binatone Focus 360 manuals
Add to My Manuals
Save this manual to your list of manuals |
Binatone Focus 360 manual content summary:
- Binatone Focus 360 | User Guide - Page 1
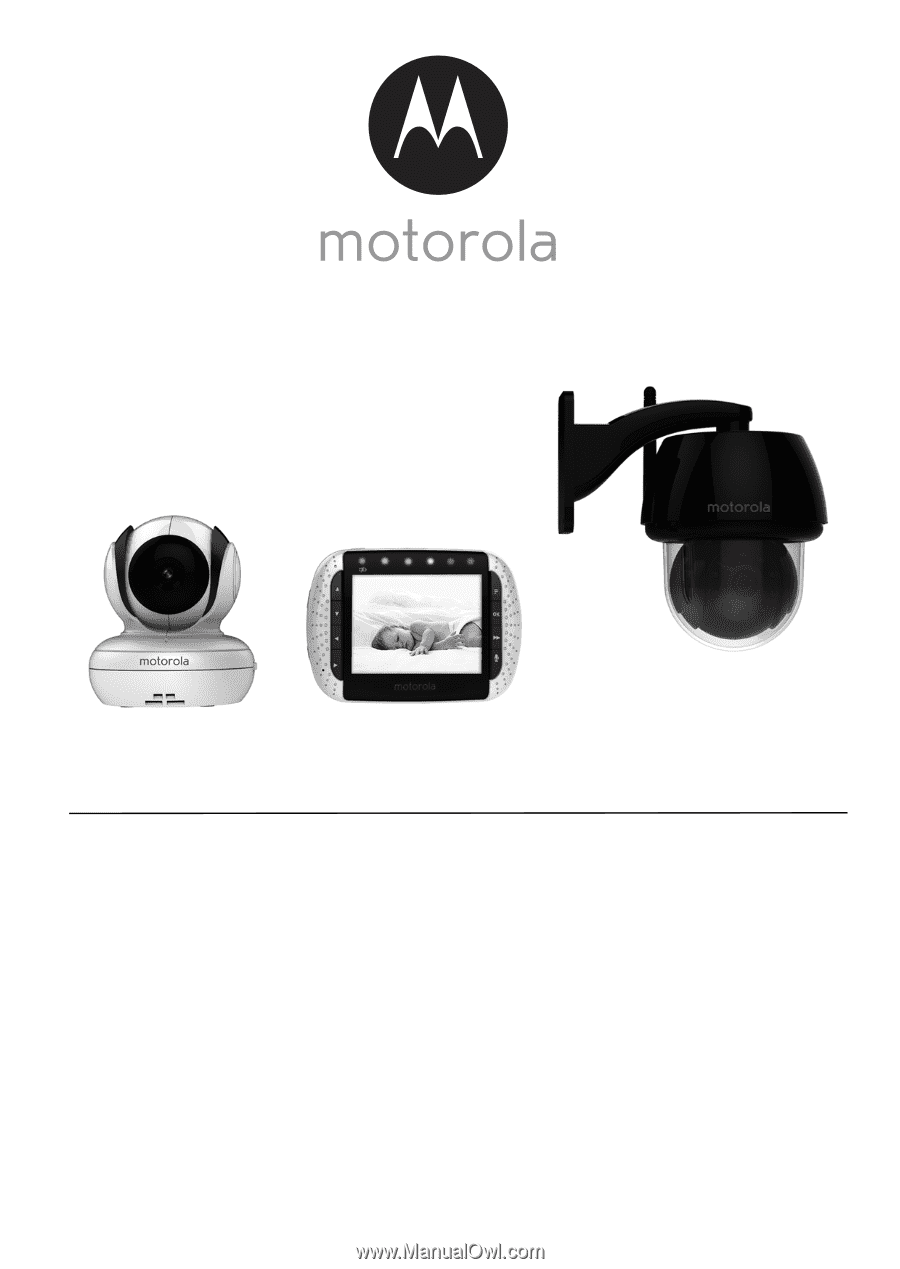
User's Guide Digital Video Monitor with Indoor and Outdoor Camera Units Model: FOCUS360 The features described in this User's Guide are subject to modifications without prior notice. - Binatone Focus 360 | User Guide - Page 2
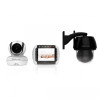
another location. Please read the Safety Instructions on page 7 before installation. Got everything? • 1 x Monitor Unit • 1 x Indoor Camera Unit • 1 x Outdoor Camera Unit • 1 x Rechargeable Ni-MH Battery Pack for the Monitor Unit • 1 x Power adapter for the Monitor Unit • 1 x Power adapter for the - Binatone Focus 360 | User Guide - Page 3
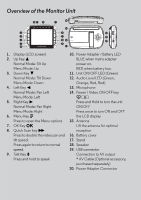
Overview of the Monitor Unit 14 POWER 10 11 12 1 15 2 6 19 3 7 18 4 8 16 20 5 9 13 17 1. Display (LCD screen) 2. Up Key + 10. Power Adapter / Battery LED BLUE when - Binatone Focus 360 | User Guide - Page 4
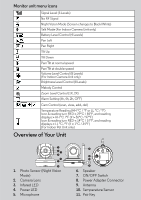
Monitor unit menu icons 1 Signal Level (5 Levels) No RF Signal Night Vision Mode (Screen changes to Black/White) T Talk Mode (For Indoor Camera Unit only) Battery Level Control (4 Levels) Pan Left Pan Right Tilt Up Tilt Down Pan/Tilt at normal speed Pan/Tilt at double speed Volume - Binatone Focus 360 | User Guide - Page 5
by environmental conditions. • Any large metal object, like a refrigerator, a mirror, a filing cabinet, metallic doors or reinforced concrete between the Camera and Monitor Unit may block the radio signal. • The signal strength may also be reduced by other solid structures, like walls, or by - Binatone Focus 360 | User Guide - Page 6
Table of contents 1. Safety Instructions 7 2. Getting Started 12 2.1 Indoor Camera Unit Power Supply 12 2.2 Monitor Unit Battery Installation 12 2.3 Monitor Unit Power Supply 13 2.4 Outdoor Camera Unit Installation 14 2.4.1 Mounting the Outdoor Camera Unit 15 2.5 Registration (Pairing 17 2.6 - Binatone Focus 360 | User Guide - Page 7
indicates that there are important operating and maintenance (servicing) instructions in the literature accompanying the unit. WARNING: VOLTAGES used to monitor infants or children, keep the unit and adapter cord more than 3 feet from the crib and out of their reach. Never place camera or cords - Binatone Focus 360 | User Guide - Page 8
a toy. Do not allow children or pet(s) to play with it. • This digital video monitor is not a substitute for responsible supervision and interaction. • Keep this User's Guide for future reference. • Do not place the Indoor Camera Unit or cables in the crib or within reach of the pet (the unit should - Binatone Focus 360 | User Guide - Page 9
consult your camera dealer or local power company. For products intended to operate from battery power, or other sources, please refer to the operating instructions indicates damage or deteriorated insulation, have it replaced by your service technician. • Power-Cord Protection - Power supply cords - Binatone Focus 360 | User Guide - Page 10
designed service monitors camera equipment may fall, causing serious damage to the product. Use this product only with a cart, stand, tripod, bracket, or table recommended by the manufacturer or sold with the product. Any mounting of the product should be according to the manufacturer's instructions - Binatone Focus 360 | User Guide - Page 11
its compliance prior to installation. • Mounting - The cameras provided with this system should be mounted only as instructed in this guide or the instructions that came with your cameras, using the supplied mounting brackets. • Camera Installation - Cameras are not intended for submersion in water - Binatone Focus 360 | User Guide - Page 12
the small plug of the power adapter to the Indoor Camera Unit and the other end to the electrical outlet. NOTE 3. Slide the ON/OFF switch to the OFF position to turn the Indoor Camera Unit off. 2.2 Monitor Unit Battery Installation Black Red 1. Insert the wire tab of the rechargeable battery pack - Binatone Focus 360 | User Guide - Page 13
, the video display will go off and will be shown on the LCD display, and the unit will beep every 5 seconds. Move the Monitor unit closer to the Indoor Camera Unit until the link is re-established. 5. Press and hold the P POWER ON/OFF button, until the progress bar finishes scrolling, to - Binatone Focus 360 | User Guide - Page 14
line-of-sight to a strong light source or direct sunlight. • Before starting permanent installation, verify the Camera Unit's performance by observing the image on a monitor when the Camera Unit is positioned in the same location/position where it will be permanently installed. • Avoid letting power - Binatone Focus 360 | User Guide - Page 15
accessory pack (4 mounting screws and drywall plugs, 1 tamperproof screw, 1 metal bracket, 1 wrench key) and follow the process below for installing the Outdoor Camera Unit. *Not for use in direct exposure to water, rain or snow. 1. Mark the position of the screw holes on the wall. 2. Drill - Binatone Focus 360 | User Guide - Page 16
Unit to the mounting plate at the center hole with the tamper-proof screw with the wrench key provided. 6. Plug the Camera Unit's power adapter into the cord on the camera and then plug the adapter into the electrical outlet. NOTE Only use the enclosed power adapter (5.9V DC / 1000mA). 16 Getting - Binatone Focus 360 | User Guide - Page 17
. You do not need to register it again unless the Indoor Camera Unit loses its link with the Monitor Unit. To re-register your Indoor Camera Unit, or register a new Indoor Camera Unit, follow the procedure below: 1. Press the M button of the Monitor unit and the menu bar will pop up. 2. Press the - Binatone Focus 360 | User Guide - Page 18
, try moving the units to different locations, and ensure they are not close to other electrical equipment. 3.2 Pan and Tilt The camera can be remotely controlled from the Monitor unit. 1. Press the + UP button or - DOWN button to tilt upward or downward. 2. Press the < LEFT button or > RIGHT button - Binatone Focus 360 | User Guide - Page 19
to turn the LCD display on or off, but will still leave the audio monitor on. 3.6 Temperature Display (HH °C / °F or LL °C / °F) (For Indoor Camera Unit only) The temperature reading from the temperature sensor at the back of the Indoor Camera Unit will be displayed at the top of the LCD screen. The - Binatone Focus 360 | User Guide - Page 20
4. Monitor Unit Menu Options 4.1 Volume (For Indoor Camera Unit only) 1. Press the M button and the menu bar will pop level from level 1 ~ 8. (The default brightness level setting is level 4.) 4.3 Melody (For Indoor Camera Unit only) 1. Press the M button and the menu bar will pop up. 2. Press the < - Binatone Focus 360 | User Guide - Page 21
Press and hold the PAIR button underneath the Indoor Camera Unit until the Monitor unit finds the camera, beeps and the picture from the camera appears. NOTE A camera can only be registered to one Monitor unit at any one time. 4.6.2 View a camera 1. Press the M button and the menu bar will pop - Binatone Focus 360 | User Guide - Page 22
. 4.6.3 Delete a camera 1. Press the M OK button to delete that registration. 4.6.4 Scan camera 1. Press the M button and the menu cameras in a loop of 1 / 2 / 3 / 4, changing about every 12 seconds. TIP Quick Method to View Cameras 4.7 Temperature (For Indoor Camera Unit only) 1. Press the - Binatone Focus 360 | User Guide - Page 23
with normal household waste. Take this product to a collection point for the recycling of electrical and electronic equipment. The symbol on the product, user's guide and/or box indicates this. Some of the product materials can be reused if you take them to a recycling point. By reusing some parts - Binatone Focus 360 | User Guide - Page 24
product which is not covered by the warranty. • Keep your Digital Video Monitor away from hot, humid areas or strong sunlight, and don't let it get Video Monitor. However, if something does go wrong, please do not try to repair it yourself -- contact Customer Service for assistance. 24 Cleaning - Binatone Focus 360 | User Guide - Page 25
power, then plug them back in. • Is the unit turned on? Press and hold the ON/OFF key on the Monitor unit to turn it ON. • Is the correct camera selected? Change the camera number, if necessary. • Is the video display turned on? Press the VIDEO ON/OFF key to turn it on - Binatone Focus 360 | User Guide - Page 26
may be out of range, move the Camera Units closer to the Monitor unit. • Make sure the Camera and Monitor units are not near other electrical equipment, such as a television, computer or cordless/mobile telephone. • Use of other 2.4 GHz products, such as wireless networks (Wi-Fi® routers), Bluetooth - Binatone Focus 360 | User Guide - Page 27
is not working properly.... 1. Read this User's Guide or the Quick Start Guide. 2. Contact Customer Service: US and Canada 1-888-331-3383 Email: [email protected] To order a replacement battery pack, contact customer service. Consumer Products and Accessories Limited Warranty ("Warranty") Thank - Binatone Focus 360 | User Guide - Page 28
What Other Limitations Are There? ANY IMPLIED WARRANTIES, INCLUDING WITHOUT LIMITATION THE IMPLIED WARRANTIES OF MERCHANTABILITY AND FITNESS FOR A PARTICULAR PURPOSE, SHALL BE LIMITED TO THE DURATION OF THIS LIMITED WARRANTY, OTHERWISE THE REPAIR OR REPLACEMENT PROVIDED UNDER THIS EXPRESS LIMITED - Binatone Focus 360 | User Guide - Page 29
ENGLISH Products Covered Length of Coverage Consumer Products One (1) year from the date of the products original purchase by the first consumer purchaser of the product. Consumer Accessories Ninety (90) days from the date of the accessories original purchase by the first consumer - Binatone Focus 360 | User Guide - Page 30
Service or Other Information? To obtain service or information, please call: US and Canada 1-888-331-3383 Email: [email protected] You will receive instructions ; (d) a written description of the problem; and, most importantly; (e) your address and telephone number. These terms and conditions - Binatone Focus 360 | User Guide - Page 31
designed to provide reasonable protection against harmful interference in a residential installation. This equipment generates, uses and can radiate radio frequency energy and, if not installed and used in accordance with the instructions . • Consult the dealer or an experienced radio/TV technician - Binatone Focus 360 | User Guide - Page 32
aux deux conditions suivantes : (1) l'appareil ne doit pas produire de brouillage, et (2) l'utilisateur de l'appareil doit accepter tout brouillage radioélectrique subi, même si le brouillage est susceptible d'en compromettre le fonctionnement. This Class B digital apparatus complies with Canadian - Binatone Focus 360 | User Guide - Page 33
f 2.5mm, F 1.8 8 pcs Adapter: BLJ5W059100P; Input: 100-240V, 50/60Hz 150mA; Output: 5.9V, 1000mA WARNING Use only with provided power supply. Outdoor Camera Unit (Model: FOCUS360CU) Frequency Image sensor Lens IR LED Power 2.4 GHz to 2.48 GHz Color CMOS 0.3M Pixels f 2.5mm, F 2.0 8 pcs Adapter - Binatone Focus 360 | User Guide - Page 34
Monitor unit (Model: FOCUS360PU) Frequency Display Display color Brightness control Volume control 1.2V 900mAh rechargeable battery pack WARNING Do not use non-rechargeable batteries for the Monitor Unit. Risk of explosion if battery is replaced by an incorrect type. Dispose of used batteries according - Binatone Focus 360 | User Guide - Page 35
Manufactured, distributed or sold by Binatone Electronics International LTD., official licensee for this product. MOTOROLA and the Stylized M Logo, are trademarks or registered trademarks of Motorola Trademark Holdings, LLC. and are used under license. All other trademarks are the property of their
-
 1
1 -
 2
2 -
 3
3 -
 4
4 -
 5
5 -
 6
6 -
 7
7 -
8
-
9
-
10
-
11
-
12
-
13
-
14
-
15
-
16
-
17
-
18
-
19
-
20
-
21
-
22
-
23
-
24
-
25
-
26
-
27
-
28
-
29
-
30
-
31
-
32
-
33
-
34
-
35
 |
 |
User's Guide
Digital Video Monitor with Indoor
and Outdoor Camera Units
Model: FOCUS360
The features described in this User's Guide are subject to modifications without prior notice.