Binatone Focus 360 User Guide - Page 15
Mounting the Outdoor Camera Unit
 |
View all Binatone Focus 360 manuals
Add to My Manuals
Save this manual to your list of manuals |
Page 15 highlights
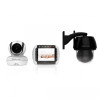
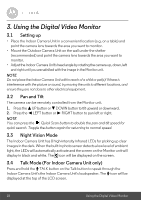
ENGLISH 2.4.1 Mounting the Outdoor Camera Unit The Camera Unit is built with durable aluminum, weather resistant housing* so you can use it outdoors in almost any weather condition. Use the provided wall mounting accessory pack (4 mounting screws and drywall plugs, 1 tamperproof screw, 1 metal bracket, 1 wrench key) and follow the process below for installing the Outdoor Camera Unit. *Not for use in direct exposure to water, rain or snow. 1. Mark the position of the screw holes on the wall. 2. Drill 4 holes and hammer the drywall plugs (included) into the holes as needed. 3. Fasten the mounting plate on the wall with the 4 provided Philips head screws. Getting Started 15
-
 1
1 -
2
-
3
-
4
-
5
-
6
-
7
-
8
-
9
-
 10
10 -
 11
11 -
 12
12 -
 13
13 -
 14
14 -
 15
15 -
 16
16 -
 17
17 -
 18
18 -
 19
19 -
 20
20 -
21
-
22
-
23
-
24
-
25
-
26
-
27
-
28
-
29
-
30
-
31
-
32
-
33
-
34
-
35
 |
 |

Getting Started
15
ENGLISH
2.4.1
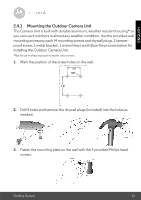
Mounting the Outdoor Camera Unit
The Camera Unit is built with durable aluminum, weather resistant housing* so
you can use it outdoors in almost any weather condition. Use the provided wall
mounting accessory pack (4 mounting screws and drywall plugs, 1 tamper-
proof screw, 1 metal bracket, 1 wrench key) and follow the process below for
installing the Outdoor Camera Unit.
*Not for use in direct exposure to water, rain or snow.
1.
Mark the position of the screw holes on the wall.
2.
Drill 4 holes and hammer the drywall plugs (included) into the holes as
needed.
3.
Fasten the mounting plate on the wall with the 4 provided Philips head
screws.