Bissell PowerSteamer PowerBrush Select Deep Cleaning System 1623 User Guide - Page 10
Ready Tools™
 |
View all Bissell PowerSteamer PowerBrush Select Deep Cleaning System 1623 manuals
Add to My Manuals
Save this manual to your list of manuals |
Page 10 highlights
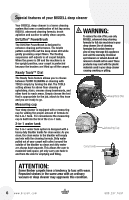
Operation Ready Tools™ 5. Vacuum thoroughly to pick up loose debris and pet hair. Use a vacuum with a brush attachment and a crevice tool to clean in fabric folds and tufts. 6. To begin cleaning with attachments, follow the instructions on pages 7-8 for filling the 2-in-1 water tank. 7. Set the ReadyTools dial to the TOOLS setting. This will allow spray and suction from the hose. 8. Attach the cleaning tool to the end of the hose. 9. Clean by pressing the trigger to spray solution onto the area to be cleaned. Slowly move the tool back and forth over the soiled surface. Release the trigger to suction dirty water. Continue to clean in the area, working in small sections, until dirt is removed. Caution: Do Not Overwet. 10. When finished cleaning, remove and rinse tool(s) in clean, running water. 11. It is recommended that you suction clean water from a bowl to rinse out the hose. 12. Before wrapping hose onto tool rack, lift end of hose and stretch out to ensure all water is cleared from hose. 13. Wrap flex hose around tool rack. 14. Empty 2-in-1 water tank and rinse out, following instructions on page 9. 15. If the ReadyTools dial becomes difficult to turn, the diverter assembly that holds the dial may need to be cleaned. To clean, first remove nozzle and locate screw that holds the diverter assembly in place. With a Phillips screwdriver, remove the screw and set aside. 16. Remove diverter assembly; hold under running water making sure water flows through and around the dial. Turn the dial about 10 times clockwise and 10 more times counter clockwise. This should free up any debris. 17. Wipe diverter assembly with a soft cloth and replace back on machine. Replace nozzle. 18. Return ReadyTools dial to FLOOR CLEANING setting. 160 w w w . b i s s e l l . c o m Tip: To clean with sliding crevice tool, slide brushes forward to clean stain, slide back to suction 7. 12. Run water through here 15. 16. Screw 800.237.7691
-
 1
1 -
2
-
3
-
4
-
 5
5 -
 6
6 -
 7
7 -
 8
8 -
 9
9 -
 10
10 -
 11
11 -
 12
12 -
 13
13 -
 14
14 -
 15
15 -
16
 |
 |
