Blendtec Total Blender Classic FourSide Owners Manual - Page 6
Installation, Operational Overview
 |
View all Blendtec Total Blender Classic FourSide manuals
Add to My Manuals
Save this manual to your list of manuals |
Page 6 highlights
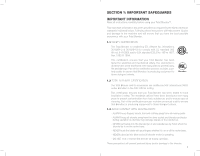
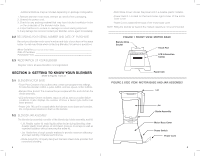
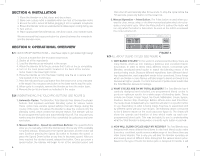
SECTION 4: INSTALLATION 1. Place the blender on a flat, clean, and dry surface. 2. Make sure a plug outlet is available within two feet of the blender motor. 3. Ensure the unit is turned off before plugging it into a separate receptacle. 4. Ensure that blender vents are unobstructed to allow proper cooling during use. 5. Turn unit on. 6. Place appropriate filled blender jar, with lid in place, onto blender base. We recommend that surge protection be placed between the receptacle and the blender motor. SECTION 5: OPERATIONAL OVERVIEW 5.1 QUICK RECIPE INSTRUCTIONS - Use these steps to get started right away! 1. Choose a recipe from the included recipe book. 2. Gather all of the ingredients. 3. Load the blender jar as indicated in the recipe. 4. Attach the blender lid to the jar; ensure that it sits on the jar completely. 5. Turn on the main power switch located on the back of the blender motor base in the lower right corner. 6. Place the blender jar onto the base, making sure the jar is secure and fully seated on the motor base. 7. Press the indicated touch pad button from the recipe once (or as indicated in the recipe). You may press any button on the lower row to stop the cycle. 8. When cycle is complete, remove the blender jar from the motor base. 9. Remove the jar lid and serve as indicated in the recipe. 5.2 UNDERSTANDING THE TOUCHPAD BUTTONS (SEE FIGURE 3) 1. Automatic Cycles: The Blendtec Total Blender has labeled touchpad buttons that represent automatic blending cycles for various needs. These cycles have variable speed settings that will change during the course of the cycle. This allows the blender to draw the contents into the blending vortex, which creates the desired texture. The blender will run its pre-programmed cycle and automatically shut off. If at any point you want to stop the blender before it has completed its cycle press any lower row button. 2. Manual Operation - Speed Up and Down Buttons: The speed buttons allow you to manually control the blender and choose any of the available 10 speed settings. Simply press the Speed Up button and the motor will start. Continue pressing the Speed Up button to increase the speed, or press the Speed Down button at any time to decrease speed. After you have reached the desired speed, release the button. Once you press a speed button, the blender will begin to run at the selected speed, and 6 then shut off automatically after 50 seconds. To stop the cycle before the 50 seconds, press any button on the lower row. 3. Manual Operation - Pulse Button: The Pulse button is used when you want to chop, mince, whip, or do other momentary tasks which do not require a long blend cycle. When the Pulse button is pushed the motor will run only while the button is held down. As soon as the button is released the motor will shut off. FIGURE 3 5.3 ALL ABOUT BLEND CYCLES (SEE FIGURE 4) 1. WHY BLEND CYCLES? In the world of professional blending, there are many factors which go into making a delicious and consistent blended product. In order to blend many different recipes consistently well, Blendtec developed blend cycles to match the blending needs of the product being made. Because different ingredients have different blending characteristics, each ingredient needs to be considered. Some things which are thicker or more fibrous will take longer to blend and need to be blended at higher speeds. It is from that world of professional results that the Total Blender derives its heritage. 2. WHAT CYCLES ARE ON MY TOTAL BLENDER? The Total Blender has 6 carefully designed and selected, pre-programmed blend cycles to produce optimum results for a wide range of blending tasks. These include Ice Cream, Frozen Yogurt, Ice Crush, Milkshakes, Soups, Syrups, Fondues, Sauces, Dips, Dressings, Batters, Whole Juice, and Smoothies. The recipe book included with your machine will refer to a specific button to use, depending on what is being made. Feel free to experiment and try different cycles with your own recipes. The following charts correspond to the 6 buttons above on the touch pad (see figure 4). The charts will show the speeds and duration of time which make up each preprogrammed blend cycle. This may be helpful to you in understanding what the Total Blender is doing when a specific cycle button is pushed. 3. HOW WILL BLEND CYCLES HELP MY RECIPES? The Total Blender was designed with many different food items in mind and blend cycles make it produce consistent results across a wider range of food items than any other home blender. This is why you will hear the blender speeding up and slowing down at different times throughout the various blend cycles. Based on the type of foods the blend cycle is designed to handle, it will 7
-
 1
1 -
 2
2 -
 3
3 -
 4
4 -
 5
5 -
 6
6 -
 7
7 -
 8
8 -
 9
9 -
 10
10 -
 11
11
 |
 |
