Bosch HMV9302 Installation Instructions
Bosch HMV9302 - 1.8 cu. Ft. Microwave Manual
 |
UPC - 825225830412
View all Bosch HMV9302 manuals
Add to My Manuals
Save this manual to your list of manuals |
Bosch HMV9302 manual content summary:
- Bosch HMV9302 | Installation Instructions - Page 1
Over-the-Range Microwave Installation Instructions For Models: HMV9302, HMV9305, HMV9306, HMV9307 PLEASE READ ENTIRE INSTRUCTIONS BEFORE PROCEEDING IMPORTANT: Save these instructions for the local electrical inspector's use. INSTALLER: Please leave these Installation Instructions with this unit for - Bosch HMV9302 | Installation Instructions - Page 2
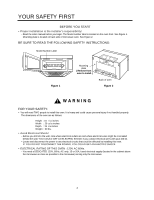
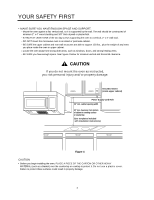
• Proper installation is the installer's responsibility! - Read the entire manual before you begin. The Model number label is located on the oven front. See Figure 1. Mounting plate is located on back side of microwave oven. See Figure 2. BE SURE TO READ THE FOLLOWING SAFETY INSTRUCTIONS: Model - Bosch HMV9302 | Installation Instructions - Page 3
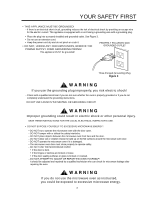
grounding wire with a grounding plug. • Place the plug into a properly installed and grounded outlet. See Figure 3. • Do not use an extension INSTRUCTIONS FOR THE LOCAL ELECTRICAL INSPECTOR'S USE. • DO NOT EXPOSE YOURSELF TO EXCESSIVE MICROWAVE ENERGY! - DO NOT try to operate the microwave oven - Bosch HMV9302 | Installation Instructions - Page 4
LEAST ONE of the two lag screws supporting the oven to a vertical, 2" x 4" wall stud. - DO NOT mount the microwave oven to an island or peninsula cabinet. countertop (Use templates included with installation instructions) Figure 4 CAUTION • Before you begin installing the oven, PLACE A PIECE OF THE - Bosch HMV9302 | Installation Instructions - Page 5
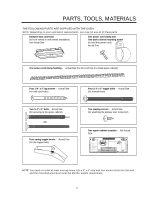
, TOOLS, MATERIALS THE FOLLOWING PARTS ARE SUPPLIED WITH THE OVEN: NOTE: Depending on your ventilation requirements, you may not use all of these parts. Damper/duct connector (for roof vented or wall vented installation) Not Actual Size One power cord clamp and One dark-colored mounting screw - Bosch HMV9302 | Installation Instructions - Page 6
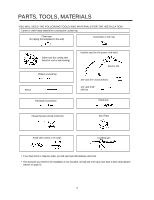
PARTS, TOOLS, MATERIALS YOU WILL NEED THE FOLLOWING TOOLS AND MATERIALS FOR THE INSTALLATION: Carton or other heavy material for covering the hardware and tools. • The ductwork you need for the installation is not included. All wall and roof caps must have a back-draft damper (shown on page 5). - Bosch HMV9302 | Installation Instructions - Page 7
4 Detail. NOTE: The outlet should be on a circuit dedicated to the microwave oven 120V, 60Hz., AC only with a 15 or 20A fused electrical supply. IMPORTANT: If you do not have the proper wall outlet, you MUST have one installed by a qualified electrician. 2. You will cut the power-supply-cord hole - Bosch HMV9302 | Installation Instructions - Page 8
THE VENTING: • Keep the length of the ductwork and the number of elbows to a minimum to ventilate your oven efficiently. See examples on page 9. • Keep the size of the ductwork the same. • Do not install two elbows together. • Use duct tape to seal all joints in the duct system. • Use caulking to - Bosch HMV9302 | Installation Instructions - Page 9
THE VENTING SYSYTEM STANDARD FITTINGS NOTE: If the existing duct is round, you must use a rectangular-to-round adapter, with a rectangular 3" extension duct installed between the damper assembly and the adapter to prevent the exhaust damper's sticking. DUCT LENGTH The total length of the duct system - Bosch HMV9302 | Installation Instructions - Page 10
THE MOUNTING PLATE: 1. Remove any shipping materials and parts from inside the microwave oven. 2. Cover the countertop or cooktop with a thick the grease filters and the power supply cord. ROOF-VENTED INSTALLATION: This oven is shipped assembled for roof-vented. You will need to install the exhaust - Bosch HMV9302 | Installation Instructions - Page 11
INSTALLATION: 1. Remove one blower unit mounting screw and one blower plate screw. Remove the blower plate from cabinet. See Figure 13. 2. Carefully lift the blower unit out of the microwave oven mounting screws Parts "B" blower unit mounting screw Figure 13 Parts "B" Knockout Parts "B" Figure - Bosch HMV9302 | Installation Instructions - Page 12
17 blower unit exhaust ports ROOM-VENTED (Recirculating) INSTALLATION: 1. Remove one blower unit mounting screw and one blower plate screw. Remove the blower plate from cabinet. See Figure 19. 2. Carefully lift the blower unit out of the microwave oven. 3. Rotate blower unit 90˚ so the exhaust - Bosch HMV9302 | Installation Instructions - Page 13
any wall stud, consult a local building contractor. CAUTION DO NOT ATTEMPT TO INSTALL THE MICROWAVE OVEN IF YOU CANNOT FIND A WALL STUD. 3. Line up the plumb line on to the range or counter top is at least 30 inches. See Figure 4 on page 4. 4. Center mounting plate on rear wall installation area by - Bosch HMV9302 | Installation Instructions - Page 14
support for the bolts. See Figure 24. • Mark the center of each filler block and drill a 3/8" diameter hole at the mark. • Align filler blocks over the two openings in the top of the microwave oven cabinet template. • Wall-Vented: go to STEP 5, INSTALL THE MOUNTING PLATE, located on page 16. 5. Use - Bosch HMV9302 | Installation Instructions - Page 15
installation. Use toggle bolts through these holes unless one of them lines up with a stud. Use a lag screw for studs. NOTE: Draw a fifth circle inside area E, through one of the holes to match the location of a stud. For wall-vented: The oven Line D Support Tab E Figure 26 Support Tab 4. - Bosch HMV9302 | Installation Instructions - Page 16
the top locking tabs and in the lower locking tabs. Take care to assure the damper hinge is installed so that it is at the top and that the damper swings freely. • Carefully guide the exhaust adaptor (now attached to the mounting plate) into the house duct, before using the screws to - Bosch HMV9302 | Installation Instructions - Page 17
to lift this microwave. Failure to use more than one person could result in personal injury. 1. Carefully lift microwave oven and hang it on support tabs (See between the upper cabinet and microwave oven is closed. 4. If wall vented or room vented installation is used, go to No.7 on the next - Bosch HMV9302 | Installation Instructions - Page 18
32 7. To install the grease filter: Slide it into the slide slot, duct then push up and toward oven center to lock. See Figure 34. power supply cord clamp 8. Plug in the power supply cord. Figure 33 9. Read your use and care manual, then check the operation of your microwave oven. Figure 34 - Bosch HMV9302 | Installation Instructions - Page 19
Installation Notes - Bosch HMV9302 | Installation Instructions - Page 20
Printed in Korea P/No.: 3828W5U0310
-
 1
1 -
 2
2 -
 3
3 -
 4
4 -
 5
5 -
 6
6 -
 7
7 -
8
-
9
-
10
-
11
-
12
-
13
-
14
-
15
-
16
-
17
-
18
-
19
-
20
 |
 |
Household Appliances
Over-the-Range Microwave
Installation Instructions
For Models: HMV9302, HMV9305, HMV9306, HMV9307
PLEASE READ ENTIRE INSTRUCTIONS BEFORE PROCEEDING
IMPORTANT: Save these instructions for the local electrical inspector’s use.
INSTALLER: Please leave these Installation Instructions with this unit for the owner.
OWNER: Please retain these instructions for future reference.