Bosch HMV9302 Installation Instructions - Page 17
Step 6, Attach The Oven To The Wall
 |
UPC - 825225830412
View all Bosch HMV9302 manuals
Add to My Manuals
Save this manual to your list of manuals |
Page 17 highlights
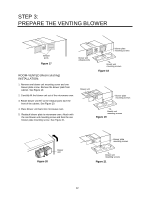
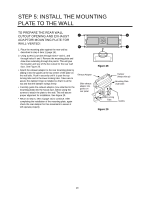
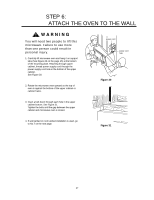
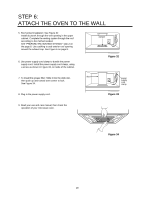
STEP 6: ATTACH THE OVEN TO THE WALL WARNING You will need two people to lift this microwave. Failure to use more than one person could result in personal injury. 1. Carefully lift microwave oven and hang it on support tabs (See Figure 26 on the page 15) at the bottom of the mounting plate. Reaching through upper cabinet, thread power supply cord through the power supply cord hole in the bottom of the upper cabinet. See Figure 30. 2. Rotate the microwave oven upward so the top of oven is against the bottom of the upper cabinet or cabinet frame. power cord power cord hole Figure 30 3. Insert a bolt down through each hole in the upper cabinet bottom. See Figure 31. Tighten the bolts until the gap between the upper cabinet and microwave oven is closed. 4. If wall vented or room vented installation is used, go to No.7 on the next page. Figure 31 17
-
 1
1 -
2
-
3
-
4
-
5
-
6
-
7
-
8
-
9
-
10
-
11
-
 12
12 -
 13
13 -
 14
14 -
 15
15 -
 16
16 -
 17
17 -
 18
18 -
 19
19 -
 20
20
 |
 |
