Bosch SHE68E05UC Installation Instructions - Page 7

Enclosure Requirements - standard

Page 7 highlights

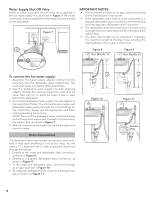
Enclosure Requirements WARNING Avoid Scalding or Electrical Shock Hazard! Make sure the water supply and electrical supply are shut off before installation or service. NOTE: This dishwasher is designed to be enclosed on the top and both sides by standard residential kitchen cabinetry. Select a location as close to the sink as possible for easy access to water supply and drain lines. For proper dishwasher operation and appearance, ensure that the enclosure is square and has the dimensions shown in Figure 1 below. After locating the proper place for your new dishwasher, you will need to make any required openings to allow for passage of the water, drain and electrical line. In order to avoid interference with the dishwasher when sliding it into the cabinet, place your openings within the dimensions shown in Figure 3 below. 90° 2.5" 24" (61cm) (5cm) 4.5"(10cm) 34¼"(86.7cm) 2(63100./016--6214.46/1c6m" ) NOTE: If your dishwasher opening width measures >2315/16 in (60.8cm) use the TOP or SIDE MOUNT mounting methods. If your dishwasher opening width measures

  • 1
  • 2
  • 3
  • 4
  • 5
  • 6
  • 7
  • 8
  • 9
  • 10
  • 11
  • 12
  • 13
  • 14
  • 15
  • 16
  • 17
  • 18
  • 19
  • 20
  • 21
  • 22
  • 23
  • 24
  • 25
  • 26
  • 27
  • 28
  • 29
  • 30
  • 31
  • 32
  • 33
  • 34
  • 35
  • 36
  • 37
  • 38
  • 39

6
Enclosure Requirements
NOTE: This dishwasher is designed to be enclosed on the
top and both sides by standard residential kitchen cabinetry.
Select a location as close to the sink as possible for easy
access to water supply and drain lines.
For proper dishwasher operation and appearance, ensure
that the enclosure is square and has the dimensions shown
in
Figure 1
below.
NOTE: If your dishwasher opening width measures >23
15
/
16
in
(60.8cm) use the TOP or SIDE MOUNT mounting methods.
If your dishwasher opening width measures <23
15
/
16
in
(60.8cm) use the ALTERNATE SIDE MOUNT mounting
method.
If the dishwasher is to be installed in a corner, make sure that
there is adequate clearance to open the door. See
Figure
2
below.
After locating the proper place for your new dishwasher,
you will need to make any required openings to allow for
passage of the water, drain and electrical line. In order to
avoid interference with the dishwasher when sliding it into the
cabinet, place your openings within the dimensions shown
in
Figure 3
below.
Required Openings:
4
1
/
4
” x 2” (108 x 52mm) -
To pass the included electrical
supply junction box through to
an adjacent cabinet
4” x 2” (100 x 50mm) -
To pass the included water sup-
ply line toward the water supply
1
1
/
4
” (32mm) diameter -
To pass the dishwasher
drain hose toward the drain
connection
NOTE: If the incoming electric supply, water supply and
drain connections are all in the same cabinet, the one
4
1
/
4
” x 2” (108 x 52mm) hole will be large enough for all three
to pass through.
Check
clearance
between
dishwasher
door and wall
Countertop
WARNING
Avoid Scalding or Electrical Shock Hazard!
Make sure the water supply and electrical supply are
shut off before installation or service.
Avoid Electrical Shock/Fire Hazard
Do not allow the electrical and water supply lines
to touch.
WARNING
4-1/2"
(114mm)
2-1/2"
(64mm)
90°
24” (61cm)
2.5” (5cm)
34¼”(86.7cm)
4.5”(10cm)
23
10
/
16
- 24
4
/
16
(60.0 - 61.6cm)
Before sliding the dishwasher into the cabinet, remove the
hose clip at the back of the dishwasher as shown.
The hose
clip may be used later to hold the drain hose as shown below.