Bosch SHX68T55UC Instructions for Use - Page 11
Rack Accessories
 |
View all Bosch SHX68T55UC manuals
Add to My Manuals
Save this manual to your list of manuals |
Page 11 highlights
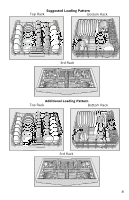
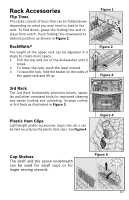
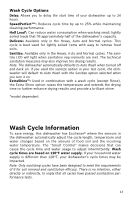
Rack Accessories Flip Tines The racks consist of tines that can be folded down depending on what you may need to load in the rack. To fold down, grasp the folding tine and release from notch. Push folding tine downward to desired position as shown in Figure 1. RackMatic® The height of the upper rack can be adjusted in 3 steps to create more space. 1 Pull the top rack out of the dishwasher until it stops. 2 To lower the rack, push the lever inward. 3 To raise the rack, hold the basket on the sides of the upper rack and lift up. 3rd Rack The 3rd Rack horizontally positions knives, spatulas and other oversized tools for improved cleaning and easier loading and unloading. Arrange cutlery in 3rd Rack as illustrated in Figure 3. Plastic Item Clips Light-weight plastic accessories (cups, lids, etc.) can be held securely by the plastic item clips. See Figure 4. Figure 1 Figure 2 Figure 3 Figure 4 Cup Shelves The shelf and the space underneath can be used for small cups or for larger serving utensils. Figure 5 10
-
 1
1 -
2
-
3
-
4
-
5
-
 6
6 -
 7
7 -
 8
8 -
 9
9 -
 10
10 -
 11
11 -
 12
12 -
 13
13 -
 14
14 -
 15
15 -
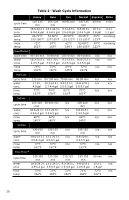 16
16 -
17
-
18
-
19
-
20
-
21
-
22
-
23
-
24
-
25
-
26
-
27
-
28
-
29
-
30
-
31
-
32
-
33
-
34
-
35
-
36
-
37
-
38
-
39
-
40
-
41
-
42
-
43
-
44
-
45
-
46
-
47
-
48
-
49
-
50
-
51
-
52
-
53
-
54
-
55
-
56
-
57
-
58
-
59
-
60
-
61
-
62
-
63
-
64
 |
 |
