Bose Aviation Headset X Owner's guide - Page 12
Clothing clip, CAUTION - down cable
 |
View all Bose Aviation Headset X manuals
Add to My Manuals
Save this manual to your list of manuals |
Page 12 highlights
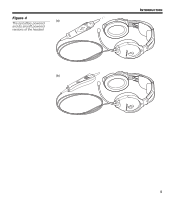
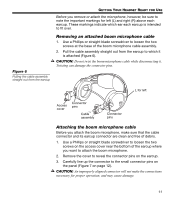
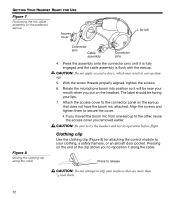
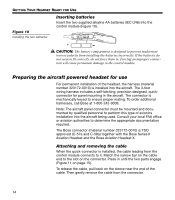
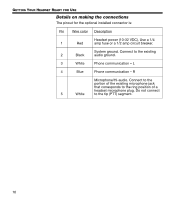
GETTING YOUR HEADSET READY FOR USE Figure 7 Positioning the mic cable assembly on the preferred earcup Access cover L for left Figure 8 Moving the clothing clip along the cable Connector pins Cable assembly Connector pins 4. Press the assembly onto the connector pins until it is fully engaged and the cable assembly is flush with the earcup. CAUTION: Do not apply excessive force, which may result in earcup damage. 5. With the screw threads properly aligned, tighten the screws. 6. Rotate the microphone boom into position so it will be near your mouth when you put on the headset. The label should be facing your lips. 7. Attach the access cover to the connector panel on the earcup that does not have the boom mic attached. Align the screws and tighten them to secure the cover. • If you moved the boom mic from one earcup to the other, reuse the access cover you removed earlier. CAUTION: Be sure to try the headset and test its operation before flight. Clothing clip Use the clothing clip (Figure 8) for attaching the control module to your clothing, a safety harness, or an aircraft door pocket. Pressing on the end of the clip allows you to reposition it along the cable. Press to release CAUTION: Do not attempt to clip onto surfaces that are more than 1/4-inch thick. 12
-
 1
1 -
2
-
3
-
4
-
5
-
6
-
 7
7 -
 8
8 -
 9
9 -
 10
10 -
 11
11 -
 12
12 -
 13
13 -
 14
14 -
 15
15 -
 16
16 -
 17
17 -
18
-
19
-
20
-
21
-
22
-
23
-
24
-
25
-
26
-
27
-
28
-
29
-
30
-
31
-
32
-
33
-
34
-
35
-
36
 |
 |
