Bose Aviation Headset X Owner's guide - Page 14
Inserting batteries, Preparing the aircraft powered headset for use - cable
 |
View all Bose Aviation Headset X manuals
Add to My Manuals
Save this manual to your list of manuals |
Page 14 highlights
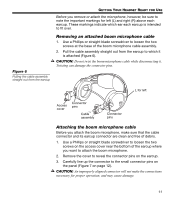
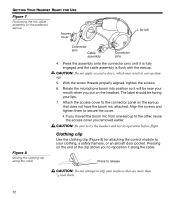
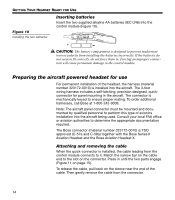
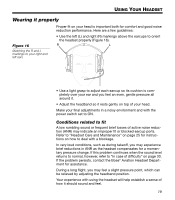
GETTING YOUR HEADSET READY FOR USE Figure 10 Installing the two batteries Inserting batteries Insert the two supplied alkaline AA batteries (IEC LR6) into the control module (Figure 10). + CAUTION: The battery compartment is designed to prevent inadvertent reverse polarity from installing the batteries incorrectly. If the batteries do not seem to fit correctly, do not force them in. Forcing an improper connection will cause permanent damage to the control module. Preparing the aircraft powered headset for use For permanent installation of the headset, the harness (material number 323172-0010) is installed into the aircraft. The 3-foot wiring harness includes a self-latching, precision designed, quickconnector for panel mounting in the aircraft. The connector is mechanically keyed to ensure proper mating. To order additional harnesses, call Bose at 1-800-242-9008. Note: The aircraft panel connector must be mounted and documented by qualified personnel to perform this type of avionics installation into the aircraft being used. Consult your local FAA office or aviation authorities to determine the appropriate documentation required. The Bose connector (material number 323172-0010) is TSO approved (C-57a and C-58a) together with the Bose Series II Aviation Headset and the Bose Aviation Headset X. Attaching and removing the cable When the quick-connector is installed, the cable leading from the control module connects to it. Match the narrow bar on the cable end to the slot on the connector. Press in until the two parts engage (Figure 11 on page 15). To release the cable, pull back on the sleeve near the end of the cable. Then gently remove the cable from the connector. 14
-
 1
1 -
2
-
3
-
4
-
5
-
6
-
7
-
8
-
 9
9 -
 10
10 -
 11
11 -
 12
12 -
 13
13 -
 14
14 -
 15
15 -
 16
16 -
 17
17 -
 18
18 -
 19
19 -
20
-
21
-
22
-
23
-
24
-
25
-
26
-
27
-
28
-
29
-
30
-
31
-
32
-
33
-
34
-
35
-
36
 |
 |
