Bose Lifestyle 135 Series II Home Entertainment Owner's Guide - Page 26
UNIFY, system overview, Using the UNIFY menu
 |
View all Bose Lifestyle 135 Series II Home Entertainment manuals
Add to My Manuals
Save this manual to your list of manuals |
Page 26 highlights
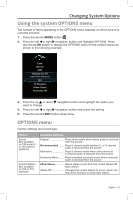
Changing Your System Setup UNIFY® system overview The UNIFY intelligent integration system guides you through the initial process of setting up and configuring your system. It helps you choose the right cables and inputs, and program the LIFESTYLE® remote to operate your connected devices. After completing the initial setup, you can use the UNIFY system at any time to change your system setup and configuration. Using the UNIFY menu To display the UNIFY menu on your TV, press the Setup button on the front of the control console. Using the navigation buttons on the remote, select the function you want and follow the instructions on the screen. Menu item What you can do Resume initial setup If your initial setup is incomplete, you can return to the UNIFY setup process at the last completed event. Restart initial setup If your initial setup is incomplete, you can start the UNIFY setup process from the beginning. Reconnect Acoustimass® (135 series II systems only) Follow the onscreen instructions to reconnect the speaker array with the Acoustimass module. Language Change the language of the onscreen display. ADAPTiQ® Start the ADAPTiQ audio calibration process. After ADAPTiQ has been run, this menu item allows you to disable or enable ADAPTiQ. TV setup After your TV is connected to the console, you can: • Program the LIFESTYLE® remote to control your TV • Manually enter remote control IR device codes • Replace your TV • Add, change, or remove the TV audio connection Source setup For sources connected to Input 1-5 of the control console, you can: • Change the name of the device • Program your remote to control the device and add the IR emitter • Manually enter remote control IR device codes • Remove the device • Add or change the type of audio or video connection Add a new device After your initial setup is complete, you can add another device or accessory to your system. Update Used to perform a system software update (see "Performing a system software update" on page 30 for more information). Teach mode This item is used to send IR codes to program a learning remote. Exit UNIFY Closes the UNIFY menu and returns you to the last source selected. 26 - English
-
 1
1 -
2
-
3
-
4
-
5
-
6
-
7
-
8
-
9
-
10
-
11
-
12
-
13
-
14
-
15
-
16
-
17
-
18
-
19
-
20
-
 21
21 -
 22
22 -
 23
23 -
 24
24 -
 25
25 -
 26
26 -
 27
27 -
 28
28 -
 29
29 -
 30
30 -
 31
31 -
32
-
33
-
34
 |
 |
