Brother International 7160C Users Manual - English - Page 212
Setting Up Automatic E-Mail Printing, Setting Up the Server
 |
UPC - 012502563631
View all Brother International 7160C manuals
Add to My Manuals
Save this manual to your list of manuals |
Page 212 highlights
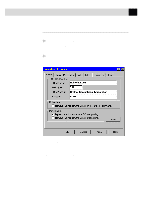
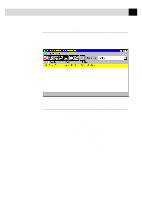
197 U S I N G A U T O M A T I C E - M A I L P R I N T I N G Setting Up Automatic E-Mail Printing To access the Properties of Brother window and set up your options: 1 From the Automatic E-Mail Printing window, select Properties from the Mail pull down menu. The User Settings window will appear. 2 Select the User you want to set up and click the Properties button. The Properties of Brother window will appear: Setting Up the Server In the Server tab of the Properties of Brother window, you must enter your POP3 Server, POP3 Port, POP3 Account name, and Password. Check the Delete Function and Print Function options as desired.
-
 1
1 -
2
-
3
-
4
-
5
-
6
-
7
-
8
-
9
-
10
-
11
-
12
-
13
-
14
-
15
-
16
-
17
-
18
-
19
-
20
-
21
-
22
-
23
-
24
-
25
-
26
-
27
-
28
-
29
-
30
-
31
-
32
-
33
-
34
-
35
-
36
-
37
-
38
-
39
-
40
-
41
-
42
-
43
-
44
-
45
-
46
-
47
-
48
-
49
-
50
-
51
-
52
-
53
-
54
-
55
-
56
-
57
-
58
-
59
-
60
-
61
-
62
-
63
-
64
-
65
-
66
-
67
-
68
-
69
-
70
-
71
-
72
-
73
-
74
-
75
-
76
-
77
-
78
-
79
-
80
-
81
-
82
-
83
-
84
-
85
-
86
-
87
-
88
-
89
-
90
-
91
-
92
-
93
-
94
-
95
-
96
-
97
-
98
-
99
-
100
-
101
-
102
-
103
-
104
-
105
-
106
-
107
-
108
-
109
-
110
-
111
-
112
-
113
-
114
-
115
-
116
-
117
-
118
-
119
-
120
-
121
-
122
-
123
-
124
-
125
-
126
-
127
-
128
-
129
-
130
-
131
-
132
-
133
-
134
-
135
-
136
-
137
-
138
-
139
-
140
-
141
-
142
-
143
-
144
-
145
-
146
-
147
-
148
-
149
-
150
-
151
-
152
-
153
-
154
-
155
-
156
-
157
-
158
-
159
-
160
-
161
-
162
-
163
-
164
-
165
-
166
-
167
-
168
-
169
-
170
-
171
-
172
-
173
-
174
-
175
-
176
-
177
-
178
-
179
-
180
-
181
-
182
-
183
-
184
-
185
-
186
-
187
-
188
-
189
-
190
-
191
-
192
-
193
-
194
-
195
-
196
-
197
-
198
-
199
-
200
-
201
-
202
-
203
-
204
-
205
-
206
-
 207
207 -
 208
208 -
 209
209 -
 210
210 -
 211
211 -
 212
212 -
 213
213 -
 214
214 -
 215
215 -
 216
216 -
 217
217 -
218
-
219
-
220
-
221
-
222
-
223
-
224
-
225
-
226
-
227
-
228
-
229
-
230
-
231
-
232
-
233
-
234
-
235
-
236
-
237
-
238
-
239
-
240
-
241
-
242
-
243
-
244
-
245
-
246
-
247
-
248
-
249
-
250
-
251
-
252
-
253
-
254
-
255
-
256
-
257
-
258
-
259
-
260
-
261
-
262
-
263
-
264
-
265
-
266
-
267
-
268
-
269
-
270
-
271
-
272
-
273
-
274
-
275
 |
 |

197
USING AUTOMATIC E-MAIL PRINTING
Setting Up Automatic E-Mail Printing
To access the Properties of Brother window and set up your options:
1
From the Automatic E-Mail Printing window, select
Properties
from the
Mail
pull down menu.
The User Settings window will appear.
2
Select the User you want to set up and click the
Properties
button.
The Properties of Brother window will appear:
Setting Up the Server
In the Server tab of the Properties of Brother window, you must enter your
POP3 Server, POP3 Port, POP3 Account name, and Password. Check the
Delete
Function and Print Function options as desired.