Brother International BAS-326G PS Basic Instruction Manual - English - Page 26
PREPARATION BEFORE SEWING, 4-1. Installing the needle, 4-2. Threading the upper thread
 |
View all Brother International BAS-326G PS manuals
Add to My Manuals
Save this manual to your list of manuals |
Page 26 highlights
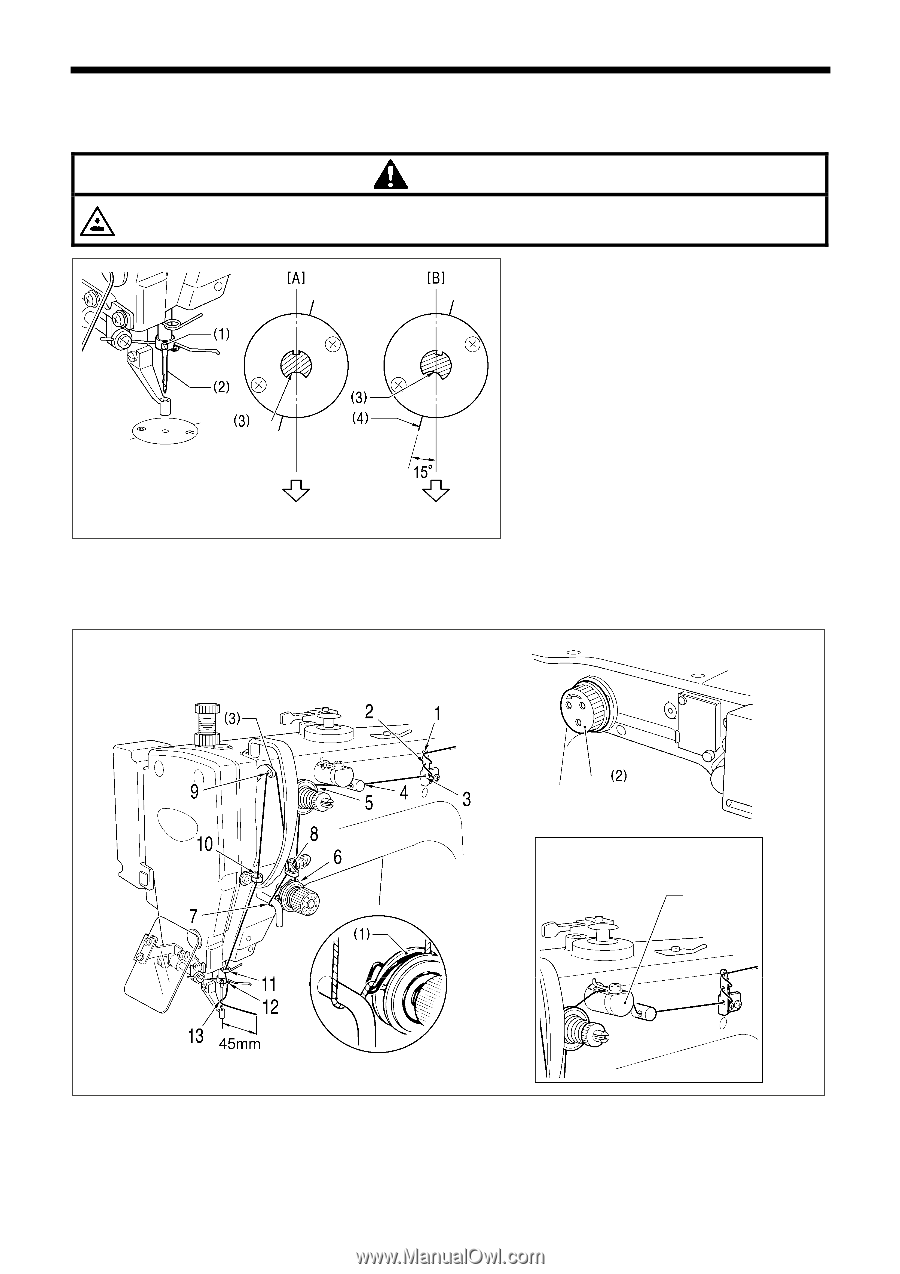
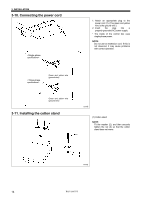
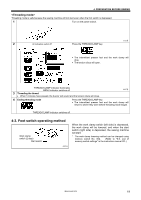
4. PREPARATION BEFORE SEWING 4. PREPARATION BEFORE SEWING 4-1. Installing the needle CAUTION Turn off the power switch before installing the needle. If the foot switch is depressed by mistake, the sewing machine might start operating and injury could result. 4400M Front Front 1. Loosen the set screw (1). 2. Insert the needle (2) as far as it will go with the hollow (3) facing to the front, and then securely tighten the set screw (1). [Figure A] 1. Loosen the set screw (1). 2. Insert the needle (2) as far as it will go so with the hollow (3) facing to the front and so that it's angle matches the angle of reference line (4), and then securely tighten the set screw (1). [Figure B] * If the installation angle of the needle has been changed, be sure to readjust the needle clearance. (Refer to "10-7. Adjusting the needle clearance" in the instruction manual CD.) 4-2. Threading the upper thread Thread the upper thread correctly as shown in the illustration below. * When using threading mode for threading, the tension discs (1) will open so that the thread can be threaded more easily. (Refer to following page.) [If using cotton thread or spun thread] [If using synthetic thread] Needle cooler 2263B • Turn the machine pulley (2) and raise the thread take-up (3) to its highest position before threading the upper thread. (This will make threading easier and it will prevent the thread from coming out at the sewing start.) • When threading the thread through the needle, allow a distance of approximately 45 mm between the needle hole and the end of the thread. If the trailing length of the thread is too long, it may cause the thread to become tangled. 18 BAS-326G PS
-
 1
1 -
2
-
3
-
4
-
5
-
6
-
7
-
8
-
9
-
10
-
11
-
12
-
13
-
14
-
15
-
16
-
17
-
18
-
19
-
20
-
 21
21 -
 22
22 -
 23
23 -
 24
24 -
 25
25 -
 26
26 -
 27
27 -
 28
28 -
 29
29 -
 30
30 -
 31
31 -
32
-
33
-
34
-
35
-
36
-
37
-
38
-
39
-
40
-
41
-
42
 |
 |