Brother International BAS-326G PS Basic Instruction Manual - English - Page 31
Home position detection, PREPARATION BEFORE SEWING, Before starting home position detection
 |
View all Brother International BAS-326G PS manuals
Add to My Manuals
Save this manual to your list of manuals |
Page 31 highlights
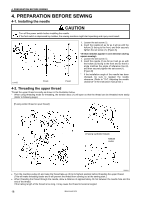
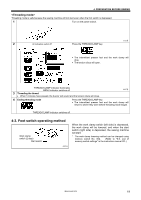
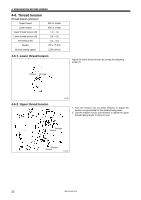
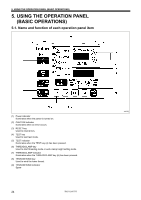
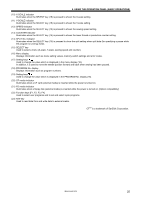
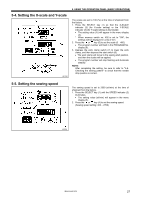
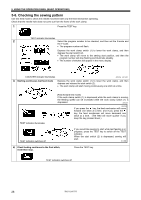
4-7. Home position detection 4950Q 4. PREPARATION BEFORE SEWING Before starting home position detection, check that the needle bar is at its highest position. Turn the pulley (1) until the ridge at the bottom of the thread take-up (2) is aligned with the { mark on the arm. 1876B 4421Q Aligned 1. Turn on the power switch. The power indicator (3) will illuminate, and the model name [326] will appear in the PROGRAM No. display (4) and [A-PS] will appear in the menu display (5). After this, the program number will flash in the PROGRAM No. display (4). 2154B 2155B 2. Depress the work clamp switch (6) to lower the work clamp, and then depress the start switch (7). (After home position detection is carried out, the work clamp will move to the sewing start position and then it will rise.) * For programs with a large number of stitches, the buzzer will sound after the home position is detected, and then the work clamp will move to the sewing start position. NOTE: If error "E110" is displayed when the start switch (7) is depressed, turn the pulley (1) in the direction of operation to clear the error display. BAS-326G PS 23
-
 1
1 -
2
-
3
-
4
-
5
-
6
-
7
-
8
-
9
-
10
-
11
-
12
-
13
-
14
-
15
-
16
-
17
-
18
-
19
-
20
-
21
-
22
-
23
-
24
-
25
-
 26
26 -
 27
27 -
 28
28 -
 29
29 -
 30
30 -
 31
31 -
 32
32 -
 33
33 -
 34
34 -
 35
35 -
 36
36 -
37
-
38
-
39
-
40
-
41
-
42
 |
 |
