Brother International DCP-8155DN Scan to Network Guide - English - Page 7
Configuring the Scan to Network Default Settings, Scan to FTP/Network Profile, Host Address
 |
View all Brother International DCP-8155DN manuals
Add to My Manuals
Save this manual to your list of manuals |
Page 7 highlights
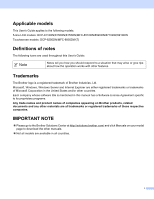
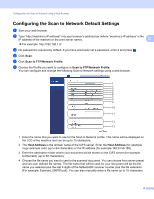
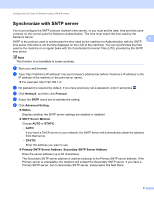
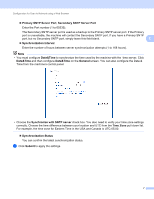
Configuration for Scan to Network using a Web Browser Configuring the Scan to Network Default Settings 2 a Start your web browser. b Type "http://machine's IP address/" into your browser's address bar (where "machine's IP address" is the IP address of the machine or the print server name). 2 For example: http://192.168.1.2/ c No password is required by default. If you have previously set a password, enter it and press . d Click Scan. e Click Scan to FTP/Network Profile. f Choose the Profile you want to configure in Scan to FTP/Network Profile. You can configure and change the following Scan to Network settings using a web browser. 1 2 3 4 5 6 7 8 9 10 11 12 13 1 Enter the name that you want to use for the Scan to Network profile. This name will be displayed on the LCD of the machine and can be up to 15 characters. 2 The Host Address is the domain name of the CIFS server. Enter the Host Address (for example mypc.example.com) (up to 64 characters) or the IP address (for example 192.23.56.189). 3 Enter the destination folder where your document will be stored on the CIFS server (for example brother\abc) (up to 60 characters). 4 Choose the file name you want to use for the scanned document. You can choose from seven preset and two user defined file names. The file name that will be used for your document will be the file name you selected plus the last 6 digits of the flatbed/ADF scanner counter plus the file extension (For example, Estimate_098765.pdf). You can also manually enter a file name up to 15 characters. 4
-
 1
1 -
 2
2 -
 3
3 -
 4
4 -
 5
5 -
 6
6 -
 7
7 -
 8
8 -
 9
9 -
 10
10 -
 11
11 -
 12
12 -
13
-
14
-
15
-
16
-
17
-
18
-
19
-
20
-
21
-
22
-
23
-
24
-
25
-
26
-
27
-
28
-
29
 |
 |