Brother International HE-120PKG Users Manual - Multi - Page 5
English
 |
View all Brother International HE-120PKG manuals
Add to My Manuals
Save this manual to your list of manuals |
Page 5 highlights
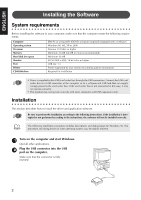
ENGLISH ENGLISH ENGLISH ENGLISH ENGLISH ENGLISH 3 After a short while, the first Add New Hardware Wizard dialog box appears. Click [Next]. When using XP, select "Install from a list or specific location (Advanced)" on the first Wizard screen and click [Next]. 4 Make sure that "Search for the best driver for your device. (Recommended)" is selected, and then click [Next]. 5 Insert the enclosed CD-ROM into the computer's CD-ROM drive. 6 Select "CD-ROM drive", and then after 5 to 10 seconds, click [Next]. Depending on the operating system, the dialog box shown in step 9 may also appear; however, the operation described in step 8 should be performed before continuing to step 9. 7 When UsbWriter appears, click [Next]. Depending on the operating system, the message "No digital signature." may appear; however, the installation can be continued. 8 When the dialog box shown at the right appears, click [Finish]. This completes the installation of the driver software. A message may appear, indicating that the computer should be restarted; however, it is not necessary to restart yet, so click [Cancel]. 3
-
 1
1 -
 2
2 -
 3
3 -
 4
4 -
 5
5 -
 6
6 -
 7
7 -
 8
8 -
 9
9 -
 10
10 -
 11
11 -
12
-
13
-
14
-
15
-
16
-
17
-
18
-
19
-
20
-
21
-
22
-
23
-
24
-
25
-
26
-
27
-
28
-
29
-
30
-
31
-
32
-
33
-
34
-
35
-
36
-
37
-
38
-
39
-
40
-
41
-
42
-
43
-
44
-
45
-
46
-
47
-
48
-
49
-
50
-
51
-
52
-
53
-
54
-
55
-
56
-
57
-
58
-
59
-
60
-
61
-
62
-
63
-
64
-
65
-
66
-
67
-
68
-
69
-
70
-
71
-
72
-
73
-
74
-
75
-
76
-
77
-
78
-
79
-
80
-
81
-
82
-
83
-
84
-
85
-
86
-
87
-
88
-
89
-
90
-
91
-
92
-
93
-
94
-
95
-
96
 |
 |
