Brother International KE-435C Instruction Manual - English - Page 64
Using the cycle sewing function, CHANGING SPECIAL FUNCTIONS USING THE MEMORY SWITCHES
 |
View all Brother International KE-435C manuals
Add to My Manuals
Save this manual to your list of manuals |
Page 64 highlights
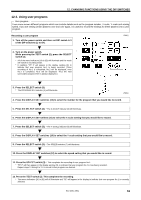
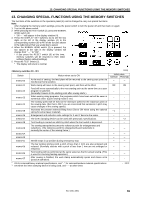
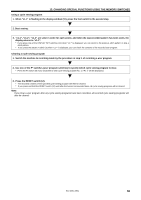
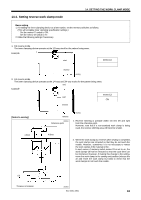
13. CHANGING SPECIAL FUNCTIONS USING THE MEMORY SWITCHES 13-1. Using the cycle sewing function What is the cycle sewing function? The cycle sewing function lets you program up to four patterns for cycle sewing of patterns in a predeter mined order. Recording a cycle sewing program 1. Set DIP switch (1)-3 to ON, and then record the patterns which you would like to use for cycle sewing. (Refer to "12-3. Using user programs".) * Cycle sewing cannot be performed using patterns (P1 to P16) which have not had a user program assigned. 2. Set the memo-03 switch to ON. (Refer to page 55 for how to do this.) 2589Q 3. While pressing the TEST switch (2), press the SELECT switch (3). * All of the menu indicators ((4) to (8)) will illuminate and the mode will switch to recording mode. 4. Press the P1 switch (9). • "Pc 1" will appear in the display window (10) to indicate that cycle sewing program No. 1 is being recorded. * Programs P2, P3 and P4 switches can also be used for programming. 2591Q 5. Press the SELECT switch (3). *The PROGRAM No. indicator (4) will illuminate and "1- -" will appear in the display window (10). 6. Press the DISPLAY SET switches (11) to select the number for the user program that you would like to record. 7. Press the SELECT switch (3). *"2- -" will appear in the display window (10). 8. Press the DISPLAY SET switches (11) to select the number for the user program that you would like to record. 9. Repeat steps 5. and 6. to record all programs which you would like to include for cycle sewing. * After "9- -" is displayed, "A- -", "b- -", "c- -", "d- -", "E- -" and "F- -" will be displayed in that order so that up to the 15th pattern can be recorded. * If you would like to return to a previous number during the recording procedure, press the P1 switch so that "Pc 1" is displayed, and then return to step 4. 10. Press the TEST switch (2). • This completes the setting of cycle sewing program No. 1. * The menu indicators ((4) to (8)) will all illuminate and "c1-1" will appear in the display window (10) to indicate that the cycle sewing program No.1 is currently selected. 58 KE-434C,435C
-
 1
1 -
2
-
3
-
4
-
5
-
6
-
7
-
8
-
9
-
10
-
11
-
12
-
13
-
14
-
15
-
16
-
17
-
18
-
19
-
20
-
21
-
22
-
23
-
24
-
25
-
26
-
27
-
28
-
29
-
30
-
31
-
32
-
33
-
34
-
35
-
36
-
37
-
38
-
39
-
40
-
41
-
42
-
43
-
44
-
45
-
46
-
47
-
48
-
49
-
50
-
51
-
52
-
53
-
54
-
55
-
56
-
57
-
58
-
 59
59 -
 60
60 -
 61
61 -
 62
62 -
 63
63 -
 64
64 -
 65
65 -
 66
66 -
 67
67 -
 68
68 -
 69
69 -
70
-
71
-
72
-
73
-
74
-
75
-
76
-
77
-
78
-
79
-
80
-
81
-
82
-
83
 |
 |
