Brother International KE-435C Instruction Manual - English - Page 66
Setting The Work Clamp Mode
 |
View all Brother International KE-435C manuals
Add to My Manuals
Save this manual to your list of manuals |
Page 66 highlights
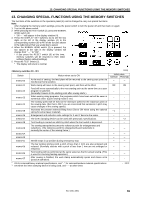
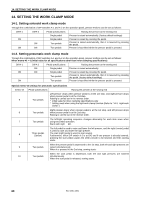
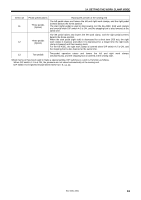
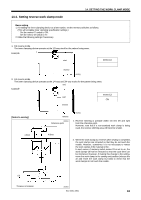
14. SETTING THE WORK CLAMP MODE 14. SETTING THE WORK CLAMP MODE 14-1. Setting solenoid work clamp mode Through the combination of DIP switches A-1 and A-2 on the operation panel, presser motions can be set as follows: DIPA-1 − ON − ON DIPA-2 − − ON ON Pedal specifications Single pedal Single pedal Two pedals Two pedals Raising the presser at the sewing end Presser is raised automatically. (factory default settings) Presser is raised by pressing the pedal. Presser is raised automatically, then it is lowered by pressing the pedal. Presser is kept lifted while the presser pedal is pressed. 14-2. Setting pneumatic work clamp mode Through the combination of DIP switches A-1 and A-2 on the operation panel, presser motions can be set as follows: When memo-42 = 0 (initial value for all specifications other than inner clamping specifications) DIPA-1 − ON − ON DIPA-2 ON ON − − Pedal specifications Single pedal Single pedal Two pedals Two pedals Raising the presser at the sewing end Presser is raised automatically. Presser is raised by pressing the pedal. Presser is raised automatically, then it is lowered by pressing the pedal. (factory default settings) Presser is kept lifted while the presser pedal is pressed. Special memo-42 settings for pneumatic specifications memo-42 Pedal specifications Raising the presser at the sewing end Left presser drops when presser pedal is at the 1st step, and right presser drops when presser pedal is at the 2nd step. 5 Two pedals Raising is carried out in the reverse order. * Initial value for inner clamping specifications only * Setting used when using the light work clamp function (Refer to "14-3. Light work clamp".) Right presser drops when presser pedal is at the 1st step, and left presser drops 6 Two pedals when presser pedal is at the 2nd step. Raising is carried out in the reverse order. The left/right operating sequence changes alternately for each item sewn when 7 Two pedals using two-pedal operation. Starts with right → left. The left pedal is used to raise and lower the left presser, and the right (center) pedal is used to raise and lower the right presser. 8 Three pedals (Option) The start (right) pedal is used to start sewing. Furthermore, when DIP switch A-2 is at ON, and if one presser is already lowered, pressing the start pedal causes the other presser to be lowered and then sewing starts. When the presser pedal is depressed to the 1st step, both left and right pressers are 9 Two pedals raised simultaneously. When it is pressed to the 2nd step, sewing starts. When the start pedal is depressed, both left and right pressers are lowered 10 Two pedals simultaneously. When the start pedal is released, sewing starts. 60 KE-434C,435C
-
 1
1 -
2
-
3
-
4
-
5
-
6
-
7
-
8
-
9
-
10
-
11
-
12
-
13
-
14
-
15
-
16
-
17
-
18
-
19
-
20
-
21
-
22
-
23
-
24
-
25
-
26
-
27
-
28
-
29
-
30
-
31
-
32
-
33
-
34
-
35
-
36
-
37
-
38
-
39
-
40
-
41
-
42
-
43
-
44
-
45
-
46
-
47
-
48
-
49
-
50
-
51
-
52
-
53
-
54
-
55
-
56
-
57
-
58
-
59
-
60
-
 61
61 -
 62
62 -
 63
63 -
 64
64 -
 65
65 -
 66
66 -
 67
67 -
 68
68 -
 69
69 -
 70
70 -
 71
71 -
72
-
73
-
74
-
75
-
76
-
77
-
78
-
79
-
80
-
81
-
82
-
83
 |
 |