Brother International LS-2125i Users Manual - Multi - Page 48
Monogramming and Embroidering
 |
UPC - 012502615293
View all Brother International LS-2125i manuals
Add to My Manuals
Save this manual to your list of manuals |
Page 48 highlights
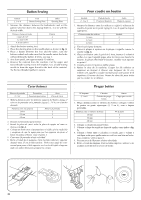
Monogramming and Embroidering Pattern 2, 3, 4, 5 (Zigzag Stitch) Foot None Other Darning Plate PREPARING FOR MONOGRAMMING AND EMBROIDERING 1. Place the darning plate on the needle plate. 2. Set the pattern selection dial to the appropriate Zigzag Stitch (2, 3, 4 or 5). 3. Draw the lettering (for monogramming) or design (for embroidering) on the surface of the fabric. 4. Stretch the fabric in an embroidery hoops as firmly as possible with the underside of the fabric on the bottom of the inside hoop. 5. Place the work under the needle and lower the presser bar with both the presser foot and presser foot holder assembly removed. 6. Pull the lower thread up through the work at the starting position by turning the balance wheel to make a few stitches to hold the end of the thread. 7. Grip the hoop with the thumb and forefingers of both hands while pressing the fabric with the middle and third fingers and supporting the outside of the hoop with your smaller fingers. Monogrammes et broderies Modèle 2, 3, 4, 5 (Point zigzag) Pied-de-biche Sans pied Autre Plaque à repriser PREPARATION AVANT DE FAIRE DES MONOGRAMMES OU DES BRODERIES 1. Placer la plaque à repriser sur la plaque à aiguille. 2. Mettre le sélecteur de modèle sur le numéro de point zigzag adéquat (2,3,4 ou 5). 3. Dessiner les lettres (monogrammes) ou le motif (broderies) sur l'endroit du tissu. 4. Tendre au maximum l'ouvrage sur le tambour, en maintenant l'envers du tissu dans le fond du cercle intérieur. 5. Placer l'ouvrage sous l'aiguille et abaisser la barre du pied-de- biche, sans pied et sans support. 6. Tirer le fil inférieur vers le haut à travers l'ouvrage à la position de départ en tournant le volant et faire quelques points de maintien. 7. Saisir le tambour des deux mains, avec le pouce et l'index, tout en appuyant sur le tissu avec le majeur et l'annulaire de chaque main. Les auriculaires serviront à tenir l'extérieur du tambour. Monogramas y bordados Número de puntada Prensatelas 2, 3, 4, 5 (Puntada zigzag) Quitarlo, sin prensatelas Otros Placa de zurcir PREPARACIÓN PARA MONOGRAMAS Y BORDADOS 1. Instale la placa de zurcir sobre la placa de agujas. 2. Ponga el selector de puntadas en la puntada zigzag apropiada (2,3,4 ó 5). 3. Dibuje las letras (para monogramas) o el diseño (para bordados) en el derecho del tejido. 4. Estire el tejido en el bastidor tanto como pueda y si es posible con el revés abajo del círculo interior. 5. Coloque la tela debajo de la aguja y baje la barra del prensatelas, aunque no haya ningún prensatelas o soporte puesto. 6. Girando la ruedecilla, pase el hilo inferior por el tejido donde quiera empezar y cosa unas puntadas para asegurar el extremo del hilo. 7. Sujete el bastidor con el pulgar e índice de cada mano, presione el tejido con los dedos medios y anulares y aguante los exteriores del bastidor con los meñiques. Execução de monogramas e de bordados Nº do ponto 2, 3, 4, 5 (Ponto ziguezague) Calcador Nenhum Outros Chapa de cerzidura PREPARAÇÃO PARA A EXECUÇÃO DE MONOGRAMAS OU BORDADOS 1. Coloque a chapa de cerzido sobre a chapa de agulha. 2. Coloque o botão selector de pontos no ziguezague adequado (2, 3, 4 ou 5). 3. Desenhe as letras (para o monograma) ou o desenho (para bordar) no lado direito do tecido. 4. Coloque o tecido num bastidor o mais esticado e firme possível, com o avesso do tecido na parte de cima do aro interior. 5. Coloque o tecido sob a agulha e abaixe a barra do precalcador, depois de ter retirado o calcador e o conjunto do suporte do calcador. 6. Puxe a linha inferior por sobre o trabalho na posição inicial girando o volante, e faça alguns pontos para prender a ponta da linha. 7. Segure o bastidor com o polegar e o indicador de cada mão. Pressione o tecido com os dedos médio e o anular e, com o dedo menor de cada mão, escore a parte externa do círculo do bastidor. 40
-
 1
1 -
2
-
3
-
4
-
5
-
6
-
7
-
8
-
9
-
10
-
11
-
12
-
13
-
14
-
15
-
16
-
17
-
18
-
19
-
20
-
21
-
22
-
23
-
24
-
25
-
26
-
27
-
28
-
29
-
30
-
31
-
32
-
33
-
34
-
35
-
36
-
37
-
38
-
39
-
40
-
41
-
42
-
 43
43 -
 44
44 -
 45
45 -
 46
46 -
 47
47 -
 48
48 -
 49
49 -
 50
50 -
 51
51 -
 52
52 -
 53
53 -
54
-
55
-
56
-
57
-
58
-
59
-
60
-
61
-
62
-
63
-
64
-
65
-
66
-
67
 |
 |
