Brother International PE-DESIGN Ver.4 3 2 Instructin Manual for PE-DESIGN Ver. - Page 139
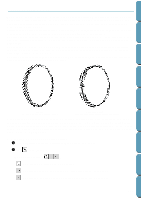
Drawing a circle or an ellipse, Drawing an arc, small axis equal to the smaller edge.
 |
View all Brother International PE-DESIGN Ver.4 3 2 manuals
Add to My Manuals
Save this manual to your list of manuals |
Page 139 highlights
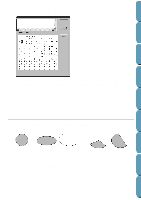
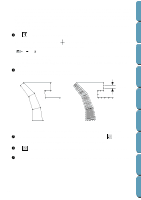
Contents Before Using Getting Started Design Center s Drawing a circle or an ellipse 1 Click on the Tool Box. The shape of the cursor changes to Attributes bar now looks like this: and displays together with a small ellipse. The Sewing You can select the colors and stitches at this step or after creating the pattern. See "Color" on page 143 and "Stitch" on page 145. You can also set the sewing attributes using the Sew menu (see "Sewing Attribute Setting" on page 177). You must decide now which kind of circle-related graphic you need. 2 Click the Arc shape selector, then click Circle. 3 Move the mouse to a point, click and drag the mouse. The point where you start dragging is considered a corner of an imaginary rectangle. The point where you release the mouse will be the diagonally opposed point of the rectangle. The ellipse will fit inside the imaginary rectangle (its great axis equal to the larger edge of the rectangle, and it small axis equal to the smaller edge). Note that you can draw a perfect circle by holding the Shift key down while dragging the mouse. s Drawing an arc 1 Click on the Tool Box. The shape of the cursor changes to Attributes bar now looks like this: and displays together with a small ellipse. The Sewing You can select the colors and stitches at this step or after creating the pattern. See "Color" on page 143 and "Stitch" on page 145. You can also set the sewing attributes using the Sew menu (see "Sewing Attribute Setting" on page 177). You must decide now which kind of circle-related graphic you need. 2 Click the Arc shape selector, then click Arc. 3 Proceed as you would to draw a circle or an ellipse. When you release the mouse, a radial line appears on the ellipse. 4 Move the cursor (without dragging) to the start point of the arc and click. The radial line disappears. 5 Move the cursor (without dragging) to the end point of the arc and click. Click at end point Layout & Editing File Utility Programmable Stich Creator Quik Reference Alphabetic Index Click at start point Move to end point 129
-
 1
1 -
2
-
3
-
4
-
5
-
6
-
7
-
8
-
9
-
10
-
11
-
12
-
13
-
14
-
15
-
16
-
17
-
18
-
19
-
20
-
21
-
22
-
23
-
24
-
25
-
26
-
27
-
28
-
29
-
30
-
31
-
32
-
33
-
34
-
35
-
36
-
37
-
38
-
39
-
40
-
41
-
42
-
43
-
44
-
45
-
46
-
47
-
48
-
49
-
50
-
51
-
52
-
53
-
54
-
55
-
56
-
57
-
58
-
59
-
60
-
61
-
62
-
63
-
64
-
65
-
66
-
67
-
68
-
69
-
70
-
71
-
72
-
73
-
74
-
75
-
76
-
77
-
78
-
79
-
80
-
81
-
82
-
83
-
84
-
85
-
86
-
87
-
88
-
89
-
90
-
91
-
92
-
93
-
94
-
95
-
96
-
97
-
98
-
99
-
100
-
101
-
102
-
103
-
104
-
105
-
106
-
107
-
108
-
109
-
110
-
111
-
112
-
113
-
114
-
115
-
116
-
117
-
118
-
119
-
120
-
121
-
122
-
123
-
124
-
125
-
126
-
127
-
128
-
129
-
130
-
131
-
132
-
133
-
 134
134 -
 135
135 -
 136
136 -
 137
137 -
 138
138 -
 139
139 -
 140
140 -
 141
141 -
 142
142 -
 143
143 -
 144
144 -
145
-
146
-
147
-
148
-
149
-
150
-
151
-
152
-
153
-
154
-
155
-
156
-
157
-
158
-
159
-
160
-
161
-
162
-
163
-
164
-
165
-
166
-
167
-
168
-
169
-
170
-
171
-
172
-
173
-
174
-
175
-
176
-
177
-
178
-
179
-
180
-
181
-
182
-
183
-
184
-
185
-
186
-
187
-
188
-
189
-
190
-
191
-
192
-
193
-
194
-
195
-
196
-
197
-
198
-
199
-
200
-
201
-
202
-
203
-
204
-
205
-
206
-
207
-
208
-
209
-
210
-
211
-
212
-
213
-
214
-
215
-
216
-
217
-
218
-
219
-
220
-
221
-
222
-
223
-
224
-
225
-
226
-
227
-
228
-
229
-
230
-
231
-
232
-
233
-
234
-
235
-
236
-
237
-
238
-
239
-
240
-
241
-
242
-
243
-
244
-
245
-
246
-
247
-
248
-
249
-
250
-
251
-
252
 |
 |
