Brother International PE-DESIGN Ver.4 3 2 Instructin Manual for PE-DESIGN Ver. - Page 7

Contents, Before Using, Getting Started, Design Center

Page 7 highlights

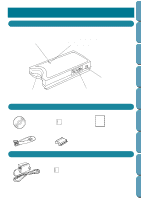
Contents Contents Before Using Getting Started Design Center Layout & Editing Before Using s Principal Parts 1 s Accessories 1 s Options 1 s Setting Up 2 Attaching the Security Device 2 s Installing the Software 4 System Requirements 4 Installing 4 Note on the use of Version 4.0 and the Internet Explorer 6 s Tips and Techniques for Creating Embroidery Patterns 7 Getting Started Introduction 9 • Design Center 9 • Layout & Editing 9 • Programmable Stitch Creator 10 • File Utility 10 About this Chapter 10 s Using Design Center 11 Starting Design Center 12 Opening an Image 13 Converting to Line Image 14 Editing Lines 15 Converting to Figure Handle Image 17 Moving to Sew Setting 18 Setting Sewing Attributes 18 • Setting the outlines 18 • Setting the regions 20 Previewing the Image 22 Saving the File 23 s Using Layout & Editing 24 Starting Layout & Editing 25 Importing Embroidery Patterns from Design Center .. 26 Zooming In and Out 27 Moving the Embroidery Pattern 30 Adding an Oval 31 Adjusting the Size and Location of the Oval 32 • To change the size of the oval 32 • To center the oval on the pattern 33 Adding Text 33 Fitting the Text around the Oval 35 Moving the Oval and Text 36 • To move both patterns as a group 36 • To move the text over the oval 36 Adding a Circle for Drawing the Sun 36 Selecting a Programmable Fill Stitch 38 Adding Broken Lines for Drawing the Sun Rays..... 40 Changing the Sewing Order of Sun and Rays ........ 41 Adjusting the Rays 41 Setting Hole Sewing 42 Previewing the Sewing Image 43 Transferring the Data to a Card 44 Saving the File 44 s Using Programmable Stitch Creator 46 Starting Programmable Stitch Creator 47 Opening a Programmable Stitch File 48 Drawing Lines to Edit the Programmable Stitch...... 49 Saving the Edited Programmable Stitch 50 Quitting Programmable Stitch Creator 50 s Creating data for the multi-position frame .......... 51 • Select the Design Page size 51 • Create the pattern 52 • Optimize Hoop Change 53 • Check the design 53 • Save the data 54 • Write the data to an original card 54 Design Center s The Screen 58 s Using the Stage 2 Tool Box 59 Drawing and Erasing 59 • Drawing 59 • Erasing 59 Zoom-in Mode 59 Fit Design Page to Window 60 Zoom-out Mode 60 s Using the Stage 3 Tool Box 61 Selection Mode 62 • Selecting patterns 62 • Moving patterns 62 • Scaling patterns 62 • Flipping a pattern horizontally or vertically......... 63 • Rotating a pattern 63 Point Edit Mode 64 • Moving points 64 • Inserting points 64 File Utility Programmable Stich Creator Quik Reference Alphabetic Index

  • 1
  • 2
  • 3
  • 4
  • 5
  • 6
  • 7
  • 8
  • 9
  • 10
  • 11
  • 12
  • 13
  • 14
  • 15
  • 16
  • 17
  • 18
  • 19
  • 20
  • 21
  • 22
  • 23
  • 24
  • 25
  • 26
  • 27
  • 28
  • 29
  • 30
  • 31
  • 32
  • 33
  • 34
  • 35
  • 36
  • 37
  • 38
  • 39
  • 40
  • 41
  • 42
  • 43
  • 44
  • 45
  • 46
  • 47
  • 48
  • 49
  • 50
  • 51
  • 52
  • 53
  • 54
  • 55
  • 56
  • 57
  • 58
  • 59
  • 60
  • 61
  • 62
  • 63
  • 64
  • 65
  • 66
  • 67
  • 68
  • 69
  • 70
  • 71
  • 72
  • 73
  • 74
  • 75
  • 76
  • 77
  • 78
  • 79
  • 80
  • 81
  • 82
  • 83
  • 84
  • 85
  • 86
  • 87
  • 88
  • 89
  • 90
  • 91
  • 92
  • 93
  • 94
  • 95
  • 96
  • 97
  • 98
  • 99
  • 100
  • 101
  • 102
  • 103
  • 104
  • 105
  • 106
  • 107
  • 108
  • 109
  • 110
  • 111
  • 112
  • 113
  • 114
  • 115
  • 116
  • 117
  • 118
  • 119
  • 120
  • 121
  • 122
  • 123
  • 124
  • 125
  • 126
  • 127
  • 128
  • 129
  • 130
  • 131
  • 132
  • 133
  • 134
  • 135
  • 136
  • 137
  • 138
  • 139
  • 140
  • 141
  • 142
  • 143
  • 144
  • 145
  • 146
  • 147
  • 148
  • 149
  • 150
  • 151
  • 152
  • 153
  • 154
  • 155
  • 156
  • 157
  • 158
  • 159
  • 160
  • 161
  • 162
  • 163
  • 164
  • 165
  • 166
  • 167
  • 168
  • 169
  • 170
  • 171
  • 172
  • 173
  • 174
  • 175
  • 176
  • 177
  • 178
  • 179
  • 180
  • 181
  • 182
  • 183
  • 184
  • 185
  • 186
  • 187
  • 188
  • 189
  • 190
  • 191
  • 192
  • 193
  • 194
  • 195
  • 196
  • 197
  • 198
  • 199
  • 200
  • 201
  • 202
  • 203
  • 204
  • 205
  • 206
  • 207
  • 208
  • 209
  • 210
  • 211
  • 212
  • 213
  • 214
  • 215
  • 216
  • 217
  • 218
  • 219
  • 220
  • 221
  • 222
  • 223
  • 224
  • 225
  • 226
  • 227
  • 228
  • 229
  • 230
  • 231
  • 232
  • 233
  • 234
  • 235
  • 236
  • 237
  • 238
  • 239
  • 240
  • 241
  • 242
  • 243
  • 244
  • 245
  • 246
  • 247
  • 248
  • 249
  • 250
  • 251
  • 252

Before Using
Design Center
Layout & Editing
File Utility
Programmable
Stich Creator
Contents
Quik Reference
Alphabetic Index
Getting Started
Before Using
Principal Parts
............................................................
1
Accessories
................................................................
1
Options
........................................................................
1
Setting Up
...................................................................
2
Attaching the Security Device
.....................................
2
Installing the Software
..............................................
4
System Requirements
.................................................
4
Installing
.......................................................................
4
Note on the use of Version 4.0 and the
Internet Explorer
..........................................................
6
Tips and Techniques for Creating
Embroidery Patterns
..................................................
7
Getting Started
Introduction
..................................................................
9
• Design Center
.......................................................
9
• Layout & Editing
....................................................
9
• Programmable Stitch Creator
.............................
10
• File Utility
.............................................................
10
About this Chapter
....................................................
10
Using Design Center
...............................................
11
Starting Design Center
..............................................
12
Opening an Image
.....................................................
13
Converting to Line Image
..........................................
14
Editing Lines
..............................................................
15
Converting to Figure Handle Image
.........................
17
Moving to Sew Setting
..............................................
18
Setting Sewing Attributes
..........................................
18
• Setting the outlines
..............................................
18
• Setting the regions
..............................................
20
Previewing the Image
...............................................
22
Saving the File
...........................................................
23
Using Layout & Editing
...........................................
24
Starting Layout & Editing
..........................................
25
Importing Embroidery Patterns from Design Center
.. 26
Zooming In and Out
..................................................
27
Moving the Embroidery Pattern
................................
30
Adding an Oval
..........................................................
31
Adjusting the Size and Location of the Oval
............
32
• To change the size of the oval
............................
32
• To center the oval on the pattern
........................
33
Adding Text
...............................................................
33
Fitting the Text around the Oval
...............................
35
Moving the Oval and Text
........................................
36
• To move both patterns as a group
.....................
36
• To move the text over the oval
...........................
36
Adding a Circle for Drawing the Sun
........................
36
Selecting a Programmable Fill Stitch
.......................
38
Adding Broken Lines for Drawing the Sun Rays
.....
40
Changing the Sewing Order of Sun and Rays
........
41
Adjusting the Rays
....................................................
41
Setting Hole Sewing
.................................................
42
Previewing the Sewing Image
..................................
43
Transferring the Data to a Card
...............................
44
Saving the File
..........................................................
44
Using Programmable Stitch Creator
....................
46
Starting Programmable Stitch Creator
.....................
47
Opening a Programmable Stitch File
.......................
48
Drawing Lines to Edit the Programmable Stitch
......
49
Saving the Edited Programmable Stitch
..................
50
Quitting Programmable Stitch Creator
.....................
50
Creating data for the multi-position frame
..........
51
• Select the Design Page size
..............................
51
• Create the pattern
...............................................
52
• Optimize Hoop Change
......................................
53
• Check the design
................................................
53
• Save the data
......................................................
54
• Write the data to an original card
.......................
54
Design Center
The Screen
................................................................
58
Using the Stage 2 Tool Box
...................................
59
Drawing and Erasing
................................................
59
• Drawing
...............................................................
59
• Erasing
................................................................
59
Zoom-in Mode
..........................................................
59
Fit Design Page to Window
......................................
60
Zoom-out Mode
........................................................
60
Using the Stage 3 Tool Box
...................................
61
Selection Mode
.........................................................
62
• Selecting patterns
...............................................
62
• Moving patterns
..................................................
62
• Scaling patterns
..................................................
62
• Flipping a pattern horizontally or vertically
.........
63
• Rotating a pattern
...............................................
63
Point Edit Mode
........................................................
64
• Moving points
......................................................
64
• Inserting points
...................................................
64
Contents