Brother International PE500 Users Manual - English - Page 33
Pull the thread to the right, pass it under - bobbin
 |
View all Brother International PE500 manuals
Add to My Manuals
Save this manual to your list of manuals |
Page 33 highlights
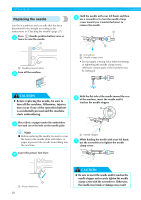
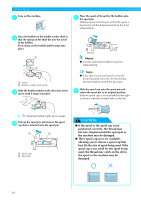
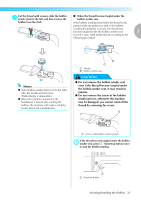
Note Pass the thread behind the thread guide cover h and to the front. z When embroidering with fine, cross-wound While holding the thread near the spool with thread, use the small spool cap, and leave a your right hand, pull the thread with your left small space between the cap and the spool. hand as shown below. 1 cb a a Spool cap (small) b Spool (cross-wound thread) c Space z When using thread that winds off quickly, such as transparent nylon thread or metallic thread, place the spool net over the spool before placing the spool of thread onto the spool pin. If the spool net is too long, fold it to fit the size of the spool. When the spool net is used, the upper thread tension may become tighter. Before embroidering, refer to "Adjusting the upper thread tension" (page 63). a b a a Thread guide cover Pull the thread to the right, pass it under the i hook of the bobbin-winding thread guide, and then wind the thread counterclockwise under the pretension disc, pulling it in as far as possible. c d a Spool net b Spool c Spool cap d Spool pin Pull the thread from the spool and pass the g thread under the hook of thread guide. a a Thread guide a a Bobbin-winding thread guide Make sure that the thread passes under the pretension disk. b c d b Hook c Pretension disk d Pull it in as far as possible. Winding/Installing the Bobbin 31
-
 1
1 -
2
-
3
-
4
-
5
-
6
-
7
-
8
-
9
-
10
-
11
-
12
-
13
-
14
-
15
-
16
-
17
-
18
-
19
-
20
-
21
-
22
-
23
-
24
-
25
-
26
-
27
-
 28
28 -
 29
29 -
 30
30 -
 31
31 -
 32
32 -
 33
33 -
 34
34 -
 35
35 -
 36
36 -
 37
37 -
 38
38 -
39
-
40
-
41
-
42
-
43
-
44
-
45
-
46
-
47
-
48
-
49
-
50
-
51
-
52
-
53
-
54
-
55
-
56
-
57
-
58
-
59
-
60
-
61
-
62
-
63
-
64
-
65
-
66
-
67
-
68
-
69
-
70
-
71
-
72
-
73
-
74
-
75
-
76
-
77
-
78
-
79
-
80
-
81
-
82
-
83
-
84
-
85
-
86
-
87
-
88
-
89
-
90
-
91
-
92
 |
 |
