Brother International PE500 Users Manual - English - Page 38
Reattach the bobbin cover.
 |
View all Brother International PE500 manuals
Add to My Manuals
Save this manual to your list of manuals |
Page 38 highlights
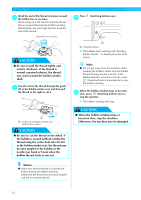
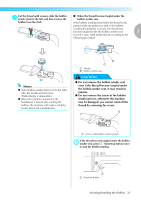
GETTING READY Note z If the thread is not correctly inserted through the tension-adjusting spring of the bobbin case, it may cause incorrect thread tension (page 63). a a Tension-adjusting spring Reattach the bobbin cover. i Insert the tab in the lower-left corner of the bobbin cover, and then lightly press down on the right side. a b 2 1 a Tab b Lower-left corner X The bobbin threading is finished. You can begin embroidering without pulling up the bobbin thread. Next, thread the upper thread. Continue with the procedure in "Upper Threading" (page 37). 36
-
 1
1 -
2
-
3
-
4
-
5
-
6
-
7
-
8
-
9
-
10
-
11
-
12
-
13
-
14
-
15
-
16
-
17
-
18
-
19
-
20
-
21
-
22
-
23
-
24
-
25
-
26
-
27
-
28
-
29
-
30
-
31
-
32
-
 33
33 -
 34
34 -
 35
35 -
 36
36 -
 37
37 -
 38
38 -
 39
39 -
 40
40 -
 41
41 -
 42
42 -
 43
43 -
44
-
45
-
46
-
47
-
48
-
49
-
50
-
51
-
52
-
53
-
54
-
55
-
56
-
57
-
58
-
59
-
60
-
61
-
62
-
63
-
64
-
65
-
66
-
67
-
68
-
69
-
70
-
71
-
72
-
73
-
74
-
75
-
76
-
77
-
78
-
79
-
80
-
81
-
82
-
83
-
84
-
85
-
86
-
87
-
88
-
89
-
90
-
91
-
92
 |
 |

36
GETTING READY
— — — — — — — — — — — — — — — — — — — — — — — — — — — — — — — — — — — — — — — — — — — —
Note
If the thread is not correctly inserted through
the tension-adjusting spring of the bobbin
case, it may cause incorrect thread tension
(page 63).
a
Tension-adjusting spring
i
Reattach the bobbin cover.
Insert the tab in the lower-left corner of the
bobbin cover, and then lightly press down on
the right side.
a
Tab
b
Lower-left corner
The bobbin threading is finished. You can
begin embroidering without pulling up the
bobbin thread.
Next, thread the upper thread. Continue with
the procedure in "Upper Threading" (page 37).
a
1
2
a
b