Brother International PEDESIGNNEXT Users Manual - English - Page 159
Using the Positioning Sheet, mark the embroidering, position on the fabric
 |
View all Brother International PEDESIGNNEXT manuals
Add to My Manuals
Save this manual to your list of manuals |
Page 159 highlights
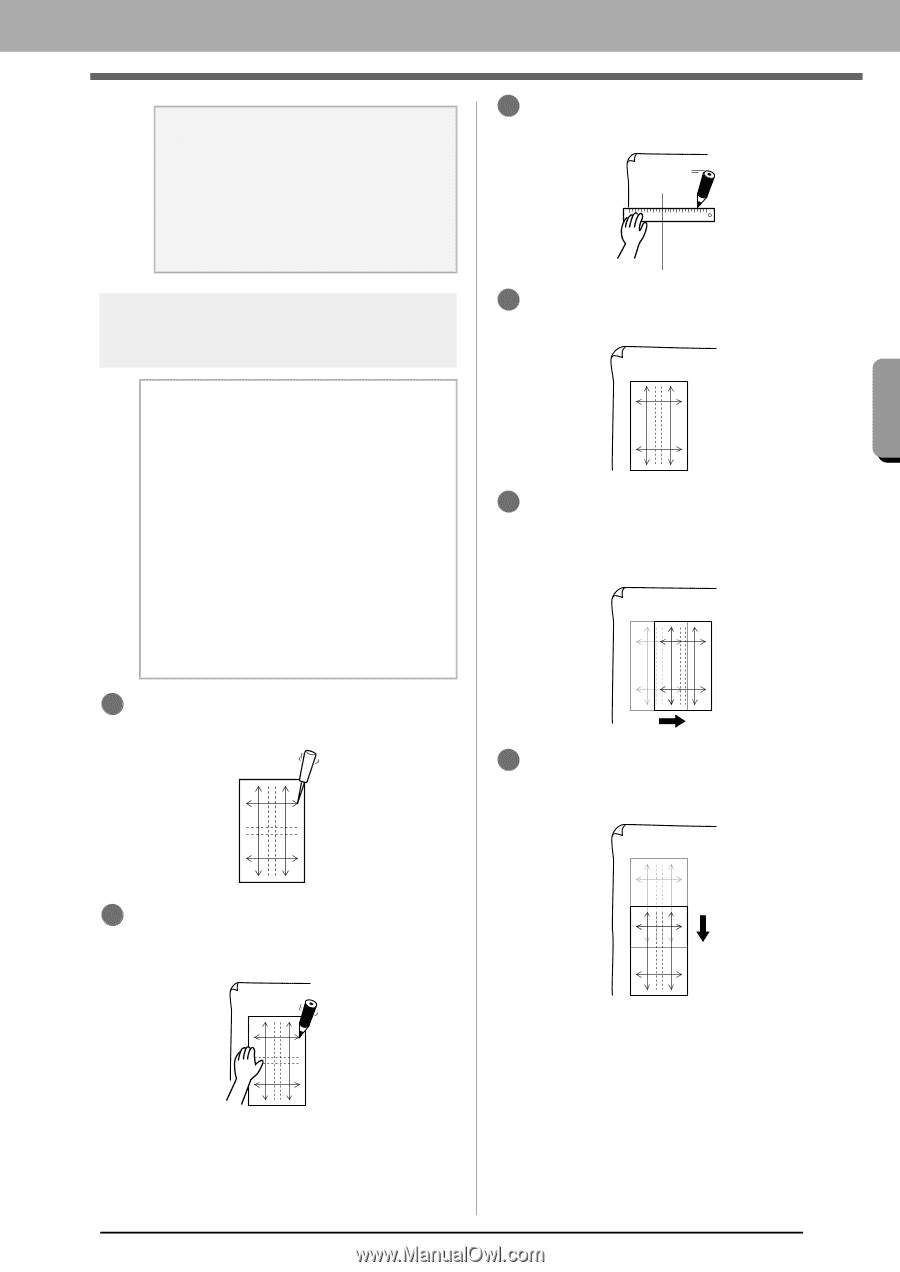
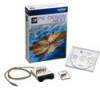
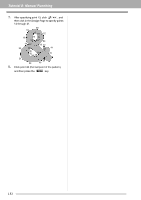
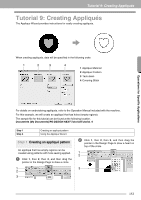
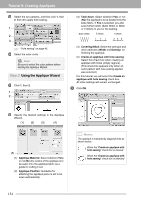
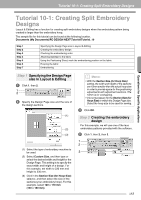
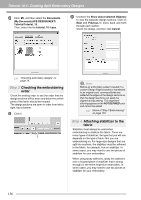
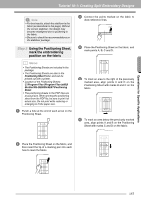
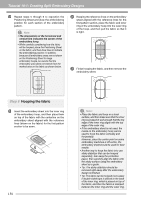
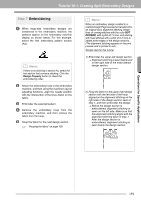
Operations for Specific Applications Tutorial 10-1: Creating Split Embroidery Designs a Note: • For best results, attach the stabilizer to the fabric (as described on this page). Without the correct stabilizer, the design may become misaligned due to puckering in the fabric. • Be sure to check the recommendations on the stabilizer package. Step 5 Using the Positioning Sheet, mark the embroidering position on the fabric b Memo: • The Positioning Sheets are included in the package. • The Positioning Sheets are also in the Positioning Sheet folder and can be printed out with a printer. • Location of the Positioning Sheets: C:\Program Files (Program Files (x86))\ Brother\PE-DESIGN NEXT\Positioning Sheet. • The positioning sheets in the PDF files are at actual size. When printing the positioning sheet from the PDF file, be sure to print it at actual size. Do not print while reducing or enlarging to fit the paper size. 1 Punch a hole at the end of each arrow on the Positioning Sheet. 3 Connect the points marked on the fabric to draw reference lines. 4 Place the Positioning Sheet on the fabric, and mark points A, B, C and D. A B D C 5 To mark an area to the right of the previously marked area, align points A and D on the Positioning Sheet with marks B and C on the fabric. A AB B D DC C 6 To mark an area below the previously marked area, align points A and B on the Positioning Sheet with marks C and D on the fabric. 2 Place the Positioning Sheet on the fabric, and then insert the tip of a marking pen into each hole to mark the fabric. A B A B D C D C 157
-
 1
1 -
2
-
3
-
4
-
5
-
6
-
7
-
8
-
9
-
10
-
11
-
12
-
13
-
14
-
15
-
16
-
17
-
18
-
19
-
20
-
21
-
22
-
23
-
24
-
25
-
26
-
27
-
28
-
29
-
30
-
31
-
32
-
33
-
34
-
35
-
36
-
37
-
38
-
39
-
40
-
41
-
42
-
43
-
44
-
45
-
46
-
47
-
48
-
49
-
50
-
51
-
52
-
53
-
54
-
55
-
56
-
57
-
58
-
59
-
60
-
61
-
62
-
63
-
64
-
65
-
66
-
67
-
68
-
69
-
70
-
71
-
72
-
73
-
74
-
75
-
76
-
77
-
78
-
79
-
80
-
81
-
82
-
83
-
84
-
85
-
86
-
87
-
88
-
89
-
90
-
91
-
92
-
93
-
94
-
95
-
96
-
97
-
98
-
99
-
100
-
101
-
102
-
103
-
104
-
105
-
106
-
107
-
108
-
109
-
110
-
111
-
112
-
113
-
114
-
115
-
116
-
117
-
118
-
119
-
120
-
121
-
122
-
123
-
124
-
125
-
126
-
127
-
128
-
129
-
130
-
131
-
132
-
133
-
134
-
135
-
136
-
137
-
138
-
139
-
140
-
141
-
142
-
143
-
144
-
145
-
146
-
147
-
148
-
149
-
150
-
151
-
152
-
153
-
 154
154 -
 155
155 -
 156
156 -
 157
157 -
 158
158 -
 159
159 -
 160
160 -
 161
161 -
 162
162 -
 163
163 -
 164
164 -
165
-
166
-
167
-
168
-
169
-
170
-
171
-
172
-
173
-
174
-
175
-
176
-
177
-
178
-
179
-
180
-
181
-
182
-
183
-
184
-
185
-
186
-
187
-
188
-
189
-
190
-
191
-
192
-
193
-
194
-
195
-
196
-
197
-
198
-
199
-
200
-
201
-
202
-
203
-
204
-
205
-
206
-
207
-
208
-
209
-
210
-
211
-
212
-
213
-
214
-
215
-
216
-
217
-
218
-
219
-
220
-
221
-
222
-
223
-
224
-
225
-
226
-
227
-
228
-
229
-
230
-
231
-
232
-
233
-
234
-
235
-
236
-
237
-
238
-
239
-
240
-
241
-
242
-
243
-
244
-
245
-
246
-
247
-
248
-
249
-
250
-
251
-
252
-
253
-
254
-
255
-
256
-
257
-
258
-
259
-
260
-
261
-
262
-
263
-
264
-
265
-
266
-
267
-
268
-
269
-
270
-
271
-
272
-
273
-
274
-
275
-
276
-
277
-
278
-
279
-
280
-
281
-
282
-
283
-
284
-
285
-
286
-
287
-
288
-
289
-
290
-
291
-
292
-
293
-
294
-
295
-
296
-
297
-
298
-
299
-
300
-
301
-
302
-
303
-
304
-
305
-
306
-
307
-
308
-
309
-
310
-
311
-
312
-
313
-
314
-
315
-
316
-
317
-
318
-
319
-
320
 |
 |