Brother International PR-1000 Operation Manual for Premium Pack I Optional acc
Brother International PR-1000 Manual
 |
View all Brother International PR-1000 manuals
Add to My Manuals
Save this manual to your list of manuals |
Brother International PR-1000 manual content summary:
- Brother International PR-1000 | Operation Manual for Premium Pack I Optional acc - Page 1
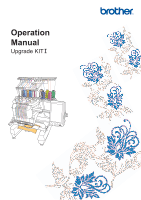
Operation Manual Upgrade KITI - Brother International PR-1000 | Operation Manual for Premium Pack I Optional acc - Page 2
...2 NEW FEATURES ...2 DISPLAYING THE FABRIC WHILE ALIGNING THE EMBROIDERY POSITION 3 CHANGING THE PATTERN SIZE WHILE MAINTAINING THE DESIRED Function 8 Saving and Recalling the Custom Thread Table using USB media 10 USING THE CAMERA TO CONNECT PATTERNS 12 Examples of Connected Patterns 12 - Brother International PR-1000 | Operation Manual for Premium Pack I Optional acc - Page 3
in the Installation Guide. The machine can then be used as outlined in this upgrade Operation Manual. Note • Screen illustrations may vary due to model of machine. NEW FEATURES The following features will be activated with the upgrade for Kit I. • Positioning of the embroidery pattern can be - Brother International PR-1000 | Operation Manual for Premium Pack I Optional acc - Page 4
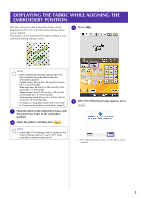
details on using fabric thicker than 2 mm, refer to "Positioning the pattern on thick fabric" (page 5). a Hoop the fabric in the embroidery frame, and then attach the frame to the embroidery machine. b Select the pattern, and then press . Note • Check page 7/7 of Settings screen to make sure - Brother International PR-1000 | Operation Manual for Premium Pack I Optional acc - Page 5
the fabric disappears or remains displayed can be specified from page 7/7 of the settings screen. a b c f Use to align the pattern with the desired embroidery position. • The pattern can be moved to the desired position by using your finger or the touch pen to drag the pattern displayed on the - Brother International PR-1000 | Operation Manual for Premium Pack I Optional acc - Page 6
. It will not affect embroidering if it is turned on with normal embroidery. a Hoop the fabric in the embroidery frame, and then attach the frame to the machine. b Select the pattern, and then press . f Affix the embroidery positioning sticker to the fabric within the area indicated by the red - Brother International PR-1000 | Operation Manual for Premium Pack I Optional acc - Page 7
). to enter Stitch Recalculator mode Note • Be sure to sew trial embroidery using same fabric and threads as project in order to check the embroidering is maintained while the pattern is enlarged/reduced. However, the needle drop point pattern is not entirely maintained. Use the normal resizing - Brother International PR-1000 | Operation Manual for Premium Pack I Optional acc - Page 8
be sure to embroider a trial sample on a piece of scrap fabric that is the same as the fabric used in the project, using the same needle and embroidery thread. • If the pattern is enlarged and there is space between stitches, a better effect can be achieved by increasing the thread density. • If the - Brother International PR-1000 | Operation Manual for Premium Pack I Optional acc - Page 9
Function With the Color Shuffling function, the machine suggests new color schemes for the embroidery pattern that you have selected. After you select Creating a custom thread table" in the Operation Manual of the machine for the details. a Number of colors to be used in the pattern b Effects - Brother International PR-1000 | Operation Manual for Premium Pack I Optional acc - Page 10
function. Refer to "Creating a custom thread table" in the Operation Manual for the machine, about setting the colors in the custom thread table. e Press review the previous schemes. Note • Maximum 10 pages of schemes can be reviewed. After 10 pages of schemes, the oldest page is deleted every time you - Brother International PR-1000 | Operation Manual for Premium Pack I Optional acc - Page 11
the Operation Manual of the machine, for the detailed instructions about of the machine. → The embroidery edit screen will appear. Note • The following settings in the settings screen cannot be changed in this function; - Thread color brand selection - Reserved needle - Brother International PR-1000 | Operation Manual for Premium Pack I Optional acc - Page 12
".pcp" data file in USB media. b Press and then press . c Press . → The "Saving" screen is displayed. When the data is loaded to the machine, the display returns to the original screen automatically. Note • Do not insert or remove USB media while "Saving" screen is displayed. You will lose - Brother International PR-1000 | Operation Manual for Premium Pack I Optional acc - Page 13
the round frames, you can not connect patterns using this function. • Split (Large-size) embroidery patterns cannot be used with this function. • You can not connect patterns using this function while the machine is set to the Link mode. Examples of Connected Patterns Two patterns can be connected - Brother International PR-1000 | Operation Manual for Premium Pack I Optional acc - Page 14
. These 3 patterns for practicing are available on the included CD. manual sample b Hoop fabric in the large embroidery frame (13 cm × 18 cm (5-1/8 inches × 7-1/8 inches)), and then attach the frame to the embroidery machine. a Pattern1.pes b Pattern2.pes c Pattern3.pes Note • Use USB media - Brother International PR-1000 | Operation Manual for Premium Pack I Optional acc - Page 15
d Press , then press and then press the start/stop button to embroider the first pattern. f When the following message appears, press . → Message appears on screen and carriage will move after pressing . g Select the second pattern [2] for practicing, then press . e After embroidering - Brother International PR-1000 | Operation Manual for Premium Pack I Optional acc - Page 16
h Press , and then select how the pattern will be connected. i When the pattern connection setting screen appears, select the reference edge and reference point of the first pattern for connecting the next pattern. Since, in this example, we will connect the center point of the right edge - Brother International PR-1000 | Operation Manual for Premium Pack I Optional acc - Page 17
point of the left edge. k Prepare two embroidery positioning stickers. We will follow the on-screen instructions to affix these two stickers to the fabric so Brother dealer. If any other sticker is used, the camera may not recognize it. • The 182 mm × 257 mm (7 inches × 10 inches) embroidery - Brother International PR-1000 | Operation Manual for Premium Pack I Optional acc - Page 18
sticker in the correct position. Make sure that the sticker is affixed with the large circle at the top. m Using both hands affix the second embroidery positioning mark within the red lines by pressing down on each corner of the positioning mark onto the material and then touch . → The camera - Brother International PR-1000 | Operation Manual for Premium Pack I Optional acc - Page 19
the two stickers, and then press . a a Embroidering area While making sure that the two positioning stickers do not peel off, remove the embroidery frame from the machine, and then rehoop the fabric. Be sure to hoop the fabric so the next pattern and both the positioning stickers are within the - Brother International PR-1000 | Operation Manual for Premium Pack I Optional acc - Page 20
so that the next pattern and both the positioning stickers are within the embroidery sewing area as indicated in the screen. Press , and then press the positioning stickers when it's hard to reach the stickers behind the needles. q Press , then press and then press the start/stop button to - Brother International PR-1000 | Operation Manual for Premium Pack I Optional acc - Page 21
r When the following message appears, press . t Before embroidering, press to display the pattern connection setting screen. Select the reference edge and reference point for connecting the second and third patterns, and then press . In this example, we will select the top point of the right - Brother International PR-1000 | Operation Manual for Premium Pack I Optional acc - Page 22
step m on page 17 in order to move the positioning stickers. For an example, the on-screen instruction appears when you use the embroidery frame with a size of 10 cm × 10 cm (4 inches × 4 inches) to connect patterns as shown below. a Reference edge and reference point b Third pattern [3] c Second - Brother International PR-1000 | Operation Manual for Premium Pack I Optional acc - Page 23
a Refer to steps a through m of "Practice (Connecting Three Patterns)" using the embroidery frame with a size of 10 cm x 10 cm (4 inches x 4 inches) to embroider the first pattern and to connect the second pattern. b Following message appears in step n if the next pattern or affixed - Brother International PR-1000 | Operation Manual for Premium Pack I Optional acc - Page 24
and then remove the stickers. e Affix the two positioning stickers again according to the on-screen instructions so that the next pattern or positioning marks can fit in the embroidery area. → The camera detects the two positioning stickers. Note • If the following message appears, rehoop the - Brother International PR-1000 | Operation Manual for Premium Pack I Optional acc - Page 25
peel off, rehoop the fabric according to the example displayed on the on-screen instruction. a → The camera detects the second positioning sticker. a Embroidering area a Pattern to be embroidered next b Embroidery sheet h Continue the operation from step o on page 18 after pressing . 24 - Brother International PR-1000 | Operation Manual for Premium Pack I Optional acc - Page 26
Connected" listed on page 27, to join the first and the second patterns along an edge. Rectangles and patterns (not angled) a Rectangle • Pressing in the embroidery settings screen changes the angle at which patterns are connected. d Press to display the - Brother International PR-1000 | Operation Manual for Premium Pack I Optional acc - Page 27
f Refer to steps d through f of "Practice (Connecting Three Patterns)" to embroider the first pattern. g Select the next pattern, and then press . k Select the reference edge and reference point for connecting this pattern to the next one. Press . h Press in the pattern editing screen. i - Brother International PR-1000 | Operation Manual for Premium Pack I Optional acc - Page 28
can be set up to ±99.9 mm. Note • The arrangement of patterns displayed in the screen may differ slightly from the actual embroidery. Use a ruler to measure the vertical and horizontal shifts before changing the settings. a a b a Reference edge and reference point → Message appears on screen - Brother International PR-1000 | Operation Manual for Premium Pack I Optional acc - Page 29
Measuring the Distance That the Pattern Will Be Slid Note • Steps a through d are for measurement placement only. Be sure to sew trial embroidery using same fabric and threads as project in order to check the embroidering results. a Set "Basting Distance" in the settings screen to "0.0". a First - Brother International PR-1000 | Operation Manual for Premium Pack I Optional acc - Page 30
to check that the pattern will be slid the correct distance. a Select the pattern, and then continue to the embroidery settings screen. b Press in the embroidery settings screen. c Embroider the first pattern. d Refer to steps e through h of "Practice (Connecting Three Patterns)" to select the - Brother International PR-1000 | Operation Manual for Premium Pack I Optional acc - Page 31
e Select the reference edge and reference point for connecting this pattern to the next one, and then press . f When the pattern connection setting screen appears, select the reference edge and reference point corresponding to those for the first pattern. a a a Reference edge and reference - Brother International PR-1000 | Operation Manual for Premium Pack I Optional acc - Page 32
. h Continue with step k of "Practice (Connecting Three Patterns)" to finish connecting the patterns. Note • After checking that the trial embroidery results are satisfactory, sew the actual embroidery. If you decide to change the distance that the pattern is slid after checking the trial - Brother International PR-1000 | Operation Manual for Premium Pack I Optional acc - Page 33
pattern. Press the pattern connection key . Begin embroidering the first pattern. È Finish embroidering the first pattern. (A) If the machine is turned off during any operation in this box, the machine will return to (A) when it is turned on again. Finish detecting positioning stickers. (B) If the - Brother International PR-1000 | Operation Manual for Premium Pack I Optional acc - Page 34
NEW PATTERNS Thumbnail List Embroidery patterns Alphabet patterns 33 - Brother International PR-1000 | Operation Manual for Premium Pack I Optional acc - Page 35
) (515) 39 (085) 184.4 mm 278.2 mm 1 Time required for embroidering 2 Embroidery thread color/ Embroidery thread color number 3 Embroidery size No. 02 No. 04 140 min 1 (001) 5 (017) 9 (323) 13 (517) 2 (817) 6 (209) 10 (030) 14 (707) 3 (812) 7 (348) 11 (330) 15 (058) 4 (205) 8 (513 - Brother International PR-1000 | Operation Manual for Premium Pack I Optional acc - Page 36
) 8 (509) 22 (019) 36 (810) 50 (086) 9 (086) 23 (001) 37 (086) 51 (019) 10 (209) 24 (612) 38 (810) 52 (810) 11 (086) 25 (209) 39 (017) 53 (612) 12 27 (001) 41 (019) 14 (017) 28 (810) 42 (209) 192.4 mm 350.8 mm 102 min 1 (339) 10 (517) 19 (328) 28 (208) 2 (030) 11 (208) 20 (339) 29 (001) 3 (808) 12 - Brother International PR-1000 | Operation Manual for Premium Pack I Optional acc - Page 37
■ Examples of Combinations No. 05 No. 08 No. 09 36 - Brother International PR-1000 | Operation Manual for Premium Pack I Optional acc - Page 38
Version 3.1 or later English 111-001
-
 1
1 -
 2
2 -
 3
3 -
 4
4 -
 5
5 -
 6
6 -
 7
7 -
8
-
9
-
10
-
11
-
12
-
13
-
14
-
15
-
16
-
17
-
18
-
19
-
20
-
21
-
22
-
23
-
24
-
25
-
26
-
27
-
28
-
29
-
30
-
31
-
32
-
33
-
34
-
35
-
36
-
37
-
38
 |
 |
Operation
Manual
Upgrade KIT
I