Brother International PR-1000 Operation Manual for Premium Pack I Optional acc - Page 6
CAUTION, Positioning the pattern on thick fabric
 |
View all Brother International PR-1000 manuals
Add to My Manuals
Save this manual to your list of manuals |
Page 6 highlights
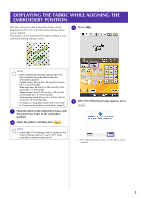
■ Positioning the pattern on thick fabric When positioning the pattern on the fabric thicker than 2 mm, the fabric may not be detected correctly. In order for the fabric to be correctly detected, its thickness must first be measured. Memo • This feature is functional only when the fabric is scanned. It will not affect embroidering if it is turned on with normal embroidery. a Hoop the fabric in the embroidery frame, and then attach the frame to the machine. b Select the pattern, and then press . f Affix the embroidery positioning sticker to the fabric within the area indicated by the red frame in the LCD, and then press . c Display page 7/7 of the settings screen, and then set "Fabric Thickness Sensor" to "ON". d Press . e Press . g When the following message appears, remove the embroidery positioning sticker, and then press . → The embroidery positioning sticker affixed to the fabric is detected, and then the embroidery frame will be moved. h Continue with step e on page 4 to align the pattern with the desired embroidery position. CAUTION • Use fabrics with a thickness of less than 3 mm (approx. 1/8 inch). Using fabrics thicker than 3 mm (approx. 1/8 inch) may cause the needle to break. 5
-
 1
1 -
 2
2 -
 3
3 -
 4
4 -
 5
5 -
 6
6 -
 7
7 -
 8
8 -
 9
9 -
 10
10 -
 11
11 -
 12
12 -
13
-
14
-
15
-
16
-
17
-
18
-
19
-
20
-
21
-
22
-
23
-
24
-
25
-
26
-
27
-
28
-
29
-
30
-
31
-
32
-
33
-
34
-
35
-
36
-
37
-
38
 |
 |
