Brother International PR-1000 Table Set Installation Manual PRWT1 - Page 2
Verifying the package, contents, Preparing for installation - for sale
 |
View all Brother International PR-1000 manuals
Add to My Manuals
Save this manual to your list of manuals |
Page 2 highlights
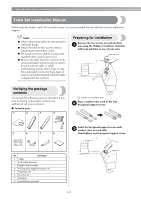
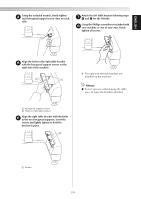
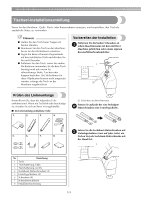
Table Set Installation Manual When using the border, quilt, flat or jumbo frame, it is recommended that the table be used for additional support. Note ● When carrying the table, be sure to hold it with both hands. ● Attach the table to the machine before installing the embroidery frame. ● Do not place heavy objects on top of the installed table or press down on it. ● Remove the table from the machine while using embroidery frame that do no need to be used with the table or while embroidering tubular items, bags or caps. The embroidery frames for these types of objects cannot be installed while the table is attached to the machine. Preparing for installation Remove the two screws on each machine 1 arm using the Phillips screwdriver included with your machine or one of your own. Verifying the package contents Check that the following parts are included. If any item is missing or damaged, contact your authorized sales representative. ■ Included parts 1. 2. 3. 4. 1 Screws on machine arm Place a washer onto each of the four 2 hexagonal support screws. 5. 6. 7. 8. Insert the hexagonal support screws with 3 washers (two on each side). Hand-tighten each hexagonal support screw. No. Part Name 1 Table 2 Left table bracket 3 Right table bracket 4 Hexagonal support screws (4) 5 Washers (4) 6 Screws (4) 7 Wrench 8 Installation manual 1/4
-
 1
1 -
 2
2 -
 3
3 -
 4
4 -
 5
5 -
 6
6 -
 7
7 -
 8
8 -
9
-
10
-
11
-
12
-
13
-
14
-
15
-
16
-
17
-
18
-
19
-
20
-
21
-
22
-
23
-
24
-
25
-
26
-
27
-
28
-
29
-
30
-
31
-
32
-
33
-
34
-
35
-
36
-
37
-
38
-
39
-
40
-
41
-
42
-
43
-
44
 |
 |
