Brother International PR-1000 Table Set Installation Manual PRWT1 - Page 3
English
 |
View all Brother International PR-1000 manuals
Add to My Manuals
Save this manual to your list of manuals |
Page 3 highlights
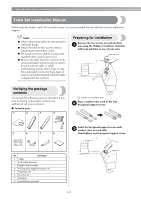
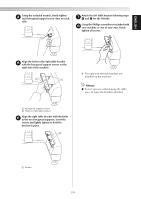
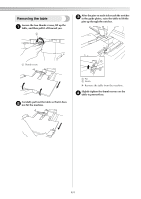
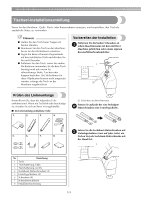
ENGLISH Using the included wrench, firmly tighten 4 each hexagonal support screw (two on each side). Attach the left table bracket following steps 7 5 and 6 for the left side. Using the Phillips screwdriver included with 8 your machine or one of your own, firmly tighten all screws. Align the holes in the right table bracket 5 with the hexagonal support screws on the right side of the machine. X The right and left table brackets are installed on the machine. Memo ● Even if you sew without using the table, you can leave the brackets attached. 1 Hexagonal support screws 2 Holes in right table bracket Align the right table bracket with the holes 6 in the two hexagonal supports, insert the screws and lightly tighten to hold the bracket in place. 1 Screws 2/4
-
 1
1 -
 2
2 -
 3
3 -
 4
4 -
 5
5 -
 6
6 -
 7
7 -
 8
8 -
 9
9 -
10
-
11
-
12
-
13
-
14
-
15
-
16
-
17
-
18
-
19
-
20
-
21
-
22
-
23
-
24
-
25
-
26
-
27
-
28
-
29
-
30
-
31
-
32
-
33
-
34
-
35
-
36
-
37
-
38
-
39
-
40
-
41
-
42
-
43
-
44
 |
 |
