Brother International PR-620 Needle Set Procedure - English - Page 6
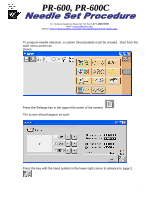
To program a design by needle bar sequence, start from the main menu. - software
 |
View all Brother International PR-620 manuals
Add to My Manuals
Save this manual to your list of manuals |
Page 6 highlights
When this has been completed, the screen should appear as such: You will notice that only five "anchors" appear over the spools. The earlier versions of software would only allow five needles to be anchored. Latest versions allow all six to be anchored. Press the OK key. Once this has been completed, you will be able to program designs with the six colors that you have set on your custom thread table. Since there are only six colors on this table, and that they are anchored, they can represent the six needle bars of the machine. To program a design by needle bar sequence, start from the main menu. For our example, select the pre-programmed designs by pressing the "Design" key from the main menu. The screen should appear as such: 6
-
 1
1 -
 2
2 -
 3
3 -
 4
4 -
 5
5 -
 6
6 -
 7
7 -
 8
8 -
 9
9 -
 10
10
 |
 |

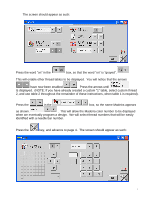
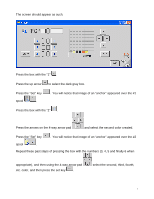
When this has been completed, the screen should appear as such:
You will notice that only five “anchors” appear over the spools.
The earlier versions of
software would only allow five needles to be anchored.
Latest versions allow all six to be
anchored.
Press the OK key.
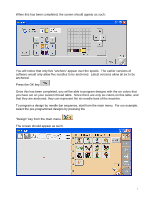
Once this has been completed, you will be able to program designs with the six colors that
you have set on your custom thread table.
Since there are only six colors on this table, and
that they are anchored, they can represent the six needle bars of the machine.
To program a design by needle bar sequence, start from the main menu.
For our example,
select the pre-programmed designs by pressing the
“Design” key from the main menu.
The screen should appear as such:
6