Brother International PR-650 Upgrade KIT CW Operation Manual PRCW1
Brother International PR-650 Manual
 |
View all Brother International PR-650 manuals
Add to My Manuals
Save this manual to your list of manuals |
Brother International PR-650 manual content summary:
- Brother International PR-650 | Upgrade KIT CW Operation Manual PRCW1 - Page 1
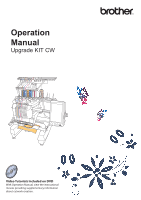
Operation Manual Upgrade KIT CW Video Tutorials Included on DVD With Operation Manual, view the instructional movies providing supplementary information about cutwork creation. - Brother International PR-650 | Upgrade KIT CW Operation Manual PRCW1 - Page 2
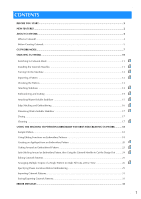
Stabilizer ...17 2 Drying ...17 Cleaning ...17 2 USING THE MACHINE TO POSITION EMBROIDERY PATTERNS FOR CREATING CUTWORK .......... 18 Sample Pattern...18 Using Editing Functions on Embroidery Patterns 18 Creating an Appliqué from an Embroidery Pattern 20 3 Cutting Around an Embroidered Pattern 23 - Brother International PR-650 | Upgrade KIT CW Operation Manual PRCW1 - Page 3
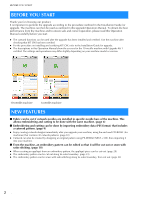
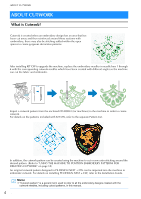
to the Installation Guide for upgrade. z The descriptions in this Operation Manual show the screens for the 10-needle machine with Upgrade pattern using PE-DESIGN NEXT + CW, then importing it into your machine. ■ From the machine, an embroidery pattern can be edited so that it will be cut out or - Brother International PR-650 | Upgrade KIT CW Operation Manual PRCW1 - Page 4
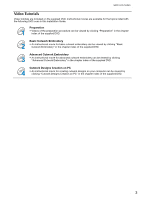
DVD icons in this Installation Guide. Preparation 1 • Videos of the preparation procedure can be viewed by clicking "Preparation" in the chapter index of the supplied DVD. Basic Cutwork Embroidery 2 • An instructional movie for basic cutwork embroidery can be viewed by clicking "Basic - Brother International PR-650 | Upgrade KIT CW Operation Manual PRCW1 - Page 5
. After installing KIT CW to upgrade the machine, replace the embroidery needles in needle bars 1 through 4 with machine to embroider cutwork. For details on installing PE-DESIGN NEXT + CW, refer to the Installation Guide. Memo • "Cutwork pattern" is a generic term used to refer to all the embroidery - Brother International PR-650 | Upgrade KIT CW Operation Manual PRCW1 - Page 6
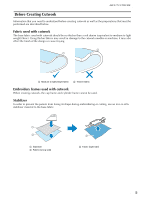
weight fabric). Using thicker fabrics may result in damage to the cutwork needles or machine, it may also effect the finish of the design or cause fraying. a Medium to lightweight fabric b Thicker fabric Embroidery frames used with cutwork When creating cutwork, the cap frame and cylinder frame - Brother International PR-650 | Upgrade KIT CW Operation Manual PRCW1 - Page 7
Installation Guide. b a a Example of a design with cutouts b Example of net fill stitching Various patterns on the enclosed CD-ROM1 (for machines) -DESIGN NEXT + CW, refer to the Installation Guide. Trial embroidery Be sure to sew trial embroidery using same fabric and threads as project in order - Brother International PR-650 | Upgrade KIT CW Operation Manual PRCW1 - Page 8
must be switched to Cutwork mode. For details on switching the machine to Cutwork mode, refer to "Switching to Cutwork Mode" on page 11. ■ Cutwork mode functions A cutwork pattern can be designed with your desired embroidery pattern using a cut out or outlined with satin stitching. The sections - Brother International PR-650 | Upgrade KIT CW Operation Manual PRCW1 - Page 9
CUTWORK MODE ■ When using Cutwork mode The displays for embroidery needles 1 through 4 change to cutwork needles. Cutting will be done with needles 1 through 4, and embroidering with the remaining needles. 654 3 2 1 654 3 2 1 When using the cutwork needles, the fabric will be cut. 8 - Brother International PR-650 | Upgrade KIT CW Operation Manual PRCW1 - Page 10
CUTWORK MODE The cutting line for the appliqué piece (APPLIQUE MATERIAL) will also be cut using the cutwork needles. Cutwork mode OFF Cutwork mode ON "APPLIQUE MATERIAL", "APPLIQUE POSITION" and "APPLIQUE" are assigned to one needle bar number and listed on the screen. Depending on the thread - Brother International PR-650 | Upgrade KIT CW Operation Manual PRCW1 - Page 11
Follow this procedure as practice. KIT CW a Switching to Cutwork Mode (page 11) b Installing the Cutwork Needles (page 11) c Turning On the Machine (page 12) d Importing a Pattern (page 12) e Checking the Pattern (page 13) f Attaching Stabilizer (page 14) g Embroidering and Cutting (page 15 - Brother International PR-650 | Upgrade KIT CW Operation Manual PRCW1 - Page 12
to turn Cutwork mode off, before you perform embroidery operation with all the needles available for your machine. To turn off Cutwork mode, touch beside " sure to turn off the embroidery machine before replacing the needles, otherwise injuries may result if the machine starts sewing. a Install - Brother International PR-650 | Upgrade KIT CW Operation Manual PRCW1 - Page 13
disabled. For details on this memory feature, refer to "Resume Embroidering After Turning Off the Machine" in chapter 3 of your machine's Operation Manual. Memo • Once the Cutwork mode has been turned on, the machine starts in Cutwork mode each time it is turned on until Cutwork mode is turned off - Brother International PR-650 | Upgrade KIT CW Operation Manual PRCW1 - Page 14
then to import the pattern. CREATING CUTWORK Memo • For details on importing patterns, refer to "Selecting an Embroidery Pattern" in chapter 5 of your machine's Operation Manual. Checking the Pattern a Touch . The imported cutwork pattern can be edited, repositioned, added or removed. If the - Brother International PR-650 | Upgrade KIT CW Operation Manual PRCW1 - Page 15
with an embroidery frame. Water-soluble stabilizers dissolve when washed, allowing you to create beautiful embroidery that is not stiff. a Fabric b Water-soluble stabilizers • For details on using stabilizer, refer to "Stabilizers (backing)" in chapter 7 of your machine's Operation Manual. 14 - Brother International PR-650 | Upgrade KIT CW Operation Manual PRCW1 - Page 16
CREATING CUTWORK b Securely hoop the fabric with the stabilizer attached, and then attach the embroidery frame to the machine. Embroidering and Cutting 2 Note • For details on the patterns requiring watersoluble stabilizer, refer to "Patterns requiring water-soluble stabilizer" on page 6. a - Brother International PR-650 | Upgrade KIT CW Operation Manual PRCW1 - Page 17
CREATING CUTWORK d Place the enclosed water-soluble stabilizer on the cutout areas to reinforce the edges to be sewn with satin stitching. Edge Stitching and Embroidering 2 a Touch , and then press the start/ stop button to restart embroidering. Note • Use a sheet of water-soluble stabilizer - Brother International PR-650 | Upgrade KIT CW Operation Manual PRCW1 - Page 18
melt away the remaining water-soluble stabilizer. a Turn off the embroidery machine. CAUTION • Unplug the power supply cord before cleaning the machine, otherwise injuries or an electric shock may occur. b Remove them, refer to "Maintenance" in chapter 7 of your machine's Operation Manual. 17 - Brother International PR-650 | Upgrade KIT CW Operation Manual PRCW1 - Page 19
procedures for editing a cutwork pattern are described as follow. The sample pattern used in this instructions is contained in the supplied CD-ROM1 (for machines). CWSample.pes Using Editing Functions on Embroidery Patterns From the machine, a cutwork pattern can be designed by either cutting out an - Brother International PR-650 | Upgrade KIT CW Operation Manual PRCW1 - Page 20
USING THE MACHINE TO POSITION EMBROIDERY PATTERNS FOR CREATING CUTWORK ■ Cutting Around an Embroidered Pattern fabric is cut in a desired shape around an embroidered pattern. ■ Satin Stitching Around an Embroidery Pattern, then Using the Cutwork Needles to Cut the Design Out (page 24) After satin - Brother International PR-650 | Upgrade KIT CW Operation Manual PRCW1 - Page 21
7 of your machine's Operation Manual. c Touch , and make sure is highlighted. With the "Appliqué Distance" keys, specify the distance of the appliqué outline from the embroidery pattern. ■ Creating an appliqué with the b outline around a pattern a c a Set the embroidery machine to Cutwork - Brother International PR-650 | Upgrade KIT CW Operation Manual PRCW1 - Page 22
USING THE MACHINE TO POSITION EMBROIDERY PATTERNS FOR CREATING CUTWORK d Press . → The following messages appear. f Press . e Check the displayed preview, and then For details on making an appliqué piece, refer to "Creating an appliqué piece" in chapter 4 of your machine's Operation Manual. 21 - Brother International PR-650 | Upgrade KIT CW Operation Manual PRCW1 - Page 23
USING THE MACHINE TO POSITION EMBROIDERY PATTERNS FOR CREATING CUTWORK g With the thread color sequence • For details on making an appliqué, refer to "Appliqué Sewing" in chapter 7 of your machine's Operation Manual. ■ Creating an appliqué with a desired frame shape c a b c a Needle bar key/ - Brother International PR-650 | Upgrade KIT CW Operation Manual PRCW1 - Page 24
USING THE MACHINE TO POSITION EMBROIDERY PATTERNS FOR CREATING CUTWORK c Continue the procedure starting with step With the "Cutting Line Distance" keys, specify the distance of the cutting line from the embroidery pattern. Memo • "Cutting Line Distance" can also be specified on page 2 of the - Brother International PR-650 | Upgrade KIT CW Operation Manual PRCW1 - Page 25
USING THE MACHINE TO POSITION EMBROIDERY PATTERNS FOR CREATING CUTWORK b Touch . Next, touch until Creating an appliqué with the outline around a pattern" on page 20. Satin Stitching Around an Embroidery Pattern, then Using the Cutwork Needles to Cut the Design Out 3 ■ Satin stitching along the - Brother International PR-650 | Upgrade KIT CW Operation Manual PRCW1 - Page 26
USING THE MACHINE TO POSITION EMBROIDERY PATTERNS FOR CREATING CUTWORK Memo • "Appliqué Distance" and "Cutting pattern to become misaligned or it may not be cleanly cut. Be sure to sew trial embroidery using same fabric and threads as project in order to check the embroidering and cutting results. - Brother International PR-650 | Upgrade KIT CW Operation Manual PRCW1 - Page 27
USING THE MACHINE TO POSITION EMBROIDERY PATTERNS FOR CREATING CUTWORK ■ Changing the size of cutwork patterns procedure describes how to duplicate cutwork patterns using the editing functions built into your machine, so that all of the cutting steps are preformed at one time. When using a cutwork - Brother International PR-650 | Upgrade KIT CW Operation Manual PRCW1 - Page 28
c Touch USING THE MACHINE TO POSITION EMBROIDERY PATTERNS FOR CREATING CUTWORK . e Select the direction in the border function, refer to "Designing repeated patterns" in chapter 5 of your machine's Operation Manual. • We recommend spacing of more than 10 mm between the patterns. Making spaces - Brother International PR-650 | Upgrade KIT CW Operation Manual PRCW1 - Page 29
USING THE MACHINE TO POSITION EMBROIDERY PATTERNS FOR CREATING CUTWORK f Specify the settings for the vertical direction, and then touch . h Touch , and then touch on the ensuing embroidering settings screen. g Touch to ungroup the patterns. i Check the machine display, and then start - Brother International PR-650 | Upgrade KIT CW Operation Manual PRCW1 - Page 30
steps a on page 26 through step g on page 28. The instructions on how to pause the machine before cutting the first pattern out are provided as follow. a b sequence display. In this example, a pause location is specified before embroidery begins after a previous pattern is cut out. a b a Thread - Brother International PR-650 | Upgrade KIT CW Operation Manual PRCW1 - Page 31
USING THE MACHINE TO POSITION EMBROIDERY PATTERNS FOR CREATING CUTWORK c Use and to display the thread color (or cutwork needle) where the machine will be paused before being sewn (being cut) at the top of the thread color sequence display, and then touch . In this example, specify a pause - Brother International PR-650 | Upgrade KIT CW Operation Manual PRCW1 - Page 32
USING THE MACHINE TO POSITION EMBROIDERY PATTERNS FOR CREATING CUTWORK Importing Cutwork Patterns Importing z Cutwork patterns cannot be imported if the machine is not in Cutwork mode. z Cutwork patterns in the following data formats can be imported • PES*/PEN (some)/PHC (when saved on the machine's - Brother International PR-650 | Upgrade KIT CW Operation Manual PRCW1 - Page 33
ERROR MESSAGES ERROR MESSAGES Depending on the pattern type or method used to create it, some cutwork patterns may not be created or imported properly. In these cases, error messages will appear. If the following error messages appear, select a different pattern or, if necessary, edit the pattern. - Brother International PR-650 | Upgrade KIT CW Operation Manual PRCW1 - Page 34
message appears, set the machine to Cutwork mode. For details, refer to "Switching to Cutwork Mode" on page 11. When the cutting line for a cutwork pattern or appliqué piece exceeds the embroidering area z Select a different pattern. z Use a larger embroidery frame to hoop the fabric (when a larger - Brother International PR-650 | Upgrade KIT CW Operation Manual PRCW1 - Page 35
English 111-001
-
 1
1 -
 2
2 -
 3
3 -
 4
4 -
 5
5 -
 6
6 -
 7
7 -
8
-
9
-
10
-
11
-
12
-
13
-
14
-
15
-
16
-
17
-
18
-
19
-
20
-
21
-
22
-
23
-
24
-
25
-
26
-
27
-
28
-
29
-
30
-
31
-
32
-
33
-
34
-
35
 |
 |

Operation
Operation
Manual
Manual
Upgrade KIT CW
Upgrade KIT CW
Operation
Manual
Upgrade KIT CW
Video Tutorials Included on DVD
With Operation Manual, view the instructional
movies providing supplementary information
about cutwork creation.