Brother International PR-650 Upgrade KIT CW Operation Manual PRCW1 - Page 11
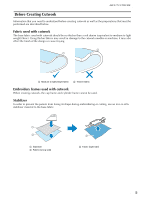
Creating Cutwork
 |
View all Brother International PR-650 manuals
Add to My Manuals
Save this manual to your list of manuals |
Page 11 highlights
CREATING CUTWORK CREATING CUTWORK One example procedure for creating cutwork using the machine is shown below. We will follow this procedure to create cutwork using the cutwork pattern for a clover on the enclosed CD-ROM1 (for machines). Follow this procedure as practice. KIT CW a Switching to Cutwork Mode (page 11) b Installing the Cutwork Needles (page 11) c Turning On the Machine (page 12) d Importing a Pattern (page 12) e Checking the Pattern (page 13) f Attaching Stabilizer (page 14) g Embroidering and Cutting (page 15) h Attaching Water-Soluble Stabilizer (page 15) i Edge Stitching and Embroidering (page 16) j Dissolving WaterSoluble Stabilizer (page 17) 10 k Drying (page 17) l Cleaning (page 17)
-
 1
1 -
2
-
3
-
4
-
5
-
 6
6 -
 7
7 -
 8
8 -
 9
9 -
 10
10 -
 11
11 -
 12
12 -
 13
13 -
 14
14 -
 15
15 -
 16
16 -
17
-
18
-
19
-
20
-
21
-
22
-
23
-
24
-
25
-
26
-
27
-
28
-
29
-
30
-
31
-
32
-
33
-
34
-
35
 |
 |

CREATING CUTWORK
10
One example procedure for creating cutwork using the machine is shown below. We will follow this
procedure to create cutwork using the cutwork pattern for a clover on the enclosed CD-ROM1 (for
machines). Follow this procedure as practice.
CREATING CUTWORK
a
Switching to Cutwork
Mode (page 11)
b
Installing the Cutwork
Needles (page 11)
c
Turning On the Machine
(page 12)
d
Importing a Pattern
(page 12)
e
Checking the Pattern
(page 13)
f
Attaching Stabilizer
(page 14)
g
Embroidering and
Cutting (page 15)
h
Attaching Water-Soluble
Stabilizer (page 15)
i
Edge Stitching and
Embroidering (page 16)
j
Dissolving Water-
Soluble Stabilizer
(page 17)
k
Drying (page 17)
l
Cleaning (page 17)
KIT CW