Brother International SM1400 Operation Manual - Page 27
needle may break or the machine may
 |
View all Brother International SM1400 manuals
Add to My Manuals
Save this manual to your list of manuals |
Page 27 highlights
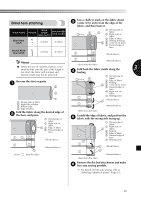
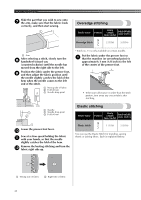
■ Attaching the extra spool pin Put the extra spool pin in the hole on the top of the machine. Put the second spool of thread onto the extra spool pin. Thread the right needle from front to 4 back. Do not pass the thread behind the needle bar thread guide. 3 2 1 2 1 First spool 2 Second spool ■ Twin needle threading You should thread each needle separately. Note Models equipped with a needle threader ● You cannot use the needle threader to thread the twin needle. Instead, thread the twin needle by hand, from front to back. Using the needle threader may damage the machine. Use the thread from the first spool to 1 thread the machine to the needle bar thread guide. The path for threading the machine to the needle bar thread guide is the same as for normally threading the machine (for a single needle). See page 18 for more details. Thread the left needle from front to back. 2 Use the thread from the second spool to 3 thread the machine to the thread take-up lever. The path for threading the machine to the thread take-up lever is the same as for normally threading the machine (for a single needle). See page 18 for more details. 1 Left needle thread passes through the needle bar thread guide. 2 Right needle thread passes in front of the needle bar thread guide. 3 Needle bar thread guide Attach zigzag foot "J". 5 For details on changing the presser foot, refer to "Changing the presser foot" on page 10. CAUTION ● When using the twin needle, be sure to attach zigzag foot "J", otherwise the needle may break or the machine may be damaged. Turn on the machine. 6 CAUTION ● Do not turn on the machine while pressing down the foot controller. The machine may start unexpectedly and cause personal injury or damage to the machine. 26
-
 1
1 -
2
-
3
-
4
-
5
-
6
-
7
-
8
-
9
-
10
-
11
-
12
-
13
-
14
-
15
-
16
-
17
-
18
-
19
-
20
-
21
-
 22
22 -
 23
23 -
 24
24 -
 25
25 -
 26
26 -
 27
27 -
 28
28 -
 29
29 -
 30
30 -
 31
31 -
 32
32 -
33
-
34
-
35
-
36
-
37
-
38
-
39
-
40
-
41
-
42
-
43
-
44
-
45
-
46
-
47
-
48
-
49
-
50
-
51
-
52
-
53
-
54
-
55
-
56
-
57
-
58
-
59
-
60
-
61
-
62
-
63
-
64
-
65
-
66
-
67
-
68
-
69
-
70
-
71
-
72
-
73
-
74
-
75
-
76
-
77
-
78
-
79
-
80
-
81
-
82
-
83
-
84
-
85
-
86
-
87
-
88
-
89
-
90
-
91
-
92
-
93
-
94
 |
 |
