Brother International XL-2600i Operation Manual - Page 25
Stitch Length Dial, Control de longitud de puntada, Stretch Stitching, Costura elástica
 |
View all Brother International XL-2600i manuals
Add to My Manuals
Save this manual to your list of manuals |
Page 25 highlights
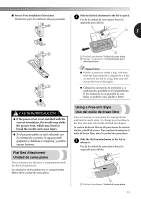
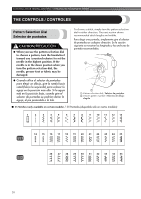
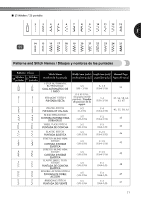
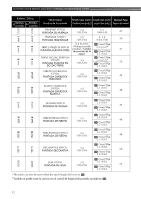
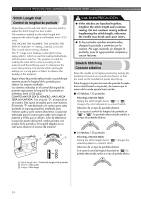
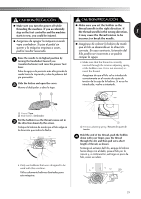
KNOWING YOUR SEWING MACHINE / CONOZCA SU MÁQUINA DE COSER Stitch Length Dial Control de longitud de puntada Depending on the selected stitch, you may need to adjust the stitch length for best results. The numbers marked on the stitch length dial represent the stitch length in millimeters (mm) (1/25 inch). THE HIGHER THE NUMBER, THE LONGER THE STITCH. With the "0" setting, material is not fed. This is used when sewing a button. The "F" range is for making a satin stitch (close zigzag stitch), which is used for making buttonholes and decorative stitches. The position needed for making the satin stitch varies according to the material and thread being used. To determine the exact dial position, first test the stitch and length settings on a scrap piece of fabric to observe the feeding of the material. Según el tipo de puntada seleccionado, es posible que necesite ajustar la longitud de la puntada para obtener los mejores resultados. Los números indicados en el control de longitud de puntada representan la longitud de la puntada en milímetros (mm) (1/25 pulg.). CUANTO MAYOR SEA EL NÚMERO, MÁS LARGA SERÁ LA PUNTADA. Con el ajuste "0", el material no se arrastra. Este ajuste se emplea para coser botones. El intervalo "F" está destinado a la costura para satén (puntada en zig-zag pequeña), empleada para realizar ojales y para costura decorativa. La posición adecuada para la costura para satén varía según el material y el hilo que se utilicen. A fin de determinar la posición exacta del control, realice primero una prueba de la puntada y la longitud elegidas en un retal para observar el avance del material. . 2 1 3 1 CAUTION/PRECAUCIÓN ● If the stitches are bunched together, lengthen the stitch length and continue sewing. Do not continue sewing without lengthening the stitch length, otherwise the needle may break and cause injury. ● Si las puntadas quedan amontonadas, alargue la puntada y continúe con la costura. No siga cosiendo sin alargar la puntada, pues la aguja podría romperse y causar lesiones. Stretch Stitching Costura elástica Raise the needle to its highest position by turning the handwheel toward you (counterclockwise) so that the mark on the handwheel points directly up. Suba la aguja a la posición más alta girando la rueda hacia usted (hacia la izquierda), de manera que la marca de la rueda apunte hacia arriba. ■ 35 Stitches / 35 puntadas Selecting a Stretch Stitch Setting the stitch length dial to " " or " " changes the selected pattern to a stretch stitch. Selección de un tipo de puntada elástica Si se ajusta el control de longitud de puntada en " " o " ", la puntada seleccionada cambia a un tipo de puntada elástica. ■ 25 Stitches / 25 puntadas Selecting a Stretch Stitch Setting the stitch length dial to " " changes the selected pattern to a stretch stitch. Selección de un tipo de puntada elástica Si se ajusta el control de longitud de puntada en " ", la puntada seleccionada cambia a un tipo de puntada elástica. 1 Stitch length dial / Control de longitud de puntada 2 Shorter / Más corta 3 Longer / Más larga 24
-
 1
1 -
2
-
3
-
4
-
5
-
6
-
7
-
8
-
9
-
10
-
11
-
12
-
13
-
14
-
15
-
16
-
17
-
18
-
19
-
 20
20 -
 21
21 -
 22
22 -
 23
23 -
 24
24 -
 25
25 -
 26
26 -
 27
27 -
 28
28 -
 29
29 -
 30
30 -
31
-
32
-
33
-
34
-
35
-
36
-
37
-
38
-
39
-
40
-
41
-
42
-
43
-
44
-
45
-
46
-
47
-
48
-
49
-
50
-
51
-
52
-
53
-
54
-
55
-
56
-
57
-
58
-
59
-
60
-
61
-
62
-
63
-
64
-
65
-
66
-
67
-
68
-
69
-
70
-
71
-
72
-
73
-
74
-
75
-
76
-
77
-
78
-
79
-
80
-
81
-
82
 |
 |
