Bushnell Natureview 8x40 Instruction Manual
Bushnell Natureview 8x40 Manual
 |
View all Bushnell Natureview 8x40 manuals
Add to My Manuals
Save this manual to your list of manuals |
Bushnell Natureview 8x40 manual content summary:
- Bushnell Natureview 8x40 | Instruction Manual - Page 1
VIDEO INSTRUCTION MANUAL Model#: 119739 11-14 - Bushnell Natureview 8x40 | Instruction Manual - Page 2
2 - Bushnell Natureview 8x40 | Instruction Manual - Page 3
TABLE OF CONTENTS ENGLISH Français Español Deutsch ITALIANO PAGE # 4-36 37-76 77-113 114-154 155-193 3 - Bushnell Natureview 8x40 | Instruction Manual - Page 4
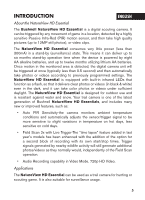
the instructions in this manual to ensure that you are completely satisfied with this product. If your Bushnell NatureView HD Essential does not seem to be functioning properly or if you are having photo/video quality issues, please check the Troubleshooting/FAQ section on pages 29-33. Problems are - Bushnell Natureview 8x40 | Instruction Manual - Page 5
Essential is designed for outdoor use and is resistant against water and snow. Your trail camera is one of the latest generation of Bushnell NatureView HD Essentials, and includes many new or improved features, such as: • Auto PIR Sensitivity-the camera monitors ambient temperature conditions and - Bushnell Natureview 8x40 | Instruction Manual - Page 6
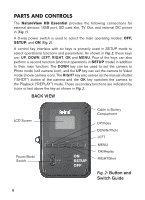
PARTS AND CONTROLS The NatureView HD Essential provides the following connections for external devices the camera to Video mode (movie camera icon). The RIGHT key also serves as the manual shutter ("SHOT") button of the camera and the OK key switches the camera to the Fig. 2: Button and Switch Guide - Bushnell Natureview 8x40 | Instruction Manual - Page 7
PARTS AND CONTROLS Video Mic TV Out USB Port DC In SD Card Slot Fig. 1: Connections FRONT VIEW Video Mic DC in Cover Plug Tripod Socket LED IR Flash Motion/ Low Battery Indicator Lens Lock Hole PIR Sensor 7 - Bushnell Natureview 8x40 | Instruction Manual - Page 8
negative or "flat" end against the long spring of each battery slot). Bushnell recommends using eight new lithium AA (Energizer® brand) or alkaline AA batteries DC power source to the "DC In" jack at the bottom of the NatureView HD Essential. It is recommended to use a power source with a current - Bushnell Natureview 8x40 | Instruction Manual - Page 9
the SD card when the power switch is in the ON position. The NatureView HD Essential uses a standard SD (Secure Digital) memory card to save photos and SDHC (High Capacity) cards up to a maximum 32GB capacity are supported. Before inserting the SD card into the card slot after opening the camera - Bushnell Natureview 8x40 | Instruction Manual - Page 10
we highly recommend that you first spend some additional time indoors with this manual and your camera until you know a bit more about what the 3- about mounting it on a tree. THE OFF, ON, AND SETUP MODES The NatureView HD Essential has three basic operational modes: • OFF mode: Power switch in the - Bushnell Natureview 8x40 | Instruction Manual - Page 11
HD Essential's front cover, lock it, and leave the monitored area. Once in the ON mode, no manual controls are needed or possible (the control keys have no effect). The NatureView HD Essential will take photos or videos automatically (according to its current parameter settings) when it is triggered - Bushnell Natureview 8x40 | Instruction Manual - Page 12
Fig. 3: SETUP Information Screen Camera (Still Photo) Mode Image Size (Resolution) SD Card Status Still Photo Mode Time Stamp 5 Field Scan On Battery Level Date:Month-Day-Year Time Hour:Minute:Second # of Photos Taken Remaining Photo Capacity Video Mode Video Sound On Video Mode Video - Bushnell Natureview 8x40 | Instruction Manual - Page 13
• Press the OK key to replay (review or playback) photos/videos on a connected TV monitor. See "Playing you to change the settings of the camera's parameters (14 different ones are available) so your NatureView HD Essential operates exactly the way you want it to. You will do this by entering the - Bushnell Natureview 8x40 | Instruction Manual - Page 14
Parameter Display The settings for a parameter are shown on the display as follows: Only one setting is displayed at a time, starting with the current setting for the parameter when it is first selected (Fig. 4a). To change the setting, use the UP/DOWN keys to display the new setting you want (Fig. - Bushnell Natureview 8x40 | Instruction Manual - Page 15
EXAMPLES-Changing the Settings of Some Common Parameters Following this page, you will find tables listing all of the parameters found in the SETUP Menu, along with their possible settings (or range of settings), and a detailed description of what the parameter controls and what the settings do. If - Bushnell Natureview 8x40 | Instruction Manual - Page 16
Live Trigger Feature Field Scan is a revolutionary new feature for the Bushnell NatureView HD Essential, which allows you to monitor your food plots or field edges with time lapse images or video. When set to "On", the NatureView HD Essential will take a photo (or record a video clip) automatically - Bushnell Natureview 8x40 | Instruction Manual - Page 17
5. After you finish setting the Stop minutes, press OK to confirm your settings for the first block of Field Scan recording. If desired, you can create a second block of time by pressing the DOWN key to select "B" (Step 4), then press OK and follow the same process to set Start and Stop times for - Bushnell Natureview 8x40 | Instruction Manual - Page 18
5:30 and 7:00 PM. No Field Scan recording would occur from 8AM to 5:30PM, or from 7PM to 6AM. Remember, Field Scan recording is independent of normal triggers due to animal activity-even if no animals enter the IR sensor coverage zone, an image or video will still be captured every 15 minutes during - Bushnell Natureview 8x40 | Instruction Manual - Page 19
The SETUP Menu - Parameters and Settings Parameter Mode Image Size (only affects still photos) Capture Number (only affects still photos) Video Size (only affects video clips) Video Length (only affects video clips) Settings Description (Bold=default) Camera or Video Selects whether still - Bushnell Natureview 8x40 | Instruction Manual - Page 20
Parameter Interval Sensor Level Settings Description (Bold=default) 10S (second) default, with a 60M (minute) to1S (second) range of settings available. (60M-1M are set in one minute increments, 59S-1S are set in one second increments) Selects the length of time that the camera will "wait" - Bushnell Natureview 8x40 | Instruction Manual - Page 21
Parameter Format TV Out Time Stamp (only affects still photos) Set Clock Settings Description (Bold=default) Execute Deletes (erases) all files stored on a card to prepare it for reuse. Always format a card that has been previously used in other devices. Caution! Make sure you have downloaded - Bushnell Natureview 8x40 | Instruction Manual - Page 22
photo/video. To ensure correct operation, avoid setting overlapping start/stop times for Field Scan A and B. Please read the "Field Scan 2x..." section of this manual for details on using this feature. On, Off Select "On" to record audio along with the video when the camera is set to video mode - Bushnell Natureview 8x40 | Instruction Manual - Page 23
HD Essential for scouting game or other outdoor applications, you must be sure to mount it in place correctly and securely. We recommend mounting the NatureView HD Essential on a sturdy tree with a diameter of about 6 in. (15cm). To get the optimal picture quality, the tree should be about 16-17 ft - Bushnell Natureview 8x40 | Instruction Manual - Page 24
box (model # 119653C) and Deluxe Tree Bracket (model# 119652C) are also available-please see your Bushnell dealer or website for more details. Sensing Angle and Distance Test To test whether the NatureView HD Essential can effectively monitor the area you choose, this test is recommended to check - Bushnell Natureview 8x40 | Instruction Manual - Page 25
have setup, mounted and activated your NatureView HD Essential, you will of course be eager to return later and review the images it has captured for described below-please read that section if you have any problem finding your files. Reviewing Images on an External Video Monitor A TV monitor can - Bushnell Natureview 8x40 | Instruction Manual - Page 26
. Reviewing Images supports 3 kinds of file system formats, FAT12, FAT16, and FAT32. The default value is FAT16 to save photos and videos. Here are some related notes: • You don't need to be concerned about the file system format of the NatureView HD Essential unless your equipment has problems - Bushnell Natureview 8x40 | Instruction Manual - Page 27
Deleting Photos or Videos If you see a photo or video during playback on a connected video monitor that you want to delete, it can be done easily without leaving SETUP mode: • Press the MENU key. You will see the first "Delete" screen, which lets you selects the option to delete only the currently - Bushnell Natureview 8x40 | Instruction Manual - Page 28
the camera's USB port, then directly to a main USB port on your computer-do not use front panel/keyboard USB ports or unpowered "hubs". The NatureView HD Essential will be recognized as a standard "USB Mass Storage" device (this may take several seconds the first time you connect it). If you would - Bushnell Natureview 8x40 | Instruction Manual - Page 29
TROUBLESHOOTING component issue. If this is the case, please contact our customer service to send the camera back for repair. Battery life is shorter new alkaline or lithium batteries. Bushnell recommends using 8 Energizer® Lithium AA batteries in all NatureView HD Essentials to obtain maximum battery - Bushnell Natureview 8x40 | Instruction Manual - Page 30
spaces 1-4 with no "gaps". Bushnell recommends using 8 Energizer® Lithium AA batteries in all NatureView HD Essentials. 2. Make sure that "Off" first, then back up to "Setup". Still Photo and/or Video Quality Problems 1. Night photos or videos appear too dark a. Check the battery indicator icon to - Bushnell Natureview 8x40 | Instruction Manual - Page 31
the sensor can become confused resulting in poor color images. b. If this is seen on a consistent basis, then the sensor may need servicing. Please contact Bushnell customer service. 7. Short video clips-not recording to the length set a. Check to make sure that the SD card is not full. b. Make sure - Bushnell Natureview 8x40 | Instruction Manual - Page 32
3. In some cases, setting the camera near water will make the camera take images with no subject in them. Try aiming the camera over ground. 4. Try to avoid setting the camera up on small trees that are prone to being moved by strong winds. 5. Remove any limbs which are right in front of the camera - Bushnell Natureview 8x40 | Instruction Manual - Page 33
2. Ants can be attracted by low level electronic vibrations, and enter through any gaps between the exterior and interior of the camera. Make sure the DC In plug is securely attached. Field Scan (Time Lapse) not working properly 1. Make sure that the stop and start times of Field Scan "A" and "B" do - Bushnell Natureview 8x40 | Instruction Manual - Page 34
TECHNICAL SPECIFICATIONS Image Sensor 5 Megapixel Color CMOS Maximum Pixel Size 4000x3000 (12 MP) Lens IR-Flash Range F = 3.1; FOV=50°; Auto IR-Cut-Remove (at night) 36'-45' (12m-15m) Display Screen Std B&W Display: 24x32mm(1.5") Memory Card Internal RAM Picture Size Video Size PIR - Bushnell Natureview 8x40 | Instruction Manual - Page 35
prepaid. This warranty does not cover damages caused by misuse, improper handling, installation, or maintenance provided by someone other than a Bushnell Authorized Service Department. Any return made under this warranty must be accompanied by the items listed below: 1. A check/money order in the - Bushnell Natureview 8x40 | Instruction Manual - Page 36
device does not contain any user-serviceable parts. Repairs should only be made by an Authorized Bushnell repair center. Unauthorized repairs or relevant regulations (see also the respective comments in this unit's instructions). Further information about the subject is available at your community - Bushnell Natureview 8x40 | Instruction Manual - Page 37
VIDEO NOTICE D'UTILISATION Français Modèle#: 119739 11-14 37 - Bushnell Natureview 8x40 | Instruction Manual - Page 38
sirons gagner votre confiance. Veuillez vous référer aux remarques ci-dessous et aux instructions de cette notice d'utilisation pour vous assurer d'utiliser au mieux ce produit. Si votre NatureView HD Essential Bushnell ne semble pas fonctionner correctement, ou si vous avez des problèmes de qualit - Bushnell Natureview 8x40 | Instruction Manual - Page 39
et résiste à l'eau et à la neige. Votre appareil de surveillance numérique fait partie de la dernière génération de NatureView HD Essentials Bushnell et propose de nombreuses fonctions, nouvelles ou améliorées, notamment : • Sensibilité infrarouge passive automatique: l'appareil surveille la temp - Bushnell Natureview 8x40 | Instruction Manual - Page 40
un appareil photo de détection pour la chasse ou pour compter le gibier. Il convient également à la surveillance. PRÉSENTATION DU NatureView HD Essential Le NatureView HD Essential dispose des connexions suivantes afin d'être raccordé à des appareils externes: Port USB, port pour carte SD, sortie TV - Bushnell Natureview 8x40 | Instruction Manual - Page 41
VUE DE FACE Micro Alimentation externe (cache en place) Flash LED infrarouge Indicateur de mouvements / de faible charge des piles Pas de vis standard Objectif Emplacement pour cadenas Capteur infrarouge passif Fig. 1: Connexions Sortie TV Prise USB Écran LCD Marche (ON)/ Configuration ( - Bushnell Natureview 8x40 | Instruction Manual - Page 42
les instructions et avertissements suivants: Mise en place des piles Après avoir ouvert les deux loquets sur le côté droit du NatureView HD Essential » en contact avec le long ressort de chaque emplacement de pile). Bushnell recommande d'utiliser huit piles AA au lithium (de la marque Energizer®) - Bushnell Natureview 8x40 | Instruction Manual - Page 43
(voir p. 41, « Vue de face »). Insertion de la carte SD Les NatureView HD Essentials ont une mémoire interne de 32 Mo, qui peut contenir environ 10 cartes SD et SDHC (haute capacité) d'une capacité maximum de 32 Go sont supportées. Avant d'insérer la carte SD dans l'appareil, veuillez vous assurez - Bushnell Natureview 8x40 | Instruction Manual - Page 44
passé au mode SETUP si la carte est verrouillée). Il est recommandé de formater la carte SD en utilisant le paramètre « Format » du NatureView HD Essential avant de l'utiliser pour la première fois, spécialement lorsque la carte a été utilisée dans d'autres appareils (voir la section « Formater » en - Bushnell Natureview 8x40 | Instruction Manual - Page 45
41, « Vue de face ») clignotera en rouge pendant environ 10 secondes. Cet intervalle vous laissera assez de temps pour fermer le couvercle avant du NatureView HD Essential, le verrouiller et quitter la zone surveillée. Une fois en mode MARCHE, aucun contrôle manuel n'est nécessaire ou possible (les - Bushnell Natureview 8x40 | Instruction Manual - Page 46
des réglages ou plus, puis passer à MARCHE ensuite. Mode CONFIGURATION (SETUP) Dans le mode CONFIGURATION vous pouvez vérifier et changer les réglages du NatureView HD Essential en utilisant l'écran LCD intégré (ou un moniteur branché au jack de sortie TV). Ces réglages, accessibles depuis le menu - Bushnell Natureview 8x40 | Instruction Manual - Page 47
Fig. 3 : Écran d'information du mode CONFIGURATION (SETUP) Mode appareil photo (photos) Mode Photo Résolution Statut de la carte SD Niveau de charge des piles Impression de la date et de l'heure sur les photos Nphoomtobsreprisdees 5 Date: Mois-JourAnnée Affichage de l'heure: Heures : - Bushnell Natureview 8x40 | Instruction Manual - Page 48
SETUP (CONFIGURATION) est de vous permettre de changer les réglages des paramètres de l'appareil (jusqu'à 14 configurations différentes) pour que votre NatureView HD Essential fonctionne exactement comme vous le désirez. Vous ferez ceci en lançant le Menu SETUP (CONFIGURATION) et en appuyant sur les - Bushnell Natureview 8x40 | Instruction Manual - Page 49
minutes si vous n'appuyez sur aucune touche. Affichage du réglage des paramètres Le réglage de chaque paramètre est affiché sur l'écran de votre NatureView HD Essential. Un seul réglage peut être affiché à la fois, en commençant par le réglage actuel du paramètre lorsqu'il est d'abord sélectionn - Bushnell Natureview 8x40 | Instruction Manual - Page 50
(« Execute ») le nouveau réglage. Si vous désirez confirmer que ce réglage est à présent le réglage actuel, appuyez simplement sur la touche DROITE pour faire défiler vers le paramètre suivant, puis appuyez sur GAUCHE pour retourner de nouveau vers le précédent. Vous pouvez désormais constater que - Bushnell Natureview 8x40 | Instruction Manual - Page 51
Scan (Balayage de champ 2x grâce à la fonctionnalité de déclenchement en direct) Le balayage de champ est une nouvelle fonctionnalité des NatureView HD Essentials Bushnell qui vous permet de surveiller des zones plus vastes, comme un champ ou une grande clairière, au moyen de photographies ou de vid - Bushnell Natureview 8x40 | Instruction Manual - Page 52
2. 3. 4. 5. 52 DROITE pour faire défiler le menu de configuration jusqu'à atteindre Field Scan (Balayage de champ). Appuyez sur le bouton HAUT pour sélectionner On, puis appuyez sur OK (Etape 1, pg 54). "A" représente la première période de temps que vous pouvez définir (une seconde période plus - Bushnell Natureview 8x40 | Instruction Manual - Page 53
(en mode photo uniquement). Utilisez les boutons HAUT/BAS pour sélectionner votre valeur, puis appuyez sur OK pour la sauvegarder (Etape 7). Notez que pour les vidéos, "Interval" est indépendant de la durée de la vidéo. Il s'agit de la fréquence à laquelle les vidéos sont enregistrées, et non - Bushnell Natureview 8x40 | Instruction Manual - Page 54
(Etape 1)-placez le mode (Etape 2)-sélectionnez (Etape 3)-réglez le Field Scan (balayage de "Field Scan "A" démarrage et l'arrêt de champ) sur "On" (appuyez sur OK) la période "A" (Etape 4)-sélectionnez "Field Scan "B" (appuyez sur OK) (Etape 5)-réglez le démarrage et l'arrêt de la période - Bushnell Natureview 8x40 | Instruction Manual - Page 55
Liste des paramètres et réglages du Menu CONFIGURATION (SETUP) avec descriptions Paramètre Mode Image Size (résolution photo) (concerne les photos seulement) Réglages (Gras=défaut) Camera (photos) ou Video 3M Pixel, 5M Pixel, 12M Pixel Capture Number (Nombre de Photos) (concerne les photos - Bushnell Natureview 8x40 | Instruction Manual - Page 56
Paramètre Interval (Intervalle) Réglages Description (Gras=défaut) 10S (seconde) par défaut, avec une plage de réglage disponible de 60 mn (minute) à 1 s (seconde). (60 mn-1 mn sont réglés par incréments d'une minute, 59S-1S sont réglés par incrément d'une seconde) Sélectionne la durée pendant - Bushnell Natureview 8x40 | Instruction Manual - Page 57
Paramètre Sensor Level (Sensibilité du Capteur infrarouge) Format (Formater) Réglages (Gras=défaut) Low (faible), Normal, High (élevée), Auto (automatique) Execute (Valider) Description Sélectionne la sensibilité du capteur infrarouge passif. Le réglage « High » rendra l'appareil plus sensible aux - Bushnell Natureview 8x40 | Instruction Manual - Page 58
Paramètre TV Out (Sortie TV) Réglages (Gras=défaut) NTSC, PAL Time Stamp (Impression Date et Heure) (concerne les photos uniquement) Off, On Set Clock (Réglage Horloge) Set (régler) Description Sélectionne le standard/format vidéo pour le jack de « sortie TV ». Le standard vidéo est NTSC pour - Bushnell Natureview 8x40 | Instruction Manual - Page 59
Paramètre Field Scan Video Sound (son vidéo) (ne concerne que les enregistrements vidéo) Réglages (Gras=défaut) On, Off (Après avoir sélectionné On) : "A" Démarrage/ Arrêt, "B" Démarrage/ Arrêt, Fréquence) On, Off (activé, désactivé) Description Active/Désactive le mode Field Scan. Si vous appuyez - Bushnell Natureview 8x40 | Instruction Manual - Page 60
Paramètre Default Set (réglages par défaut) Réglages (Gras=défaut) Cancel, (annuler), Execute (valider) Description Sélectionnez « Execute » et appuyez sur OK pour restaurer tous les paramètres par défaut. Si l'appareil se comporte de manière étrange et que vous pensez peut-être avoir modifié - Bushnell Natureview 8x40 | Instruction Manual - Page 61
une des extrémités de la sangle dans l'un ou l'autre des supports à l'arrière du NatureView HD Essential. Passez l'extrémité de la sangle dans la boucle. 119653C) et un support pour montage sur arbre (modèle 119652C) sont également disponibles-veuillez consulter votre revendeur Bushnell ou notre site - Bushnell Natureview 8x40 | Instruction Manual - Page 62
en dehors de la zone de détection. Les résultats de vos essais vous aideront à déterminer la meilleure position lorsque vous monterez et pointerez le NatureView HD Essential. La hauteur de positionnement au-dessus du sol devra varier de manière appropriée en fonction de la taille de l'animal. En - Bushnell Natureview 8x40 | Instruction Manual - Page 63
prises. Visionnage direct sur la carte SD C'est la méthode la plus simple pour visionner des images. Vous n'avez qu'à retirer la carte SD du NatureView HD Essential. En rentrant chez vous, il vous suffit de mettre cette carte dans l'emplacement prévu à cet effet, soit dans votre ordinateur ou votre - Bushnell Natureview 8x40 | Instruction Manual - Page 64
(comme un cadre photo numérique) ayant une entrée vidéo composite standard (cordon jack RCA) au mini jack « TV Out » (sortie TV) du NatureView HD Essential en utilisant le câble (non inclus). Puis: Câble de « sortie TV » • Placez le commutateur d'alimentation en mode SETUP (CONFIGURATION) (mettez - Bushnell Natureview 8x40 | Instruction Manual - Page 65
vidéo (avec le suffixe .avi). *Un logiciel supplémentaire pourra être nécessaire pour visionner les fichiers vidéo « AVI » sur un Mac. Le NatureView HD Essential supporte 3 types de formats de système de fichiers, FAT12, FAT16 et FAT32. La valeur par défaut est FAT16 pour sauvegarder les photos et - Bushnell Natureview 8x40 | Instruction Manual - Page 66
TÉLÉCHARGEMENT des PHOTOS/VIDÉOS Pour télécharger vos photos/vidéos sur un PC ou un Mac*, assurez-vous d'abord que le commutateur d'alimentation du NatureView HD Essential soit en position OFF (ARRÊT). Branchez le câble (non inclus) sur la prise USB de l'appareil, puis directement sur une prise USB - Bushnell Natureview 8x40 | Instruction Manual - Page 67
glissez/posez vers votre disque dur ou sur votre bureau. Après que les photos aient été copiées sur votre disque dur, vous pouvez débrancher le NatureView HD Essential. (Sur les ordinateurs Mac, une icône apparaîtra sur votre bureau) Il est possible de visionner ou d'éditer les fichiers au standard - Bushnell Natureview 8x40 | Instruction Manual - Page 68
problème avec un composant électronique. Si tel est le cas, veuillez contacter notre service clientèle afin d'envoyer la caméra en réparation. La durée de vie ou au lithium neuves. Bushnell recommande d'utiliser 8 piles AA au lithium Energizer® dans tous les NatureView HD Essentials pour obtenir une - Bushnell Natureview 8x40 | Instruction Manual - Page 69
, en commençant par le haut et en remplissant les emplacements 1-4 sans laisser d'« espaces ». Bushnell recommande d'utiliser 8 piles AA au lithium Energizer® dans tous les NatureView HD Essentials. 2. Assurez-vous d'avoir installé les piles correctement, en respectant la polarité. Placez toujours - Bushnell Natureview 8x40 | Instruction Manual - Page 70
activer le mode qui convient (évitez les positions intermédiaires (commutateur placé entre deux modes)). 4. Ne mettez pas le commutateur directement de « ON » sur « SETUP » - mettez toujours d'abord le commutateur tout en bas sur « OFF », puis sur « SETUP ». Problèmes de qualité des photos et/ou vid - Bushnell Natureview 8x40 | Instruction Manual - Page 71
coloris altérés. b. Si cela se produit régulièrement, il se peut que le détecteur soit défectueux. Dans ce cas, veuillez contacter votre revendeur Bushnell. 7. Séquences vidéos courtes-n'enregistre pas pendant la durée fixée a. Vérifiez que la carte SD n'est pas pleine. b. Assurez-vous que les - Bushnell Natureview 8x40 | Instruction Manual - Page 72
passif (PIR) clignote/ ne clignote pas 1. Lorsque l'appareil est en mode SETUP (CONFIGURATION), une LED située sur la face avant du NatureView HD Essential clignote à chaque mouvement détecté. Cela est utile lors de l'installation uniquement et aidera l'utilisateur à orienter correctement l'appareil - Bushnell Natureview 8x40 | Instruction Manual - Page 73
Humidité ou fourmis à l'intérieur de la caméra 1. Afin d'empêcher toute infiltration d'eau dans le boîtier du NatureView HD Essential, veillez à ce que le cache de protection de l'alimentation externe soit bien en place. 2. Les fourmis peuvent être attirées par les faibles - Bushnell Natureview 8x40 | Instruction Manual - Page 74
CARACTÉRISTIQUES TECHNIQUES Capteur d'images 5 Mégapixels couleur CMOS Résolution Maximale Objectif Portée du flash infrarouge Écran d'affichage 4000 x 3000 (12 MP) Focale = 3,1 ; Champ de Vision = 50 ° ; Infrarouge à activation automatique 12-15 mètres Affichage monochrome : 24x32 mm(1.5 pouces - Bushnell Natureview 8x40 | Instruction Manual - Page 75
veuillez contacter votre revendeur local pour les informations applicables de la garantie. En Europe vous pouvez également contacter Bushnell à: Bushnell Germany GmbH European Service Centre Mathias-Brüggen-Str. 80 D-50827 Köln GERMANY Tél : +49 221 995568-0 Fax : +49 221 995568-20 Cette - Bushnell Natureview 8x40 | Instruction Manual - Page 76
Traitement des déchets d'équipements électriques et électroniques (En vigueur dans l'Union européenne et autres pays européens ayant des systèmes de collecte des déchets séparés) Cet équipement contient des composants électriques et/ou électroniques et par conséquent ne doit pas être éliminé en fin - Bushnell Natureview 8x40 | Instruction Manual - Page 77
VIDEO MANUAL DE INSTRUCCIONES Modelo #: 119739 E spaño l 11-14 77 - Bushnell Natureview 8x40 | Instruction Manual - Page 78
su compra y queremos ganarnos su confianza. Consulte las notas siguientes y las instrucciones de este manual para asegurarse que queda plenamente satisfecho con este producto. Si su Bushnell NatureView HD Essential parece no funcionar correctamente o si tiene problemas de calidad con los vídeos - Bushnell Natureview 8x40 | Instruction Manual - Page 79
INTRODUCCIÓN Español Acerca de la NatureView HD Essential La Bushnell NatureView HD Essential es una cámara digital de el agua y la nieve. Su cámara de trampeo es una de las NatureView HD Essential s de Bushnell de última generación, e incorpora muchas funciones nuevas o mejoradas, incluidas las - Bushnell Natureview 8x40 | Instruction Manual - Page 80
cámara de cine). La tecla DERECHA también sirve como botón de disparador manual de la cámara y la tecla ACEPTAR conmuta la cámara al modo de PILAS Y LA TARJETA SD Antes de empezar a conocer el funcionamiento de su NatureView HD Essential tendrá que colocar un conjunto de pilas e insertar una tarjeta - Bushnell Natureview 8x40 | Instruction Manual - Page 81
Vista frontal Micrófono de video Entrada de CC firme tapa Flash LED de Infrarojos Indicador de movimiento/de pila Junta para el trípode Lente Orificio para candado Sensor PIR Fig. 1: Conexiones Salida de TV Puerto USB Pantalla LCD Interruptor de encendido/ modo Entrada de CC Ranura para - Bushnell Natureview 8x40 | Instruction Manual - Page 82
de la pila debería instalar un juego completo de ocho pilas. La NatureView HD Essential también puede funcionar con sólo cuatro pilas colocadas únicamente o "plano" contra el muelle largo de cada cavidad para pila). Bushnell recomienda usar ocho pilas AA nuevas de litio (marca Energizer®) o - Bushnell Natureview 8x40 | Instruction Manual - Page 83
de empezar a utilizar la máquina. No inserte ni retire la tarjeta SD si el interruptor de encendido de la cámara en la posición ON. La NatureView HD Essential utiliza una tarjeta de memoria SD (Secure Digital) estándar para guardar fotografías (en formato .jpg) y vídeos (en formato .avi). Se pueden - Bushnell Natureview 8x40 | Instruction Manual - Page 84
recomendable formatear la tarjeta SD con el parámetro "Formato" de la NatureView HD Essential antes de utilizarla por primera vez, especialmente si la tarjeta encarecidamente que antes pase algún tiempo más bajo cubierto, con su manual y su cámara, hasta que sepa algo más sobre que hacen - Bushnell Natureview 8x40 | Instruction Manual - Page 85
, bloquearla y abandonar el área observada. Una vez en modo ENCENDIDO, no es necesario ni posible ningún control manual (las teclas de control no tienen ningún efecto). La NatureView HD Essential tomará fotos o vídeos automáticamente (en función de su configuración actual) cuando sea activada por - Bushnell Natureview 8x40 | Instruction Manual - Page 86
Fig. 3: Información en la pantalla de CONFIGURACIÓN Tamaño de imagen Modo cámara Impresión Tiempo Info tarjeta SD Modo de vídeo Sonido del vídeo Resolución de activado Video Nivel de Pila 5 Fecha 5 Hora Nº de imágenes Espacio Disponible Modo de cámara (foto estática) Disponible vídeo - Bushnell Natureview 8x40 | Instruction Manual - Page 87
objetivo principal del modo CONFIGURACIÓN es permitirle cambiar los ajustes de los parámetros de la cámara (dispondrá de 14) para que su NatureView HD Essential funcione exactamente como usted desea que lo haga. Puede hacerlo entrando en el menú CONFIGURACIÓN y pulsando las teclas situadas bajo la - Bushnell Natureview 8x40 | Instruction Manual - Page 88
si no se pulsa ninguna tecla. Pantalla de configuración de parámetros Los ajustes para todos los parámetros aparecen en la pantalla de la NatureView HD Essential . Sólo se visualiza un ajuste cada vez, a partir del ajuste actual del parámetro cuando se selecciona por primera vez (Fig. 4a). Para - Bushnell Natureview 8x40 | Instruction Manual - Page 89
Fig. 4: Selección de ajustes de parámetro Pulse MENÚ (4a) Pulse ABAJO (4b) Pulse OK CONFIGURACIÓN (SETUP) es "Modo" (Mode). Para cambiarlo del valor predeterminado de "Cámara" (imágenes fijas) a "Vídeo" (grabación de clips de vídeo), pulse la tecla ABAJO (DOWN) para seleccionar el ajuste "Vídeo". - Bushnell Natureview 8x40 | Instruction Manual - Page 90
directo El Barrido de Campo es una nueva función de la Bushnell NatureView HD Essential , que le permite monitorear sus parcelas de alimentaci capturados por lapsos de tiempo. Cuando se establezca en "Activada" (On), la NatureView HD Essential tomará una fotografía (o grabará un clip de vídeo) autom - Bushnell Natureview 8x40 | Instruction Manual - Page 91
del primer bloque de Barrido de campo (Field Scan) cada día. Puede configurarlas con la hora y minuto exactos que desea, para obtener una "ventana" de grabación que dura desde solo un minuto hasta 24 horas completas. 4. Configure las horas de inicio (Start) y finalización (Stop), comenzando por la - Bushnell Natureview 8x40 | Instruction Manual - Page 92
Sus opciones son 60 minutos, 30 minutos, 15 minutos, 5 minutos (esta es la predeterminada) o 1 minuto [solo en modo de fotografía]. Utilice las teclas ARRIBA/ABAJO (UP/DOWN) para seleccionar su preferencia; a continuación, pulse Aceptar (OK) para guardarla (Paso 7). Tenga en cuenta que para los ví - Bushnell Natureview 8x40 | Instruction Manual - Page 93
animal: incluso aunque ningún animal entre dentro de la zona de cobertura del sensor infrarrojo, se seguirán capturando imágenes o vídeos cada 15 minutos durante los bloques temporales. Si un animal activa la cámara entre los intervalos de 15 minutos, se grabará. Nota: La configuración del Barrido - Bushnell Natureview 8x40 | Instruction Manual - Page 94
Menú CONFIGURACIÓN (Setup) - Parámetros y Ajustes Parámetro Modo Ajustes (Negrilla = predeterminado) Cámara o Vídeo Image Size / Tamaño de imagen (sólo afecta a las fotos) 3M píxeles, 5M píxeles, 12M píxeles Capture Number/ Nº de fotos (sólo afecta a las fotos) 1 foto, 2 fotos, 3 fotos Video - Bushnell Natureview 8x40 | Instruction Manual - Page 95
Parámetro Ajustes (Negrilla = predeterminado) Video length / Duración de vídeo (sólo afecta a los videoclips) 10s (segundos) predeterminado, con una gama de posibilidades entre 5s y 60s Intervalo 10s (segundos) predeterminado, con una gama disponible entre 1S (segundo) y 60m (minutos). (60m - 1m - Bushnell Natureview 8x40 | Instruction Manual - Page 96
Parámetro Sensor Level / Nivel del sensor Ajustes (Negrilla = predeterminado) Bajo (Low), Normal, Alto (High) y Automática (Auto) Descripción Selecciona la sensibilidad del sensor PIR. La configuración "Alta" (High) hará que la cámara sea más sensible a los infrarrojos (calor) y se dispare más fá - Bushnell Natureview 8x40 | Instruction Manual - Page 97
Parámetro Ajustes Descripción (Negrilla = predeterminado) TV Out / NTSC, PAL Salida de TV Selecciona el estándar/formato de vídeo del conector "Salida de TV". El estándar de vídeo es NTSC en Estados Unidos, Canadá, México, Asia y Sudamérica. PAL se utiliza principalmente en Europa. Time - Bushnell Natureview 8x40 | Instruction Manual - Page 98
" si está definiendo horas de inicio y/o parada de Barrido de campo de día y de noche. Lea el apartado "Barrido de campo (Field Scan 2x)..." de este manual (p. 90) para obtener detalles sobre el uso de esta función. 98 - Bushnell Natureview 8x40 | Instruction Manual - Page 99
Parámetro Sonido de video (sólo afecta a los videoclips) Ajustes (Negrilla = predeterminado) Activado, Desactivado Descripción Seleccione Activado (On) para grabar el audio del video, cuando la cámara esté en modo video (los archivos que se guarden tendrán un tamaño algo mayor). Default Set / - Bushnell Natureview 8x40 | Instruction Manual - Page 100
con el sujeto dentro del rango ideal del flash, no más lejos de 14 m ni más cerca de 3 m de la cámara. Hay dos formas de montar la NatureView HD Essential: utilizando la correa ajustable incluida o con la rosca para el trípode. Utilización de la correa ajustable: La Fig. 5 muestra la utilización de - Bushnell Natureview 8x40 | Instruction Manual - Page 101
" (modelo n.º 19653C) y una brida para árbol "De lujo" (modelo n.º 119652C), consulte a su agente de Bushnell o el sitio web si desea más detalles. Ensayo de ángulo y distancia Para comprobar si la NatureView HD Essential puede observar eficazmente el área que elija, se recomienda este ensayo para - Bushnell Natureview 8x40 | Instruction Manual - Page 102
de encendido en la posición ON? (no lo deje en modo SETUP). REPRODUCCIÓN/SUPRESIÓN de FOTOS/ VÍDEOS Después de configuración, montar y activar la NatureView HD Essential se supone que deseará volver más tarde y revisar las imágenes que ha capturado para usted. Hay varias maneras de hacerlo. Revisi - Bushnell Natureview 8x40 | Instruction Manual - Page 103
ón (como un marco de fotos digital) con entrada de vídeo compuesto estándar (conector RCA) al mini-conector "Salida de TV" de la NatureView HD Essential utilizando el cable (no incluido). Después: • Ponga el interruptor de encendido en modo Cable de "Salida de TV" CONFIGURACIÓN (primero cambie - Bushnell Natureview 8x40 | Instruction Manual - Page 104
No necesita preocuparse sobre el formato del sistema de archivos de la NatureView HD Essential excepto si su equipo tiene problemas leyendo la tarjeta SD. En tal caso mayoría de ordenadores. Si formatea una tarjeta SD para la NatureView HD Essential en su ordenador, debería elegir el formato de - Bushnell Natureview 8x40 | Instruction Manual - Page 105
én como "Disco extraíble" si abre la ventana "Mi PC" (en los Mac aparecerá un icono en su escritorio). Los archivos de fotos de la NatureView HD Essential se denominan "09030001.JPG" etc., y se encuentran en la carpeta "DCIM\100EK113" de este "Disco extraíble". Los nombres de los archivos de - Bushnell Natureview 8x40 | Instruction Manual - Page 106
de imágenes antes que las pilas se agoten. 2. Compruebe que ha utilizado pilas alcalinas o de litio nuevas. Bushnell recomienda utilizar ocho pilas AA de litio Energizer® en todas las NatureView HD Essential para conseguir la máxima duración de la pila. 3. Compruebe que se puso el interruptor de - Bushnell Natureview 8x40 | Instruction Manual - Page 107
de las pilas, empezando por arriba, llenando las cavidades para pila 1-4 sin saltarse ninguno. 2. Bushnell recomienda utilizar ocho pilas AA de litio Energizer® en todas las NatureView HD Essential. 3. Compruebe que las pilas se han colocado correctamente, respetando la polaridad. Coloque - Bushnell Natureview 8x40 | Instruction Manual - Page 108
Problemas de calidad de las instantáneas o los vídeos 1. Los vídeos o fotos nocturnos son demasiado oscuros a. Observe el icono indicador de las pilas para ver si la están a plena carga. El flash dejará de funcionar cuando la pila se acerque al final de su vida. b. Obtendrá los mejores resultados si - Bushnell Natureview 8x40 | Instruction Manual - Page 109
b. Si pasa con frecuentemente, el sensor puede necesitar una revisión. Por favor contacte con el Servicio de Posventa de Bushnell. 7. Videoclips cortos - no se graban hasta la duración fijada a. Compruebe que la tarjeta SD no esté llena. b. Compruebe que la cámara lleva unas buenas pilas. - Bushnell Natureview 8x40 | Instruction Manual - Page 110
asegurar el modo correcto (evite posiciones "entre" dos modos). b. No mueva el interruptor directamente de "On" a "Setup", cambie siempre primero a "Off" y después retroceda a "Setup". 2. La pantalla LCD muestra una tenue línea negra después de cambiar de "Configuración" a "Encendido". a. La LCD se - Bushnell Natureview 8x40 | Instruction Manual - Page 111
ESPECIFICACIONES TÉCNICAS Sensor de imagen Tamaño máximo en píxeles Objetivo 5 Megapíxeles, a color, CMOS 4000 x 3000 (12 MP)) F=3.1; FOV=50°; Auto IR-Cut-Remove (para uso nocturno) Alcance del flash IR Pantalla de visualización Tarjeta de memoria RAM interna Tamaño de la imagen Tamaño del vídeo - Bushnell Natureview 8x40 | Instruction Manual - Page 112
o Canadá por favor, contacte con su vendedor habitual para información sobre la garantía válida. En Europa puede contactar también con Bushnell Germany GmbH European Service Centre Mathias-Brüggen-Str. 80 D-50827 Köln GERMANY Tel: +49 221 995568-0 Fax: +49 221 995568-20 Esta garantía le - Bushnell Natureview 8x40 | Instruction Manual - Page 113
Eliminación de equipos eléctricos y electrónicos (Aplicable en la UE y otros países europeos con sistemas de recogida separada) Este equipo contiene elementos eléctricos o electrónicos y por tanto no debe eliminarse con los residuos domésticos normales. En cambio, debe eliminarse en los - Bushnell Natureview 8x40 | Instruction Manual - Page 114
VIDEO GEBRAUCHSANLEITUNG Modellnummer #: 119739 De utsc h 11-14 114 - Bushnell Natureview 8x40 | Instruction Manual - Page 115
zufrieden sind. Falls Ihre NatureView HD Essential nicht ordnungsgemäß Problem nach dem Lesen des Abschnittes Problembehebung und häufig gestellte Fragen und Antworten weiterhin bestehen, wenden Sie sich bitte an einen Bushnell Fachhändler in Ihrer Umgebung. Bushnell empfiehlt in diesem NatureView - Bushnell Natureview 8x40 | Instruction Manual - Page 116
im Freien entwickelt und ist beständig gegen Regen und Schnee. Ihre Wildkamera gehört zur neuesten Generation der Bushnell NatureView HD Essential s an und besitzt viele neue oder verbesserte Funktionen, darunter: • Automatische PIR-Empfindlichkeit, Die Kamera überwacht die Umgebungstemperatur - Bushnell Natureview 8x40 | Instruction Manual - Page 117
zur Aufnahme zusätzlicher Fotos/Videos. Und zahlreiche weitere Funktionen wie 720p HD Video mit Audio. Einsatzbereiche Die NatureView HD Essential von Bushnell lässt sich als Wildkamera für das Aufspüren oder Beobachten von Wild einsetzen. Sie kann ebenfalls für Überwachungszwecke eingesetzt werden - Bushnell Natureview 8x40 | Instruction Manual - Page 118
Vorderansicht Video-Mikrofon (Video Mic) DC-Eingangsstecker Verschluss LED IR-Blitz Stativöffnung Bewegungs- / Batteriestatusanzeige (niedriger Batteriestand) Objektiv Verriegelungsloch Abb.1 : Anschlüsse PIR-Sensor TV-Ausgang USB-Anschluss DC-Eingang SD-Kartenschlitz Schnappverschluss - Bushnell Natureview 8x40 | Instruction Manual - Page 119
an die lange Sprungfeder in den einzelnen Batteriefächern einlegen). Bushnell empfiehlt die Verwendung von acht Lithium AA Batterien (Marke externe 6V DC-Stromquelle an den "DCEingang" unten an der NatureView HD Essential anschließen. Empfohlen wird eine Stromquelle mit einer Ausgangsleistung - Bushnell Natureview 8x40 | Instruction Manual - Page 120
ässt, leuchtet die Batteriestandsanzeige blau, womit auf ein baldiges Austauschen der Batterien hingewiesen wird (Seite 118, "Vorderansicht"). Einlegen der SD-Karte Die NatureView HD Essentials verfügen über einen internen Speicher von 32 MB, der für ca. 10 Fotos ausreichend ist (bei einer Auflösung - Bushnell Natureview 8x40 | Instruction Manual - Page 121
ist erscheint im SETUP-Modus das SD-Karten-Symbol mit einem "Schloss"-Symbol). Das Formatieren der SD-Karte mittels des in der NatureView HD Essential enthaltenen Parameters "Formatieren" wird vor der Erstnutzung der Kamera empfohlen, besonders dann, wenn die Karte zuvor bereits in anderen Ger - Bushnell Natureview 8x40 | Instruction Manual - Page 122
die Kamera nicht verwenden sollte sich diese natürlich auch im AUS-Modus befinden. Nehmen Sie bitte zur Kenntnis, dass auch wenn sich die NatureView HD Essential im AUS-Modus befindet immer noch Strom verbraucht, wenn auch wenig. Daher empfiehlt es sich, die Batterien aus dem Batteriefach zu nehmen - Bushnell Natureview 8x40 | Instruction Manual - Page 123
Sie den Knopf auf ON, nacem dieser Vorgang abgeschlossen ist. SETUP MODE (EINSTELLUNGS-Modus) Im SETUP-Modus lassen sich die Einstellungen der NatureView HD Essential mittels des eingebauten LCD oder einen am TV-Ausgang angeschlossenen Monitor prüfen und ändern. Im SETUP-Menü lassen sich die - Bushnell Natureview 8x40 | Instruction Manual - Page 124
mit dem SETUP-Menü Der SETUP-Modus dient zur Änderung der Einstellungen der Kameraparameter (es stehen 14 verschiedene Parameter zur Verfügung), damit sich Ihre NatureView HD Essential exakt auf Ihre Bedürfnisse einstellen lässt. Gehen Sie dazu in das SETUP-Menü, drücken Sie die Tasten unter dem LCD - Bushnell Natureview 8x40 | Instruction Manual - Page 125
keine Taste betätigt wurde. Anzeige der Parameter-Einstellungen Die Einstellungen der einzelnen Parameter werden auf dem Bildschirm Ihrer NatureView HD Essential angezeigt. Es wird immer nur eine Einstellung gleichzeitig angezeigt, beginnend mit der aktuellen Einstellung für den Parameter, der - Bushnell Natureview 8x40 | Instruction Manual - Page 126
Abb. 4: Auswahl der Parametereinstellungen MENÜ-Taste drücken (4a) NACH UNTEN drücken (4b) OK drücken SPIELE - Ändern der Einstellungen bei einigen der am häufigsten verwendeten Parameter Weiter unten auf dieser Seite folgt eine Tabelle mit allen Parametern im SETUP-Menü mit den möglichen - Bushnell Natureview 8x40 | Instruction Manual - Page 127
Videoeinstellung auszuwählen. Drücken Sie die OK-Taste zum „Anwenden" (Festlegen) der neuen Einstellung, die Sie für diesen Parameter gewählt haben. Drücken Sie jetzt auf die RECHTS -Taste, um zu einem anderen Parameter im Menü zu gelangen. Mit vier Mal Drücken gelangen Sie zu "Videolänge". - Bushnell Natureview 8x40 | Instruction Manual - Page 128
Scan" ist eine revolutionäre neue Funktion für die Bushnell NatureView HD Essential , die Ihnen die Überwachung Ihrer Futterfelder oder Feldränder mit Zeitrafferbildern oder -videos ermöglicht. Wenn Sie hier „On" (Ein) wählen, nimmt die NatureView HD Essential automatisch Fotos (oder Videoclips) auf - Bushnell Natureview 8x40 | Instruction Manual - Page 129
Uhrzeiten festgelegt werden, zu denen die „Field Scan"-Aufnahme an jedem Tag beginnt und endet. Diese Zeiten können Sie auf die Stunde und Minute genau für einen Aufnahmeblock einstellen, der sowohl nur eine Minute, als auch volle 24 Stunden oder ein beliebiges Zeitintervall dazwischen betragen kann - Bushnell Natureview 8x40 | Instruction Manual - Page 130
AUFWÄRTS-/ABWÄRTS-Tasten den gewünschten Wert und drücken Sie OK, um diesen zu speichern (Schritt 7). Beachten Sie, dass „Interval" (Intervall) unabhängig von der Videolänge ist- das Intervall gibt an, wie oft Videos aufgenommen werden, nicht wie lange ein Video dauert. 7. Hier sehen Sie ein - Bushnell Natureview 8x40 | Instruction Manual - Page 131
(Schritt 1)- Field Scan-Modus auf „On" (Ein) festlegen Schritte 4 und 5 sind optional (nur erforderlich, wenn Sie einen zweiten „Field Scan"Aufnahmeblock mit anderen Startund Stoppzeiten einstellen möchten) (Schritt 2)- Field Scan A wählen (Schritt 3)- Start und Stopp für Field (OK drücken) Scan - Bushnell Natureview 8x40 | Instruction Manual - Page 132
SETUP-Menü (Aufstellung und Beschreibung der Menüparameter für EINSTELLUNGEN) Parameter Modus Image Size (Bildgröße, betrifft lediglich Standfotos) Capture Number (Bildanzahl, betrifft lediglich Standfotos) Einstellungen (Fett= Standardeinstellung) Kamera oder Video 3 Mio. Pixel, 5 Mio. Pixel, 12 - Bushnell Natureview 8x40 | Instruction Manual - Page 133
Parameter Video Size (Videogröße, betrifft nur Videoaufnahmen) Video Length (Videolänge, betrifft nur Videoaufnahmen) Einstellungen (Fett= Standardeinstellung) 320x240, 640x480, 1280x720 10S (Sekunden) Einstellungen von 60 Sek. bis zu 5 Sek. sind möglich Erklärung Auswahl der Videoauflösung (Pixel - Bushnell Natureview 8x40 | Instruction Manual - Page 134
Parameter Zeitabstand Einstellungen (Fett= Standardeinstellung) 10S (Sekunden) Einstellungen von 60 Sek. bis zu 1 Sek. möglich. (60 - 1 Min. werden in Minuteneinheiten, 59 -1 Sek. in Sekundeneinheiten eingestellt) Erklärung Bestimmt die Länge der Wartezeit der Kamera, bis sie auf weitere Auslöser - Bushnell Natureview 8x40 | Instruction Manual - Page 135
Parameter Sensor Level (Sensoreinstellung) Einstellungen (Fett= Standardeinstellung) Low (Niedrig), Normal, High (Hoch), Auto (Automatisch) Erklärung Hier wird die Empfindlichkeit des PIR-Sensors eingestellt. Mit der Einstellung "Hoch" reagiert die Kamera empfindlicher auf Infrarot (Wärme) und - Bushnell Natureview 8x40 | Instruction Manual - Page 136
Parameter Format TV-Out (TV-Ausgang) Time Stamp (Zeitstempel, betrifft lediglich Standfotos) Einstellungen (Fett= Standardeinstellung) Ausführen NTSC, PAL Off (Aus), On (Ein) Erklärung Löscht sämtliche auf einer Karte gespeicherten Daten, damit sie erneut verwendet werden kann. Jede zuvor in einem - Bushnell Natureview 8x40 | Instruction Manual - Page 137
Parameter Set Clock (Zeiteinstellungen) Einstellungen (Fett= Standardeinstellung) Einstellen Erklärung Drücken Sie OK und ändern Sie die Einstellungen mit den Tasten AUFWÄRTS/ ABWÄRTS zum Ändern der Einstellungen und die LINKS/RECHTS Tasten, um in das nächste Feld zu gelangen, wo Stunden (nur im - Bushnell Natureview 8x40 | Instruction Manual - Page 138
Parameter „Field Scan" Video Sound (Videoton, betrifft nur Videoclips) Default Set (Werkseinstellungen) 138 Einstellungen (Fett= Erklärung Standardeinstellung) On (Ein), Off (Aus) (Nach Auswahl von On (Ein)): A Start/Stopp, B Start/Stopp, Interval) Schaltet den Field Scan (Zeitraffer) - Bushnell Natureview 8x40 | Instruction Manual - Page 139
ist auf sichere und korrekte Befestigung der Kamera zu achten. Wir empfehlen das Anbringen der NatureView HD Essential an einem kräftigen Baum mit einem Durchmesser von ungefähr 15cm. 119652C). Weitere Informationen dazu erhalten Sie in Ihrem Bushnell-Fachgeschäft oder auf unserer Webseite. 139 - Bushnell Natureview 8x40 | Instruction Manual - Page 140
sie nicht, befindet sich diese Position außerhalb des vom Sensor erfassten Bereichs. Durch diese Tests erfahren Sie, in welcher Position sie die NatureView HD Essential am besten montieren und ausrichten. Die Höhe, in der die Kamera angebracht wird, sollte an die Größe des Tieres angepasst werden - Bushnell Natureview 8x40 | Instruction Manual - Page 141
Position EIN (ON)? Auf keinen Fall im SETUP-Modus lassen. ABSPIELEN UND LÖSCHEN DER FOTOS ODER VIDEOS Nach Einrichten, Befestigen und Aktivieren Ihrer NatureView HD Essential, können Sie es sicherlich kaum erwarten zu sehen, welche Bilder Ihre Kamera für Sie eingefangen hat. Hierfür können Sie unter - Bushnell Natureview 8x40 | Instruction Manual - Page 142
oder ein anderes Bildbetrachtungsgerät (etwa einen digitalen Bilderrahmen) mit einem standardmäßigen Videoeingang (RCA-Buchse) an den TV-Ausgang der NatureView HD Essential an und verwenden dazu das Kabel (nicht im Lieferumfang enthalten). Dann: • Bringen Sie den Einschaltknopf in den (SETUP - Bushnell Natureview 8x40 | Instruction Manual - Page 143
Standardmäßig werden Fotos und Videos mit FAT16 gespeichert. Es folgen einige nützliche Hinweise: • Sie müssen sich keine Gedanken über das Dateiformat der NatureView HD Essential machen, es sei denn Ihr System ist nicht in der Lage, die SD-Karte zu lesen. Sollte dies der Fall sein, formatieren Sie - Bushnell Natureview 8x40 | Instruction Manual - Page 144
der FOTOS und VIDEOS Zum Herunterladen der Fotos oder Videos auf einen PC oder MAC überprüfen Sie zunächst, ob sich der Einschaltknopf der NatureView HD Essential in der Position OFF (AUS) befindet. Schließen Sie das Kabel an den USB-Anschluss der Kamera, dann direkt an den USB-Hauptanschluss - Bushnell Natureview 8x40 | Instruction Manual - Page 145
Dateinamen bzw. Symbole auf Ihr Laufwerk oder Ihren Desktop. Nach dem Kopieren der Fotos auf Ihre Festplatte können Sie die Verbindung zur NatureView HD Essential beenden (Bei Mac-Computern das "Laufwerk", das auf Ihrem Desktop erschien, als die Kamera angeschlossen wurde, in den Papierkorb ziehen - Bushnell Natureview 8x40 | Instruction Manual - Page 146
an dem keine Bewegung stattfindet. 3. Wenn die Kamera unverändert Probleme macht, kann die Ursache in einer elektronischen Komponente liegen. In ob Sie neue Alkali- oder Lithiumbatterien eingelegt haben. Bushnell empfiehlt in allen NatureView HD Essentials die Verwendung von 8 Energizer® Lithium AA - Bushnell Natureview 8x40 | Instruction Manual - Page 147
schaltet sich nicht ein 1. Haben Sie mindestens vier Batterien (erforderliche Mindestanzahl) von oben beginnend in das Batteriefach eingelegt? Es dürfen keine leeren Fächer dazwischen liegen.Bushnell empfiehlt für alle NatureView HD Essentials die Verwendung von 8 Energizer® Lithium AABatterien. 147 - Bushnell Natureview 8x40 | Instruction Manual - Page 148
2. Achten Sie darauf, dass die Batterien korrekt und richtig gepolt eingelegt sind. Die Batterie muss immer mit dem negativen (flachen) Pol in Richtung der Feder in das Batteriefach der Kamera eingelegt werden. 3. Prüfen Sie nach dem Betätigen des Einschaltknopfes von "OFF (Aus)" in "SETUP" oder "ON - Bushnell Natureview 8x40 | Instruction Manual - Page 149
hrt. b. Sollte dies aber regelmäßig auftreten, muss der Sensor eventuell gewartet werden. Wenden Sie sich in diesem Fall bitte an Ihren Bushnell-Fachhändler. 7. Kurze Videoaufnahmen-Gerät nimmt nicht in der vollständigen eingestellten Länge auf a. Ist die Speicherkarte eventuell voll. b. Prüfen Sie - Bushnell Natureview 8x40 | Instruction Manual - Page 150
. 2. Im späteren Gebrauch blinkt diese LED-Leuchte bei Aufnahmen der Kamera nicht mehr. Dadurch wird die Kamera vom Wild nicht gleich entdeckt. Probleme mit dem LCD-Bildschirm 1. Der LCD-Bildschirm ist eingeschaltet, aber es erscheint kein Text. a. Prüfen Sie nach dem Betätigen des Einschaltknopfes - Bushnell Natureview 8x40 | Instruction Manual - Page 151
der LCD-Bildschirm aus. Hin und wieder erscheint dann dieser schwarze Streifen, der in der Regel nach einer Sekunde wieder verschwindet. Das ist völlig normal und beeinträchtigt die Kamera nicht in ihrer Funktion. 3. Der Bildschirm schaltet sich ein und danach sofort wieder aus a. Vergewissern Sie - Bushnell Natureview 8x40 | Instruction Manual - Page 152
Technische Spezifikationen Bildsensor Maximale Pixelauflösung Objektiv Reichweite IR-Blitz Bildschirmanzeige Speicherkarte Interner RAM-Speicher Bildgröße Videogröße PIR-Empfindlichkeit Bedienung Reaktionszeit Auslösezeit Zahl der Aufnahmen Videolänge Stromversorgung Ruhestrom Energieverbrauch - Bushnell Natureview 8x40 | Instruction Manual - Page 153
Sie im Garantiefall bitte Ihren Händler vor Ort auf die weitere Vorgehensweise an. In Europa können Sie Bushnell ebenfalls unter folgender Anschrift kontaktieren: Bushnell Germany GmbH European Service Centre Mathias-Brüggen-Str. 80 D-50827 Köln GERMANY Tel: +49 221 995568-0 Fax: +49 221 995568 - Bushnell Natureview 8x40 | Instruction Manual - Page 154
Entsorgung von elektrischen und elektronischen Geräten (Gültig in der EU und anderen europäischen Ländern mit getrennten Sammelsystemen) Dieses Gerät enthält elektrische und/oder elektronische Bauteile und darf deshalb nicht im normalen Haushaltmüll entsorgt werden. Stattdessen sollte es an den - Bushnell Natureview 8x40 | Instruction Manual - Page 155
VIDEO MANUALE DI ISTRUZIONI Modelli #: 119739 Italia no 11-14 155 - Bushnell Natureview 8x40 | Instruction Manual - Page 156
acquisto di una delle migliori fotocamere di esplorazione del mercato! Bushnell è molto orgogliosa di questa piccola unità e siamo anche alle istruzioni contenute in questo manuale per essere sicuro di essere soddisfatto di questo prodotto. Se la vostra NatureView HD Essential sembra non funzionare - Bushnell Natureview 8x40 | Instruction Manual - Page 157
è progettata per un uso all'esterno ed è resistente all'acqua e alla neve. La trail camera è una delle ultime generazioni di Bushnell NatureView HD Essential s e si presenta con tante caratteristiche nuove e migliorate, tra cui: • Sensibilità auto PIR- la camera controlla le condizioni della - Bushnell Natureview 8x40 | Instruction Manual - Page 158
fotocamera). Il tasto RIGHT (destra) serve anche come otturatore manuale ("SHOT") della fotocamera e il tasto OK commuta la fotocamera INSTALLAZIONE delle batterie e della SCHEDA SD Prima di imparare l'uso della NatureView HD Essential, occorre installare un set di batterie e inserire una scheda - Bushnell Natureview 8x40 | Instruction Manual - Page 159
Vista frontale Mic video la spina CC In Flash IR a LED Attacco per il fissaggio del treppiede Movimento/ Indicatore di batteria bassa Obiettivo Foro di blocco Sensore PIR Fig. 1: Connessioni Uscita TV Porta USB Schermo LCD Power (Alimentazione)/ commutatore modalità Ingresso CC Slot della - Bushnell Natureview 8x40 | Instruction Manual - Page 160
o estremità piatta contgro la molla lunga di ciascun slot). La Bushnell raccomanda l'uso di nuove batterie al Litio AA (marca Energizer®) o collegare l'alimentazione esterna con la porta di ingresso di alimentazione della NatureView HD Essential, assicurandosi che la polarità sia corretta. Nota: - Bushnell Natureview 8x40 | Instruction Manual - Page 161
sostituite (pag 159, "Vista frontale"). Inserimento di una scheda SD Le NatureView HD Essential dispongono di una memoria interna di 32MB, che possono archiviare le foto (in formato .jpg) e/o video (in formato .avi). Sono supportate schede SD e SDHC (ad alta capacità) fino ad un massimo di 32GB. - Bushnell Natureview 8x40 | Instruction Manual - Page 162
preparata la NatureView HD Essential con l'installazione delle batterie e della scheda SD, si potrebbe semplicemente portarla fuori, agganciarla ad un albero, accenderla e lasciarla; e prendere le foto a piacere. Comunque, raccomandiamo di spendere un po' di tempo con lettura di questo manuale, e di - Bushnell Natureview 8x40 | Instruction Manual - Page 163
video. E naturalmente, quando si ripone o non si usa la fotocamera, si porterà il commutatore su OFF. Notare che anche nella modalità OFF la NatureView HD Essential consuma ancora potenza a un livello molto basso. Quindi è una buona norma togliere le batterie se la fotocamera non viene usata per un - Bushnell Natureview 8x40 | Instruction Manual - Page 164
a riprendere filmati. • Premere il tasto DOWN per impostare la fotocamera a scattare istantanee. • Premere il tasto RIGHT per impostare lo scatto manuale. Questo è utile per impostare la fotocamera; assicurarsi di essere in modalità SETUP , premere il tasto RIGHT ed entro pochi secondi una foto - Bushnell Natureview 8x40 | Instruction Manual - Page 165
La funzione principale della modalità SETUP è di permettere di modificare i parametri della fotocamera (ne sono disponibili 14 diversi) in modo che la NatureView HD Essential funzioni esattamente come desiderato. Per questo, entrare nel menu SETUP e premere i tasti sotto il display LCD, che indicher - Bushnell Natureview 8x40 | Instruction Manual - Page 166
tasto. Visualizzazione delle impostazioni dei parametri Le impostazioni di ciascun parametro sono visualizzate nello schermo del display della NatureView HD Essential . Viene visualizzata solo un'impostazione alla volta, a partire dall'impostazione attuale del parametro quando viene selezionato - Bushnell Natureview 8x40 | Instruction Manual - Page 167
ESEMPI: modifica delle impostazioni di alcuni parametri comuni Consultando questa pagina, si troveranno le tabelle che elencano tutti i parametri che si trovano nel menu SETUP, assieme alle loro possibili impostazioni (o gamma di impostazioni), e una descrizione dettagliata di che cosa controlla il - Bushnell Natureview 8x40 | Instruction Manual - Page 168
Field Scan Field Scan è la nuova rivoluzionaria funzione per Bushnell NatureView HD Essential , che consente all'utente di monitorare intervalli di tempo prestabiliti. Una volta impostata su "On", la NatureView HD Essential realizza una foto (oppure registra un videoclip) automaticamente, secondo - Bushnell Natureview 8x40 | Instruction Manual - Page 169
registrazioni di Field Scan per ciascuna giornata. Gli orari possono essere impostati con le ore e i minuti esatti secondo quanto desiderato e ottenere così un periodo di registrazione di qualsiasi durata, da 1 minuto a 24 ore complete. 4. Impostare gli orari di inizio [Start] e fine [Stop] - Bushnell Natureview 8x40 | Instruction Manual - Page 170
7. Segue un esempio di funzionamento della videocamera, in base alle impostazioni seguenti di Field Scan: • Field Scan: On • Field Scan A: • Start [Inizio]: 6.00 • Stop [Fine]: 8.00 • Field Scan B: • Start [Inizio]: 17.30 • Stop [Fine]: 19.00 • Interval [Intervallo]: 15 min. Attenzione: evitare - Bushnell Natureview 8x40 | Instruction Manual - Page 171
(Fase 1)-impostare la modalità Field Scan su "On" (Fase 2)-selezionare Field (Fase 3)-impostare inizio e fine Scan "A" (premere OK) "A" di Field Scan Le fasi 4 e 5 sono opzionali (unicamente necessarie per impostare una secondo blocco di registrazioni di Field Scan con diversi orari di inizio e - Bushnell Natureview 8x40 | Instruction Manual - Page 172
Menu SETUP - Parametri ed elenco impostazioni con descrizioni Parametro Impostazioni (Grassetto=predefinita) Modalità ("Mode") "CAMERA" o "VIDEO" Dimensione dell'immagine ("Image Size") (influenza solo le foto) 3M Pixel, 5M Pixel, 12M Pixel Numeri di scatti ("Capture Number") (riguarda solo le - Bushnell Natureview 8x40 | Instruction Manual - Page 173
Parametro Lunghezza video "Video Length" (influisce solo sui filmati) Intervallo "Interval" Impostazioni (Grassetto=predefinita) 10 sec (secondi) predefinita, con possibile gamma da 60 sec a 5 sec 10 Sec (secondi) predefiniti, con una gamma disponibile di impostazione da 60 min (minuti) a 1 Sec ( - Bushnell Natureview 8x40 | Instruction Manual - Page 174
Parametro Livello del sensore "Sensor Level" 174 Impostazioni (Grassetto=predefinita) Descrizione Basso, Normale, Alto, Auto Selezione della sensibilità del sensore PIR. L'impostazione "High" (alta) renderà la videocamera più sensibile all'infrarosso (heat) e più facilmente attivata dal - Bushnell Natureview 8x40 | Instruction Manual - Page 175
Parametro Formattare "Format" Uscita TV "TV Out" Stampare l'ora "Time Stamp" (riguarda solo le foto) Impostazioni (Grassetto=predefinita) Esegui NTSC, PAL Off (disattiva), On (attiva) Descrizione Cancella tutti i file archiviati su una scheda per prepararla al riutilizzo. Formattare sempre una - Bushnell Natureview 8x40 | Instruction Manual - Page 176
Parametro Impostare orologio Impostare orologio "Set Clock" Impostazioni (Grassetto=predefinita) Impostare Descrizione Premere OK e usare i tasti UP (SU)/DOWN (GIÙ) (per modificare l'impostazione) e i tasti LEFT (sinistra)/RIGHT (destra) (per spostarsi al campo successivo) per impostare l'ora ( - Bushnell Natureview 8x40 | Instruction Manual - Page 177
HR" se si impostano gli orari di inizio e/o di fine per Field Scan di giorno e notte. Leggere attentamente la sezione "Field Scan 2x..." del presente manuale per ulteriori istruzioni sull'impiego della presente funzione. 177 - Bushnell Natureview 8x40 | Instruction Manual - Page 178
Parametro Video Sound (solo per videoclip) Impostazione predefinita "Default Set" Impostazioni (Grassetto=predefinita) On, Off Annulla, Esegui Descrizione Selezionare "On" per effettuare registrazioni video con il sonoro quando la videocamera è impostata in modalità video (le dimensioni del file - Bushnell Natureview 8x40 | Instruction Manual - Page 179
m) e non più vicino di 10 piedi (3 m) dalla fotocamera. Ci sono due modi di montare la NatureView HD Essential: usando la cinghia regolabile a rete o un attraverso un supporto quale staffa ol treppiede. Uso della No 119652C); per maggiori dettagli vedere il rivenditore Bushnell o il sito web. 179 - Bushnell Natureview 8x40 | Instruction Manual - Page 180
posizione è fuori dall'area di sensibilità. Il risultato del test aiuterà a trovare la posizione migliore quando si monta e si punta la NatureView HD Essential. L'altezza dal terreno per il posizionamento dell'apparecchio dovrebbe variare con la dimensione dell'animale. In generale, è preferibile da - Bushnell Natureview 8x40 | Instruction Manual - Page 181
trova nella posizione ON? (non lasciarlo in SETUP). RIPRODUZIONE/CANCELLAZIONE delle foto e di filmati Dopo aver installato, montato e attivata la NatureView HD Essential, di desidera naturalmente ritornare in seguito e vedere le immagini catturate. Ci sono diversi modi per fare questo. Rivedere le - Bushnell Natureview 8x40 | Instruction Manual - Page 182
TV o un dispositivo di visualizzazione (come un quadro digitale) che possieda un ingresso video standard (lack RCA) all'ingresso TV della NatureView HD Essential, usando il cavo (non è incluso). Poi: • Portare il commutatore di potenza sulla modalità SETUP (commutarlo prima su OFF). • Premere - Bushnell Natureview 8x40 | Instruction Manual - Page 183
jpg) o di un video (con estensione .avi). *I file video ".avi" possono richiedere un software addizionale per la visualizzazione con il Mac. La NatureView HD Essential supporta 3 generi di formati per il file system, FAT12, FAT16, e FAT32. Il valore predefinito è FAT16 per salvare foto e video. Ecco - Bushnell Natureview 8x40 | Instruction Manual - Page 184
o versione successiva, basta usare le opzioni visualizzate nella finestra pop-up per copiare, vedere o stampare le foto. Su tutti i Windows OS, la NatureView HD Essential sarà indicata come un"Disco rimovibile" se si apre una finestra "Mio computer" (sui Mac, apparirà una icona sul desktop). I file - Bushnell Natureview 8x40 | Instruction Manual - Page 185
Essential potrà scattare diverse migliaia di immagini prima dell'esaurimento delle batterie. 2. Controllare se sono state usate batterie alcaline o a Litio nuove. La Bushnell raccomanda di usare 8 batterie Energizer® al Litio AA in tutte le NatureView HD Essential per ottenere la massima durata. 185 - Bushnell Natureview 8x40 | Instruction Manual - Page 186
batterie, iniziando dall'alto, riempiendo gli spazi da 1 a 4 senza intervallo fra le batterie. 2. Bushnell raccomanda di usare 8 pile Energizer® Lithium AA nella NatureView HD Essential. 3. Assicurarsi che le batterie siano installate correttamente, osservando la giusta polarità. Posizionare sempre - Bushnell Natureview 8x40 | Instruction Manual - Page 187
ciascuna pila in contatto con il lato a molla del suo slot. 4. Dopo aver spostato il commutatore da "Off" a "Setup" o a "On", assicurarsi che il commutatore sia posizionato correttamente (evitare posizioni "fra" due modi). 5. Non spostare direttamente il commutatore da "On" a "Setup"; spostare - Bushnell Natureview 8x40 | Instruction Manual - Page 188
povere di colore. b. Se questo si vede in un modo evidente, allora il sensore va controllato. Contattare il servizio assistenza della Bushnell. 7. Filmati troppo brevi: registrazione non corrispondente all'impostazione a. Assicurarsi che la scheda SD non sia piena. b. Assicurarsi che le batterie - Bushnell Natureview 8x40 | Instruction Manual - Page 189
Il LED del sensore PIR lampeggia/non lampeggia 1. Quando la telecamera è in modalità "Setup", un LED speciale sulla parte anteriore della telecamera lampeggerà quando rileva un movimento. Questo serve solo per scopi di installazione e aiuterà l'utilizzatore a puntare la telecamera. 2. Durante l'uso, - Bushnell Natureview 8x40 | Instruction Manual - Page 190
Presenza di umidità o insetti nella videocamera 1. Per garantire di tenere umidità o pioggia lontano dalla videocamera, posizionare in modo saldo la spina CC In. 2. Gli insetti possono essere attratti da vibrazioni elettroniche a basso livello e entrare nei fori tra la parte interna ed esterna della - Bushnell Natureview 8x40 | Instruction Manual - Page 191
Specifiche tecniche Sensore delle immagini Massima dimensione in Pixel Obiettivo Campo del flash IR Schermo display CMOS a colori da 5 Megapixel 4000x3000 (12 MP) F=3,1; FOV=50°; Auto IR-Cut-Remove (di notte) 36-45 pollici (12-15 metri) Display B&W : 24x32 mm(1,5 pollici) Scheda di memoria RAM - Bushnell Natureview 8x40 | Instruction Manual - Page 192
Uniti o dal Canada, rivolgersi al rivenditore per le clausole pertinenti della garanzia. In Europa si può anche contattare la Bushnell al seguente recapito: Bushnell Germany GmbH European Service Centre Mathias-Brüggen-Str. 80 D-50827 Köln GERMANY Tel: +49 221 995568-0 Fax: +49 221 995568-20 - Bushnell Natureview 8x40 | Instruction Manual - Page 193
Smaltimento di apparecchiature elettriche ed elettroniche (Vigente presso i Paesi UE e altri Paesi europei con sistemi di raccolta differenziata dei rifiuti) Il presente apparecchio componenti elettriche e/o elettroniche e non può pertanto essere smaltito come rifiuto domestico ordinario. Al - Bushnell Natureview 8x40 | Instruction Manual - Page 194
- Bushnell Natureview 8x40 | Instruction Manual - Page 195
- Bushnell Natureview 8x40 | Instruction Manual - Page 196
For further questions or additional information please contact: Bushnell Outdoor Products 9200 Cody, Overland Park, Kansas 66214 (800) 423-3537 • www.bushnell.com ©2014 Bushnell Outdoor Products
-
 1
1 -
 2
2 -
 3
3 -
 4
4 -
 5
5 -
 6
6 -
 7
7 -
8
-
9
-
10
-
11
-
12
-
13
-
14
-
15
-
16
-
17
-
18
-
19
-
20
-
21
-
22
-
23
-
24
-
25
-
26
-
27
-
28
-
29
-
30
-
31
-
32
-
33
-
34
-
35
-
36
-
37
-
38
-
39
-
40
-
41
-
42
-
43
-
44
-
45
-
46
-
47
-
48
-
49
-
50
-
51
-
52
-
53
-
54
-
55
-
56
-
57
-
58
-
59
-
60
-
61
-
62
-
63
-
64
-
65
-
66
-
67
-
68
-
69
-
70
-
71
-
72
-
73
-
74
-
75
-
76
-
77
-
78
-
79
-
80
-
81
-
82
-
83
-
84
-
85
-
86
-
87
-
88
-
89
-
90
-
91
-
92
-
93
-
94
-
95
-
96
-
97
-
98
-
99
-
100
-
101
-
102
-
103
-
104
-
105
-
106
-
107
-
108
-
109
-
110
-
111
-
112
-
113
-
114
-
115
-
116
-
117
-
118
-
119
-
120
-
121
-
122
-
123
-
124
-
125
-
126
-
127
-
128
-
129
-
130
-
131
-
132
-
133
-
134
-
135
-
136
-
137
-
138
-
139
-
140
-
141
-
142
-
143
-
144
-
145
-
146
-
147
-
148
-
149
-
150
-
151
-
152
-
153
-
154
-
155
-
156
-
157
-
158
-
159
-
160
-
161
-
162
-
163
-
164
-
165
-
166
-
167
-
168
-
169
-
170
-
171
-
172
-
173
-
174
-
175
-
176
-
177
-
178
-
179
-
180
-
181
-
182
-
183
-
184
-
185
-
186
-
187
-
188
-
189
-
190
-
191
-
192
-
193
-
194
-
195
-
196
 |
 |

INSTRUCTION MANUAL
Model#: 119739
11-14