Bushnell Natureview 8x40 Instruction Manual - Page 16
NatureView, HD Essential, NatureView HD, Essential, without requiring a trigger from, an active
 |
View all Bushnell Natureview 8x40 manuals
Add to My Manuals
Save this manual to your list of manuals |
Page 16 highlights
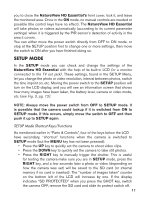
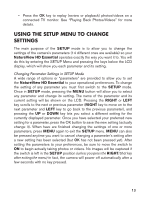
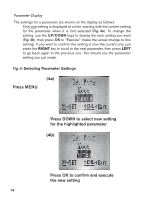
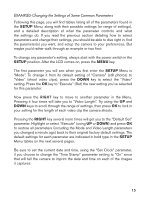
Field Scan 2x with Live Trigger Feature Field Scan is a revolutionary new feature for the Bushnell NatureView HD Essential, which allows you to monitor your food plots or field edges with time lapse images or video. When set to "On", the NatureView HD Essential will take a photo (or record a video clip) automatically at your choice of intervals (for example, once every five minutes) during one or two blocks of time you set up for each day, without requiring a trigger from an active animal. This has the advantage of giving you the ability to monitor the edge of a field that might be 50 or 150 yards away from the camera out of the PIR sensor's range. The result is an effective range much greater than it would normally be, with the camera dependant on triggers generated by nearby animals. This is a great tool for hunters to scout an entire field with only one camera. If an animal does enter the area covered by the PIR sensor and generate a trigger event during a time in between the Field Scan intervals you set, the camera will capture an image or video just as it normally would, based on your other menu settings. Here's how to setup and use Field Scan (be sure you've set the current time in "Set Clock" first, so your Field Scan recording will stop and start at the correct times of day): 1. Move the main switch to SETUP, then press MENU. 2. Keep pressing the RIGHT key, stepping through the Setup Menu until you reach Field Scan. 3. Press the UP key to select On, and press OK (Step 1, pg.18). You will see "A", representing the first block of time you can define (a second block of time later in the day, "B" can also be setup if you wish). Press OK (Step 2). This takes you to the screen to set Start and Stop times, which determines the clock times when the first block of Field Scan recording will begin and end for each day. You can set these times to the exact hour and minute you want, for a recording "window" that lasts anywhere from just a minute to a full 24 hours. 4. Set the [Start] and [Stop] times, beginning with the Start hour, using the UP/DOWN keys to change the setting (Step 3). The hour setting is based on a 24-hour clock, with "00" hours = midnight, "12" hours = noon, "23" hrs = 11PM, etc. To move to the next setting, press the RIGHT key, change the minute for the Start time with UP/DOWN, then on to the hour and minute settings for the Stop time. 16
-
 1
1 -
2
-
3
-
4
-
5
-
6
-
7
-
8
-
9
-
10
-
 11
11 -
 12
12 -
 13
13 -
 14
14 -
 15
15 -
 16
16 -
 17
17 -
 18
18 -
 19
19 -
 20
20 -
 21
21 -
22
-
23
-
24
-
25
-
26
-
27
-
28
-
29
-
30
-
31
-
32
-
33
-
34
-
35
-
36
-
37
-
38
-
39
-
40
-
41
-
42
-
43
-
44
-
45
-
46
-
47
-
48
-
49
-
50
-
51
-
52
-
53
-
54
-
55
-
56
-
57
-
58
-
59
-
60
-
61
-
62
-
63
-
64
-
65
-
66
-
67
-
68
-
69
-
70
-
71
-
72
-
73
-
74
-
75
-
76
-
77
-
78
-
79
-
80
-
81
-
82
-
83
-
84
-
85
-
86
-
87
-
88
-
89
-
90
-
91
-
92
-
93
-
94
-
95
-
96
-
97
-
98
-
99
-
100
-
101
-
102
-
103
-
104
-
105
-
106
-
107
-
108
-
109
-
110
-
111
-
112
-
113
-
114
-
115
-
116
-
117
-
118
-
119
-
120
-
121
-
122
-
123
-
124
-
125
-
126
-
127
-
128
-
129
-
130
-
131
-
132
-
133
-
134
-
135
-
136
-
137
-
138
-
139
-
140
-
141
-
142
-
143
-
144
-
145
-
146
-
147
-
148
-
149
-
150
-
151
-
152
-
153
-
154
-
155
-
156
-
157
-
158
-
159
-
160
-
161
-
162
-
163
-
164
-
165
-
166
-
167
-
168
-
169
-
170
-
171
-
172
-
173
-
174
-
175
-
176
-
177
-
178
-
179
-
180
-
181
-
182
-
183
-
184
-
185
-
186
-
187
-
188
-
189
-
190
-
191
-
192
-
193
-
194
-
195
-
196
 |
 |
