Bushnell Natureview 8x40 Instruction Manual - Page 20
Parameter, Settings, Description
 |
View all Bushnell Natureview 8x40 manuals
Add to My Manuals
Save this manual to your list of manuals |
Page 20 highlights
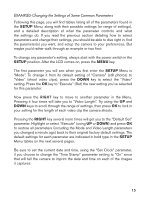
Parameter Interval Sensor Level Settings Description (Bold=default) 10S (second) default, with a 60M (minute) to1S (second) range of settings available. (60M-1M are set in one minute increments, 59S-1S are set in one second increments) Selects the length of time that the camera will "wait" until it responds to any additional triggers from the PIR after an animal is first detected and remains within the sensor's range. During this user set "ignore triggers" interval, the camera will not capture photos/videos. This prevents the card from filling up with too many redundant images. Settings begin with 10 second default when parameter is first selected. Note: after setting down past "1S", settings start over at "60M". Low, Normal, High, Auto Selects the sensitivity of the PIR sensor. The "High" setting will make the camera more sensitive to infrared (heat) and more easily triggered by motion, and the "Low" setting makes it less sensitive to heat and motion. The High setting can be useful when the ambient temperature is warm (making it more difficult for the sensor to detect animals), and the Low setting may help in cold weather if the camera is being triggered too often by anything warmer than the surroundings. "Normal" is for average or moderate conditions. The default "Auto" setting will allow the camera to determine the best setting based on its current operating temperature. This is an ideal setting if the weather is expected to change significantly during the period the camera will be used. 20
-
 1
1 -
2
-
3
-
4
-
5
-
6
-
7
-
8
-
9
-
10
-
11
-
12
-
13
-
14
-
 15
15 -
 16
16 -
 17
17 -
 18
18 -
 19
19 -
 20
20 -
 21
21 -
 22
22 -
 23
23 -
 24
24 -
 25
25 -
26
-
27
-
28
-
29
-
30
-
31
-
32
-
33
-
34
-
35
-
36
-
37
-
38
-
39
-
40
-
41
-
42
-
43
-
44
-
45
-
46
-
47
-
48
-
49
-
50
-
51
-
52
-
53
-
54
-
55
-
56
-
57
-
58
-
59
-
60
-
61
-
62
-
63
-
64
-
65
-
66
-
67
-
68
-
69
-
70
-
71
-
72
-
73
-
74
-
75
-
76
-
77
-
78
-
79
-
80
-
81
-
82
-
83
-
84
-
85
-
86
-
87
-
88
-
89
-
90
-
91
-
92
-
93
-
94
-
95
-
96
-
97
-
98
-
99
-
100
-
101
-
102
-
103
-
104
-
105
-
106
-
107
-
108
-
109
-
110
-
111
-
112
-
113
-
114
-
115
-
116
-
117
-
118
-
119
-
120
-
121
-
122
-
123
-
124
-
125
-
126
-
127
-
128
-
129
-
130
-
131
-
132
-
133
-
134
-
135
-
136
-
137
-
138
-
139
-
140
-
141
-
142
-
143
-
144
-
145
-
146
-
147
-
148
-
149
-
150
-
151
-
152
-
153
-
154
-
155
-
156
-
157
-
158
-
159
-
160
-
161
-
162
-
163
-
164
-
165
-
166
-
167
-
168
-
169
-
170
-
171
-
172
-
173
-
174
-
175
-
176
-
177
-
178
-
179
-
180
-
181
-
182
-
183
-
184
-
185
-
186
-
187
-
188
-
189
-
190
-
191
-
192
-
193
-
194
-
195
-
196
 |
 |
