Bushnell Weather FXI Owner's Manual - Page 5
Fig. 3, Fig. 4 - forecaster
 |
View all Bushnell Weather FXI manuals
Add to My Manuals
Save this manual to your list of manuals |
Page 5 highlights
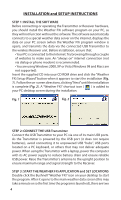
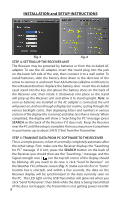
simple, onetime setup steps. The first is to set your current, or "home" location, as well as (at your option) up to four additional "Favorite" locations (allowing you to quickly check the weather forecast for a vacation or business trip destination, a friend's or relative's hometown, etc), using the five location boxes at the top of the Weather FXi software screen. Move your cursor into the first (far left) location box, then move the cursor down to the "Edit Location" button that pops up below it (Fig. 3)-click on this, and the main weather data screen will change to the Location Settings window (Fig. 4). Normally you should set your current location or "home city" in the first location box (still highlighted in yellow at the top). Use the drop down arrows to select your Continent first, then your Country, Region or State, and finally your City from the lists that appear when the arrows are clicked. Once you have made the four settings to define your location, click "Save" (if you get a "Cannot connect to server..." message, wait a minute and try clicking "Save" again). The name of your location should appear in the first box now, and you are automatically returned to the main weather data screen. If you wish, go ahead and set up additional cities in any or all of the other four location boxes now, using the same procedure you used to set your home location, beginning by clicking on the next blank or "empty" location box, clicking Edit Location and then setting it with the four drop down boxes. Fig. 3 Fig. 4 After you have finished setting up one or more locations, the only other setup step is to set your preferred units (English or Metric) for temperature, wind speed, and time. Click "Settings" at the top of the screen (just right of the Weather FXi logo), and the General Settings window will replace the main weather data screen (Fig. 5). Use the "Time offset" drop down if necessary (due to changes in start/end dates for daylight savings time, time zone boundaries, etc). Then select your preferences for how other types of data will be displayed using the remaining drop downs for temperature units, etc. When finished, click "Save" to store these settings and return to the main screen (Fig. 6). The Weather FXi application is now setup and ready to use. 5
-
 1
1 -
 2
2 -
 3
3 -
 4
4 -
 5
5 -
 6
6 -
 7
7 -
 8
8 -
 9
9 -
 10
10 -
 11
11 -
12
-
13
-
14
-
15
-
16
 |
 |
