Canon 1188B001 User Manual - Page 23
Preparations
 |
View all Canon 1188B001 manuals
Add to My Manuals
Save this manual to your list of manuals |
Page 23 highlights
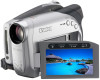
Getting Started 23 Preparations 1 Move the power switch to ON to set the camcorder in mode. 2 Slide OPEN fully in the direction of the arrow and gently open the disc cover completely until it stops. Retract the grip belt under the camcorder so it will not get in the way of the disc cover. 3 Insert the disc and press its center firmly until it clicks in place. • Insert the disc with the recording side facing down (single sided discs - label side facing out). • Be careful not to touch the recording surface of the disc or the pick up lens. comparison between the [VIDEO] and [VR] specifications, see An E Introduction to DVDs ( 4). You will be asked to confirm the disc specification you selected. Select ( ) [YES] and press ( ) to continue, or select [NO] and press ( ) to return and select a different disc specification. A confirmation message will appear on the screen. Select ( ) [YES] and press ( ) to start the disc initialization. • The disc initialization will take approximately one minute. Avoid moving the camcorder while the operation is in progress. • You can start recording movies once the record pause indication appears. 4 Close the disc cover. Do not force the cover closed if the disc is not correctly inserted and firmly set in place. IMPORTANT The process of recognizing a disc may take a moment. The display will move while the disc is being read. Wait until the camcorder finishes recognizing the disc before you start recording. Removing the Disc WHEN USING DVD-R/DVD-R DL DISCS You can start recording movies once the record pause indication appears. WHEN USING A DVD-RW You need to initialize new discs before you can start recording. The disc initialization screen will appear when a new DVD-RW is first inserted. It will not appear when inserting a disc already initialized. In that case, you can start recording once the record pause indication appears. Select ( ) the desired disc specification and press ( ). For a 1 Move the power switch to ON. 2 Slide OPEN fully in the direction of the arrow and gently open the disc cover completely until it stops.
-
 1
1 -
2
-
3
-
4
-
5
-
6
-
7
-
8
-
9
-
10
-
11
-
12
-
13
-
14
-
15
-
16
-
17
-
 18
18 -
 19
19 -
 20
20 -
 21
21 -
 22
22 -
 23
23 -
 24
24 -
 25
25 -
 26
26 -
 27
27 -
 28
28 -
29
-
30
-
31
-
32
-
33
-
34
-
35
-
36
-
37
-
38
-
39
-
40
-
41
-
42
-
43
-
44
-
45
-
46
-
47
-
48
-
49
-
50
-
51
-
52
-
53
-
54
-
55
-
56
-
57
-
58
-
59
-
60
-
61
-
62
-
63
-
64
-
65
-
66
-
67
-
68
-
69
-
70
-
71
-
72
-
73
-
74
-
75
-
76
-
77
-
78
-
79
-
80
-
81
-
82
-
83
-
84
-
85
-
86
-
87
-
88
-
89
-
90
-
91
-
92
-
93
-
94
-
95
-
96
-
97
-
98
-
99
-
100
-
101
-
102
-
103
-
104
-
105
-
106
-
107
-
108
-
109
-
110
 |
 |
