Canon 600 Optura Instruction Manual - Page 39
controller up or down.
 |
UPC - 013803050738
View all Canon 600 manuals
Add to My Manuals
Save this manual to your list of manuals |
Page 39 highlights
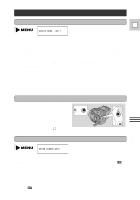
To use the conversion program, put the camera in record pause mode and turn the program selector to . E You can also alter the strength and tint of the colors, plus mask the edges of the picture when using the Film Adapter (FP-100). 1. Display TINT, COLOR and MASK. options by moving the controller up or down. 2. Adjust the level or choose the type of masking by pressing the controller up or down to choose the option and then left/right to change its setting. Tint: • There are 15 possible settings. When converting a negative image, around setting 5 gives the converted image the most reddish tint, around 10 gives the most bluish tint. Color: • The settings for the overall strength of the colors varies from +5 to -5. Setting -5 gives a black and white image. Use this when converting black & white negatives. • When you adjust the tint or color, M appears in the display. • When you select a different recording program or switch the power off , the tint and color will return to a level set automatically by the camcorder and the M will disappear from the display. • Also, when you change the film you need to return the tint and color to the automatic levels in the same way. Masking: • There are 6 masking settings, three portrait (vertical) maskings and 3 landscape No display (horizontal) maskings. • 2 and 2 correspond to the Advanced MASK. 3 Photo System, the others to 35 mm film. • The options disappear from the frame a MASK. 2 few seconds after your last operation. MASK . 1 MASK . 1 MASK . 2 MASK . 3 No display Note: • The camera mode is set to progressive scan by the camera; you cannot select normal mode. Using the Full Range of Features 39
-
 1
1 -
2
-
3
-
4
-
5
-
6
-
7
-
8
-
9
-
10
-
11
-
12
-
13
-
14
-
15
-
16
-
17
-
18
-
19
-
20
-
21
-
22
-
23
-
24
-
25
-
26
-
27
-
28
-
29
-
30
-
31
-
32
-
33
-
 34
34 -
 35
35 -
 36
36 -
 37
37 -
 38
38 -
 39
39 -
 40
40 -
 41
41 -
 42
42 -
 43
43 -
 44
44 -
45
-
46
-
47
-
48
-
49
-
50
-
51
-
52
-
53
-
54
-
55
-
56
-
57
-
58
-
59
-
60
-
61
-
62
-
63
-
64
-
65
-
66
-
67
-
68
-
69
-
70
-
71
-
72
-
73
-
74
-
75
-
76
-
77
-
78
-
79
-
80
 |
 |
